This registration method is the most straightforward option for merchants, as it eliminates the need for additional sign-up on the Apple Developer webpage. By utilizing Shift4 and the Shift4.js library, software development for the front end becomes significantly easier—all necessary configuration details for a successful Payment Request are automatically handled for you.
To get started, follow the steps below:
- Confirm with your Shift4 representative that your account is set up to process payments through APMs.
- Register your domain with a Shift4 certificate. This registration will verify your domain with Apple and Shift4, linking it to a merchant ID on Apple's platform. To do this, log into your account.
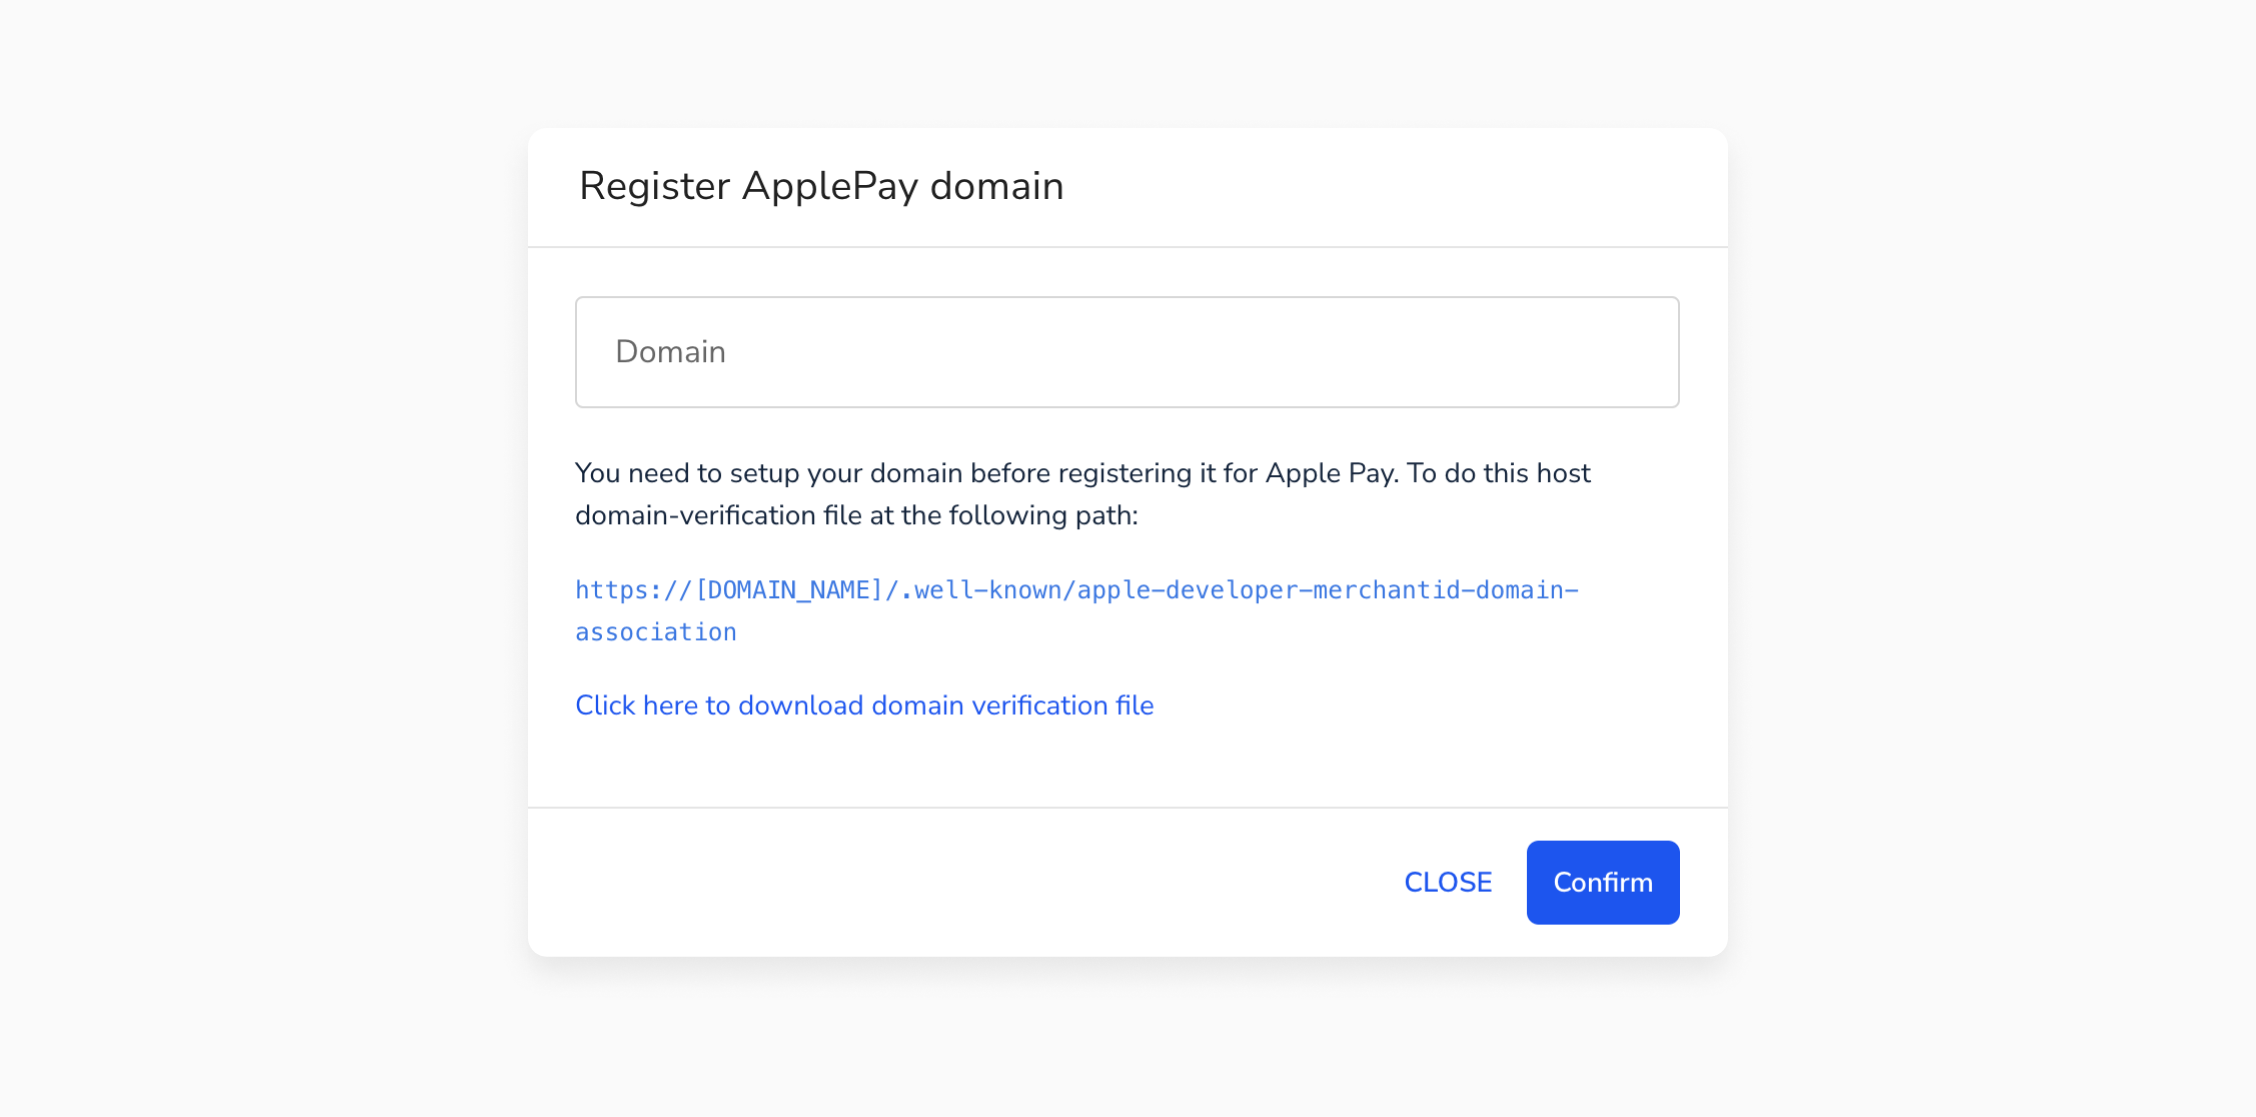
To enable Apple Pay processing with Shift4 on your domain, please ensure the following requirements are met:
- You have a valid SSL certificate in place
- Shift4's verification file is uploaded without any extension and is publicly accessible. This file contains information about the encryption keys used for data security. Our system won't recognize it if your domain is registered with a different file.These conditions must always be met during your Apple Pay processing. After clicking "Confirm", you will be able to register a domain.
This registration mode is particularly suitable for native apps.
To use your own processing certificates for your domain while handling Apple Pay payments with the Shift4 API, you need to create a Merchant Identifier (Merchant ID), an Apple Pay Payment Processing Certificate, an Apple Pay Merchant Identity Certificate, and register a Merchant Domain linked to the Merchant Identity. This documentation outlines the steps necessary to properly configure the Apple Pay Merchant Identifier for integration with the Shift4 API.
Go to your Account Settings and click "+ Add certificate" in Apple Pay Processing certificates section
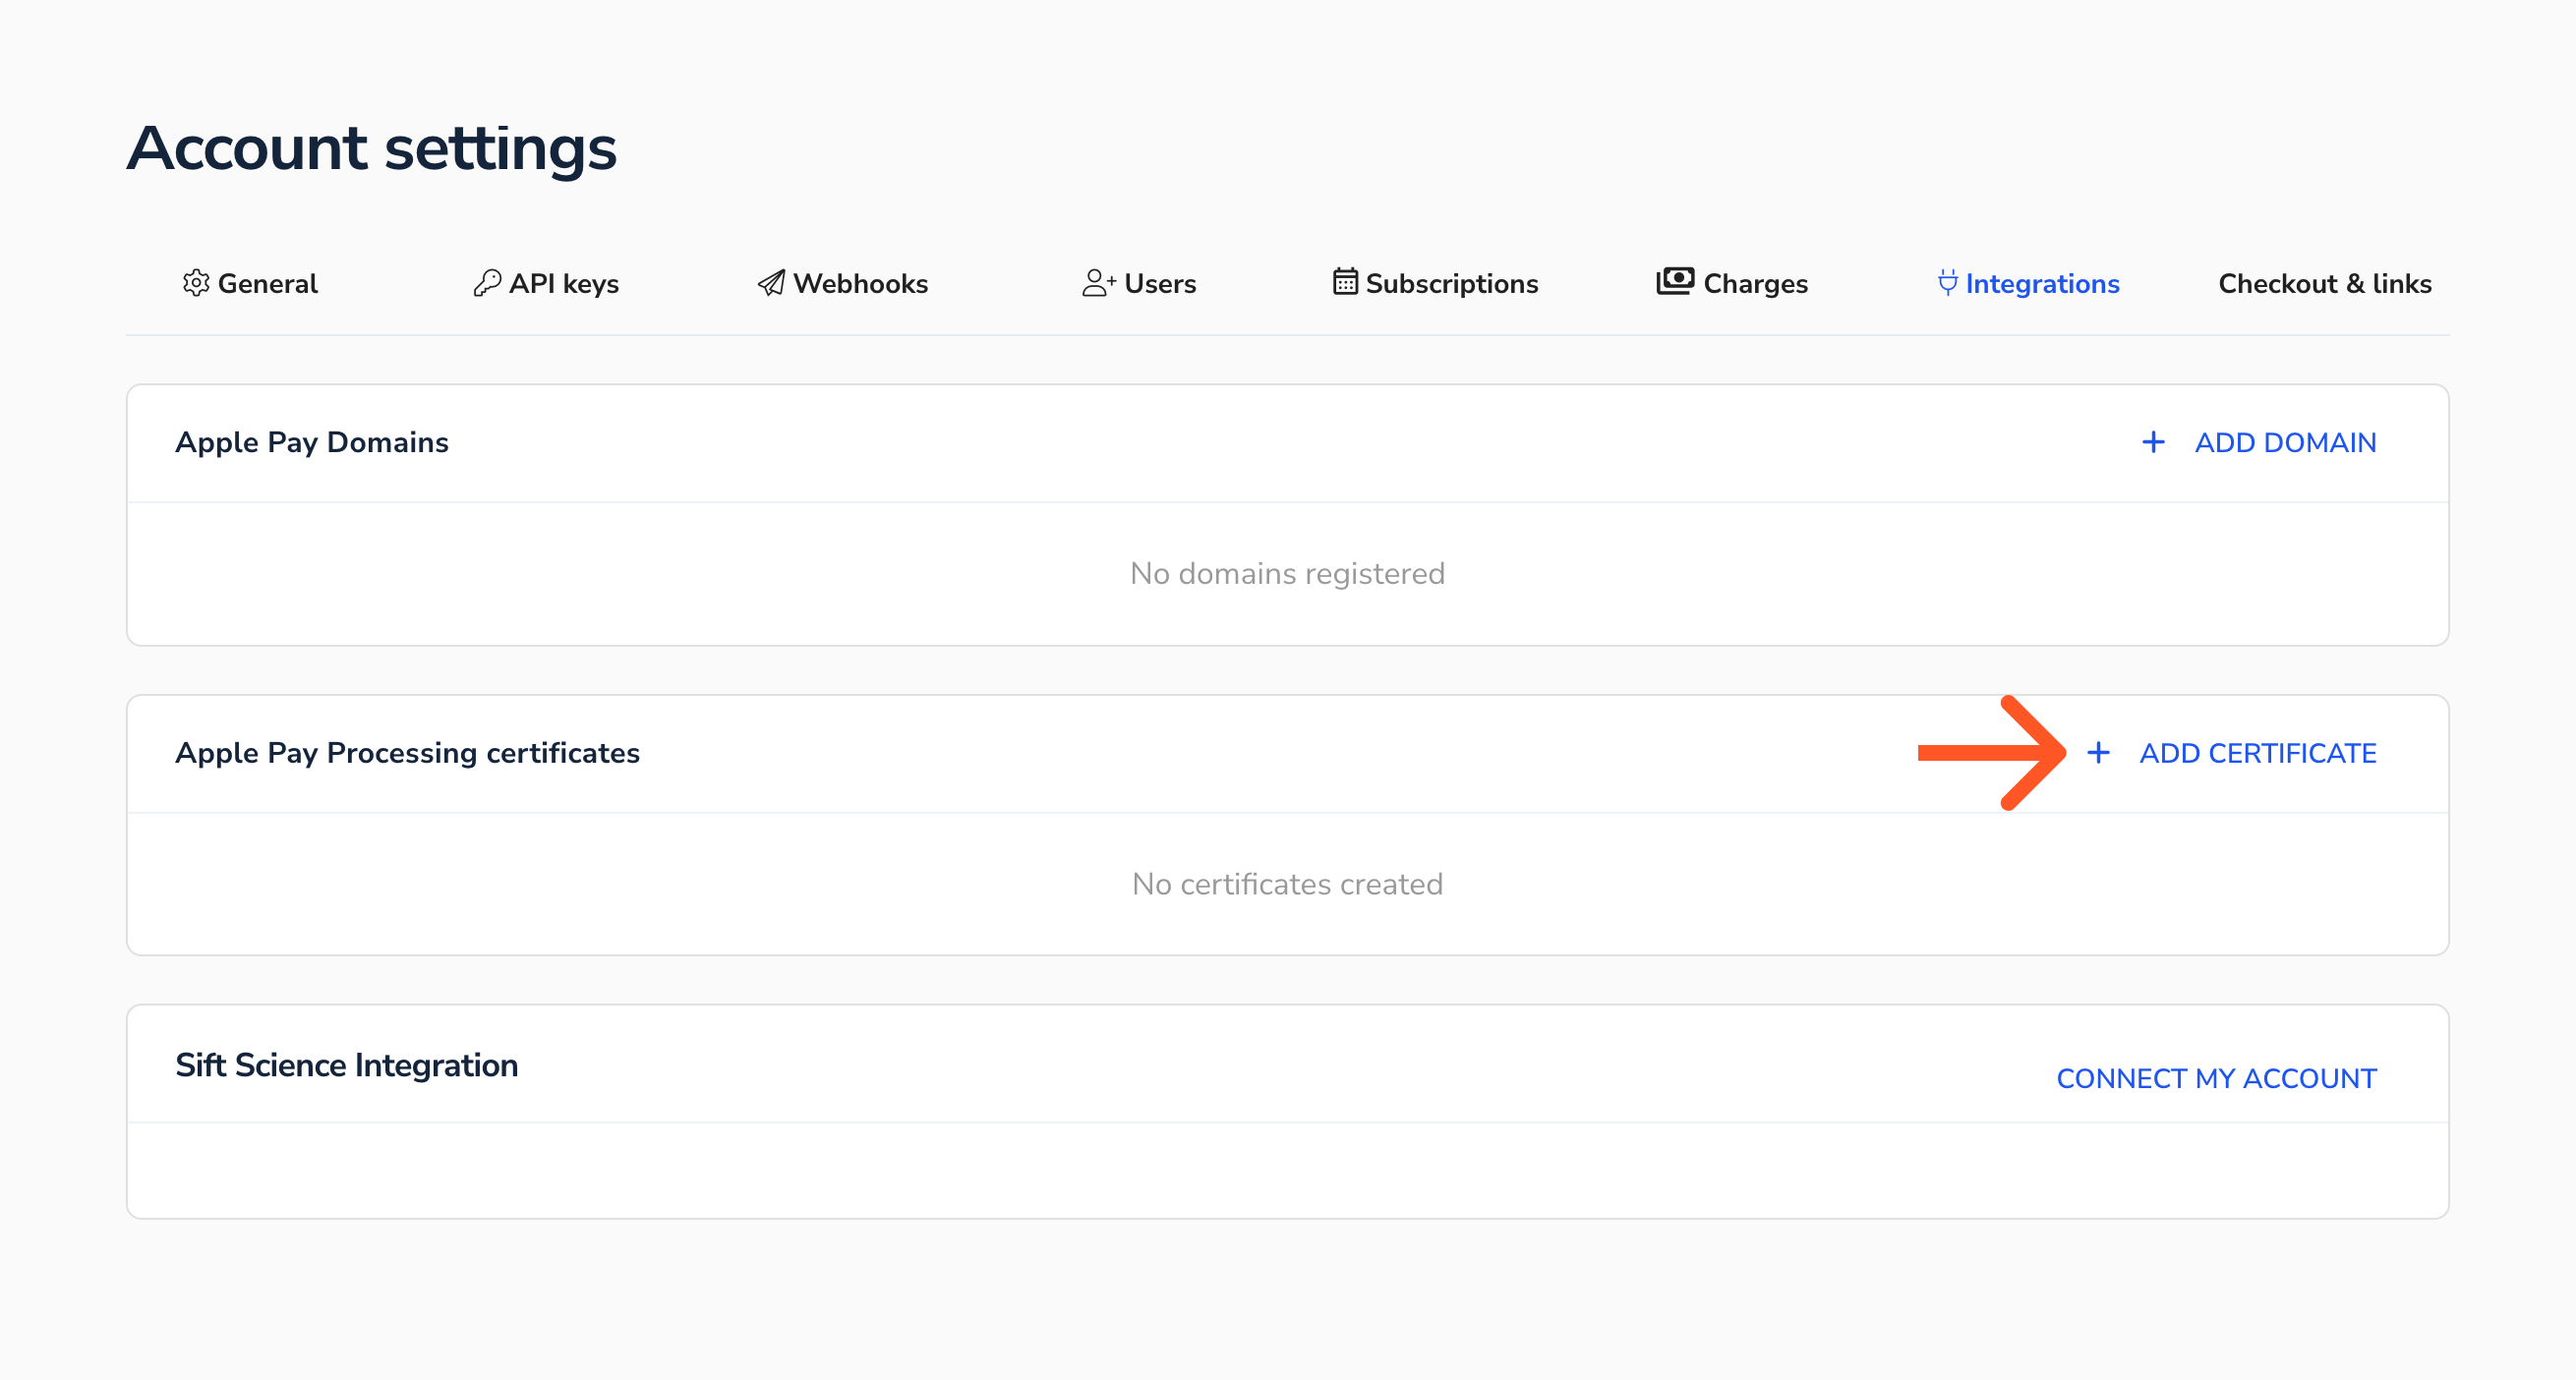
Fig. 1. Account Settings at dev.shift4.com
Generate a Certificate Signing Request by clicking "Download CSR file"
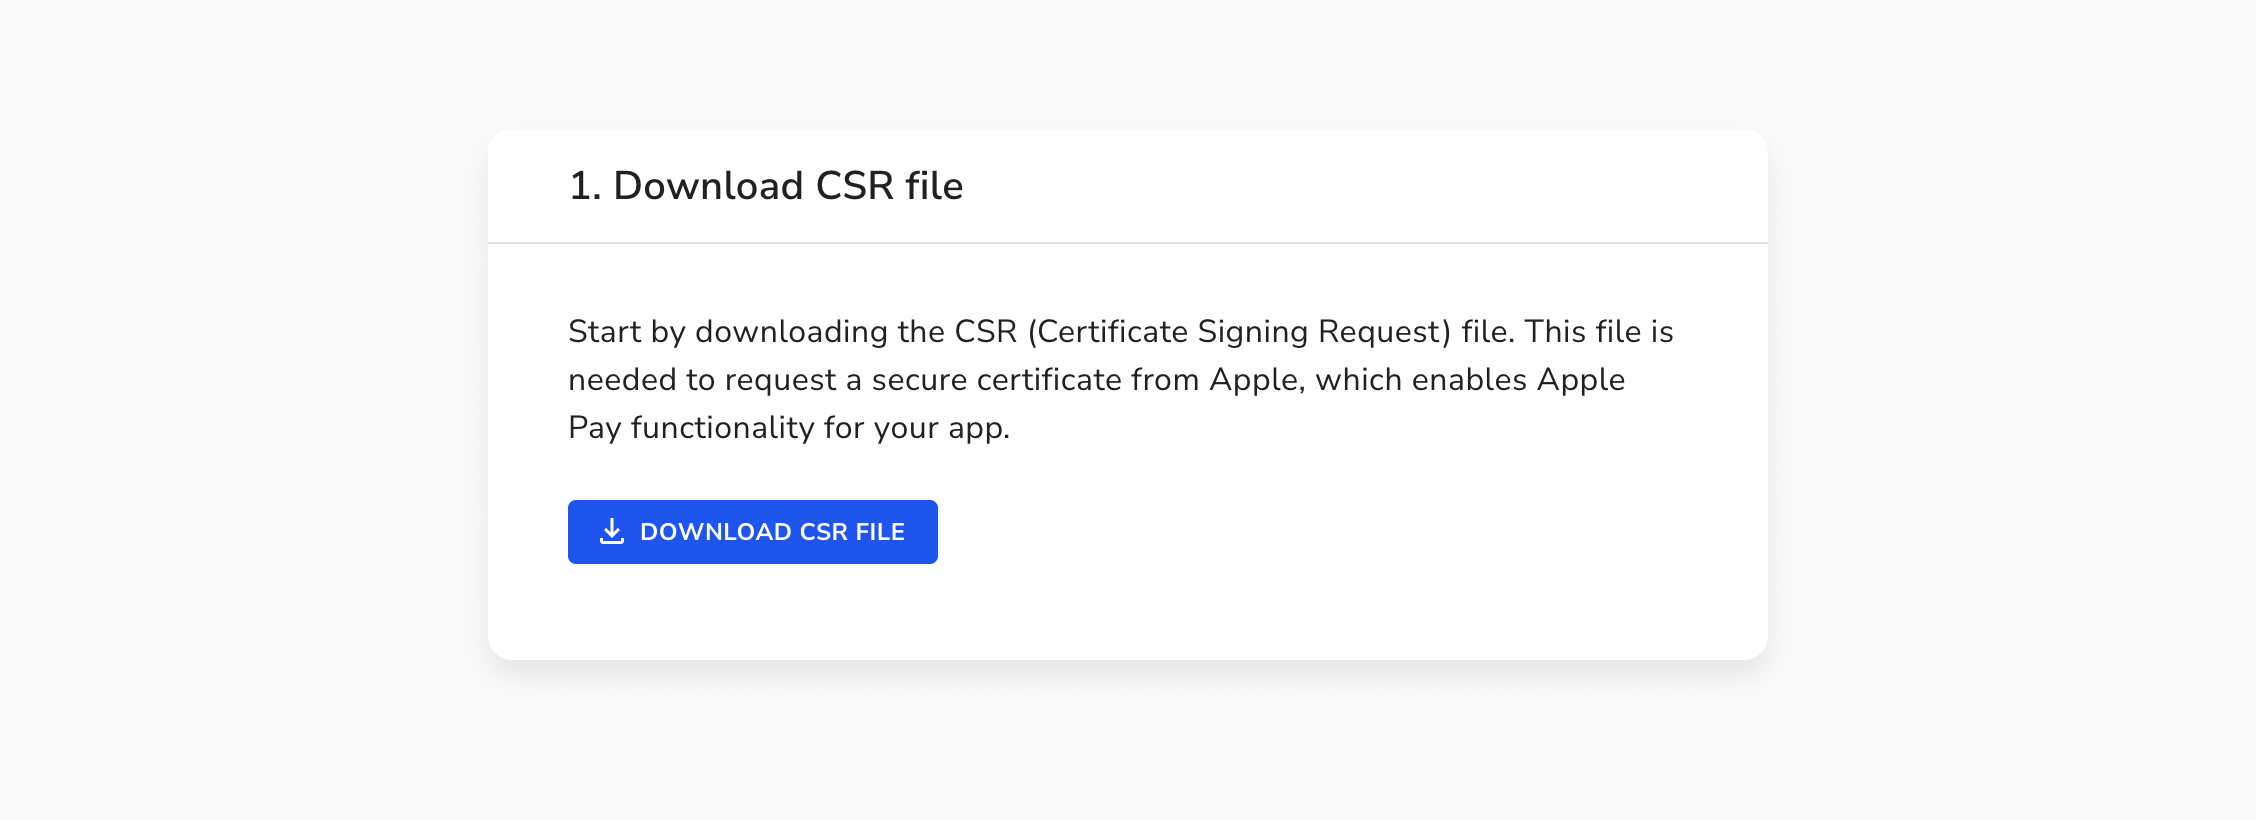
Fig. 2. Downloading CSR file from merchant's dashboard
Set up your Apple Pay Identifiers. To access the Apple Pay Identifiers configuration page, log in to https://developer.apple.com and follow the instructions below, or go directly to https://developer.apple.com/account/resources/identifiers/list.
Log in to your Apple Pay Developer account. Go to the Certificates, IDs & Profiles section and select the Identifiers tab, as shown in Fig. 1.
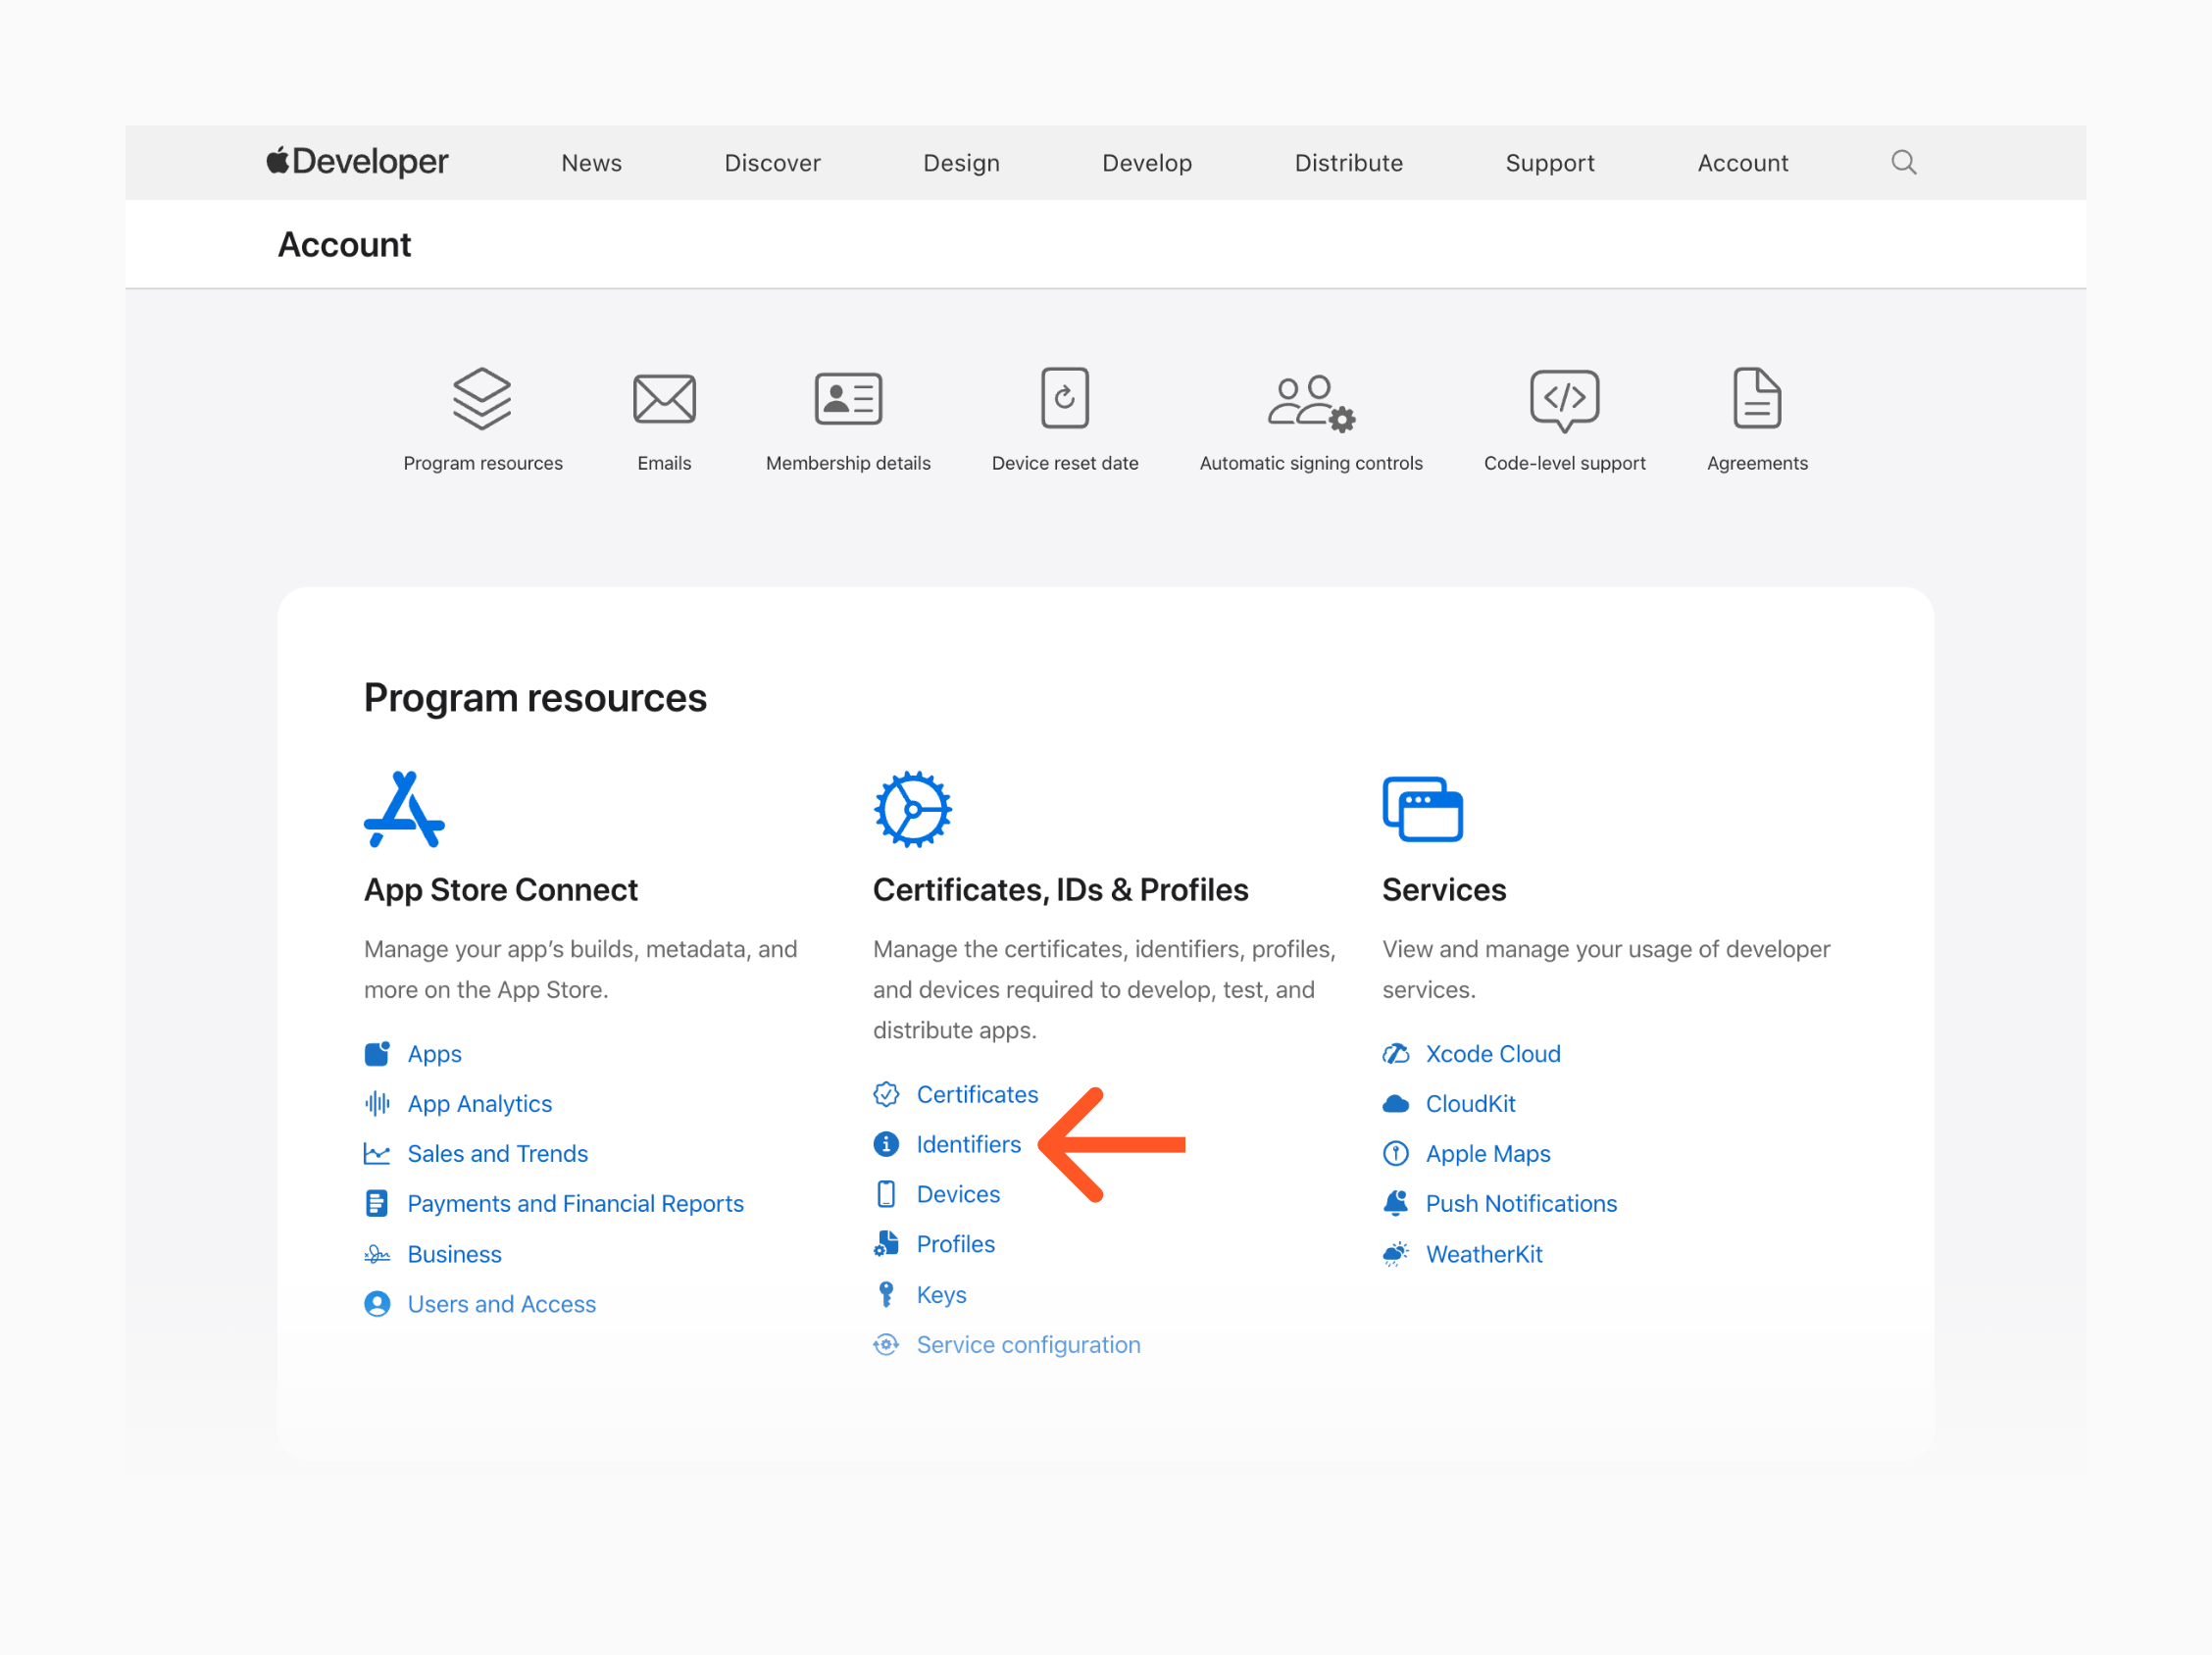
Fig. 3. Navigating to Identifiers page in Apple Developer site.
To create the Merchant ID that will be used with the Shift4 API, follow these steps. If you already have a Merchant ID, you can skip this step and proceed directly to step 5.
Navigate to the Identifiers tab and click the plus icon to create a new Merchant ID, as shown in Fig. 4.
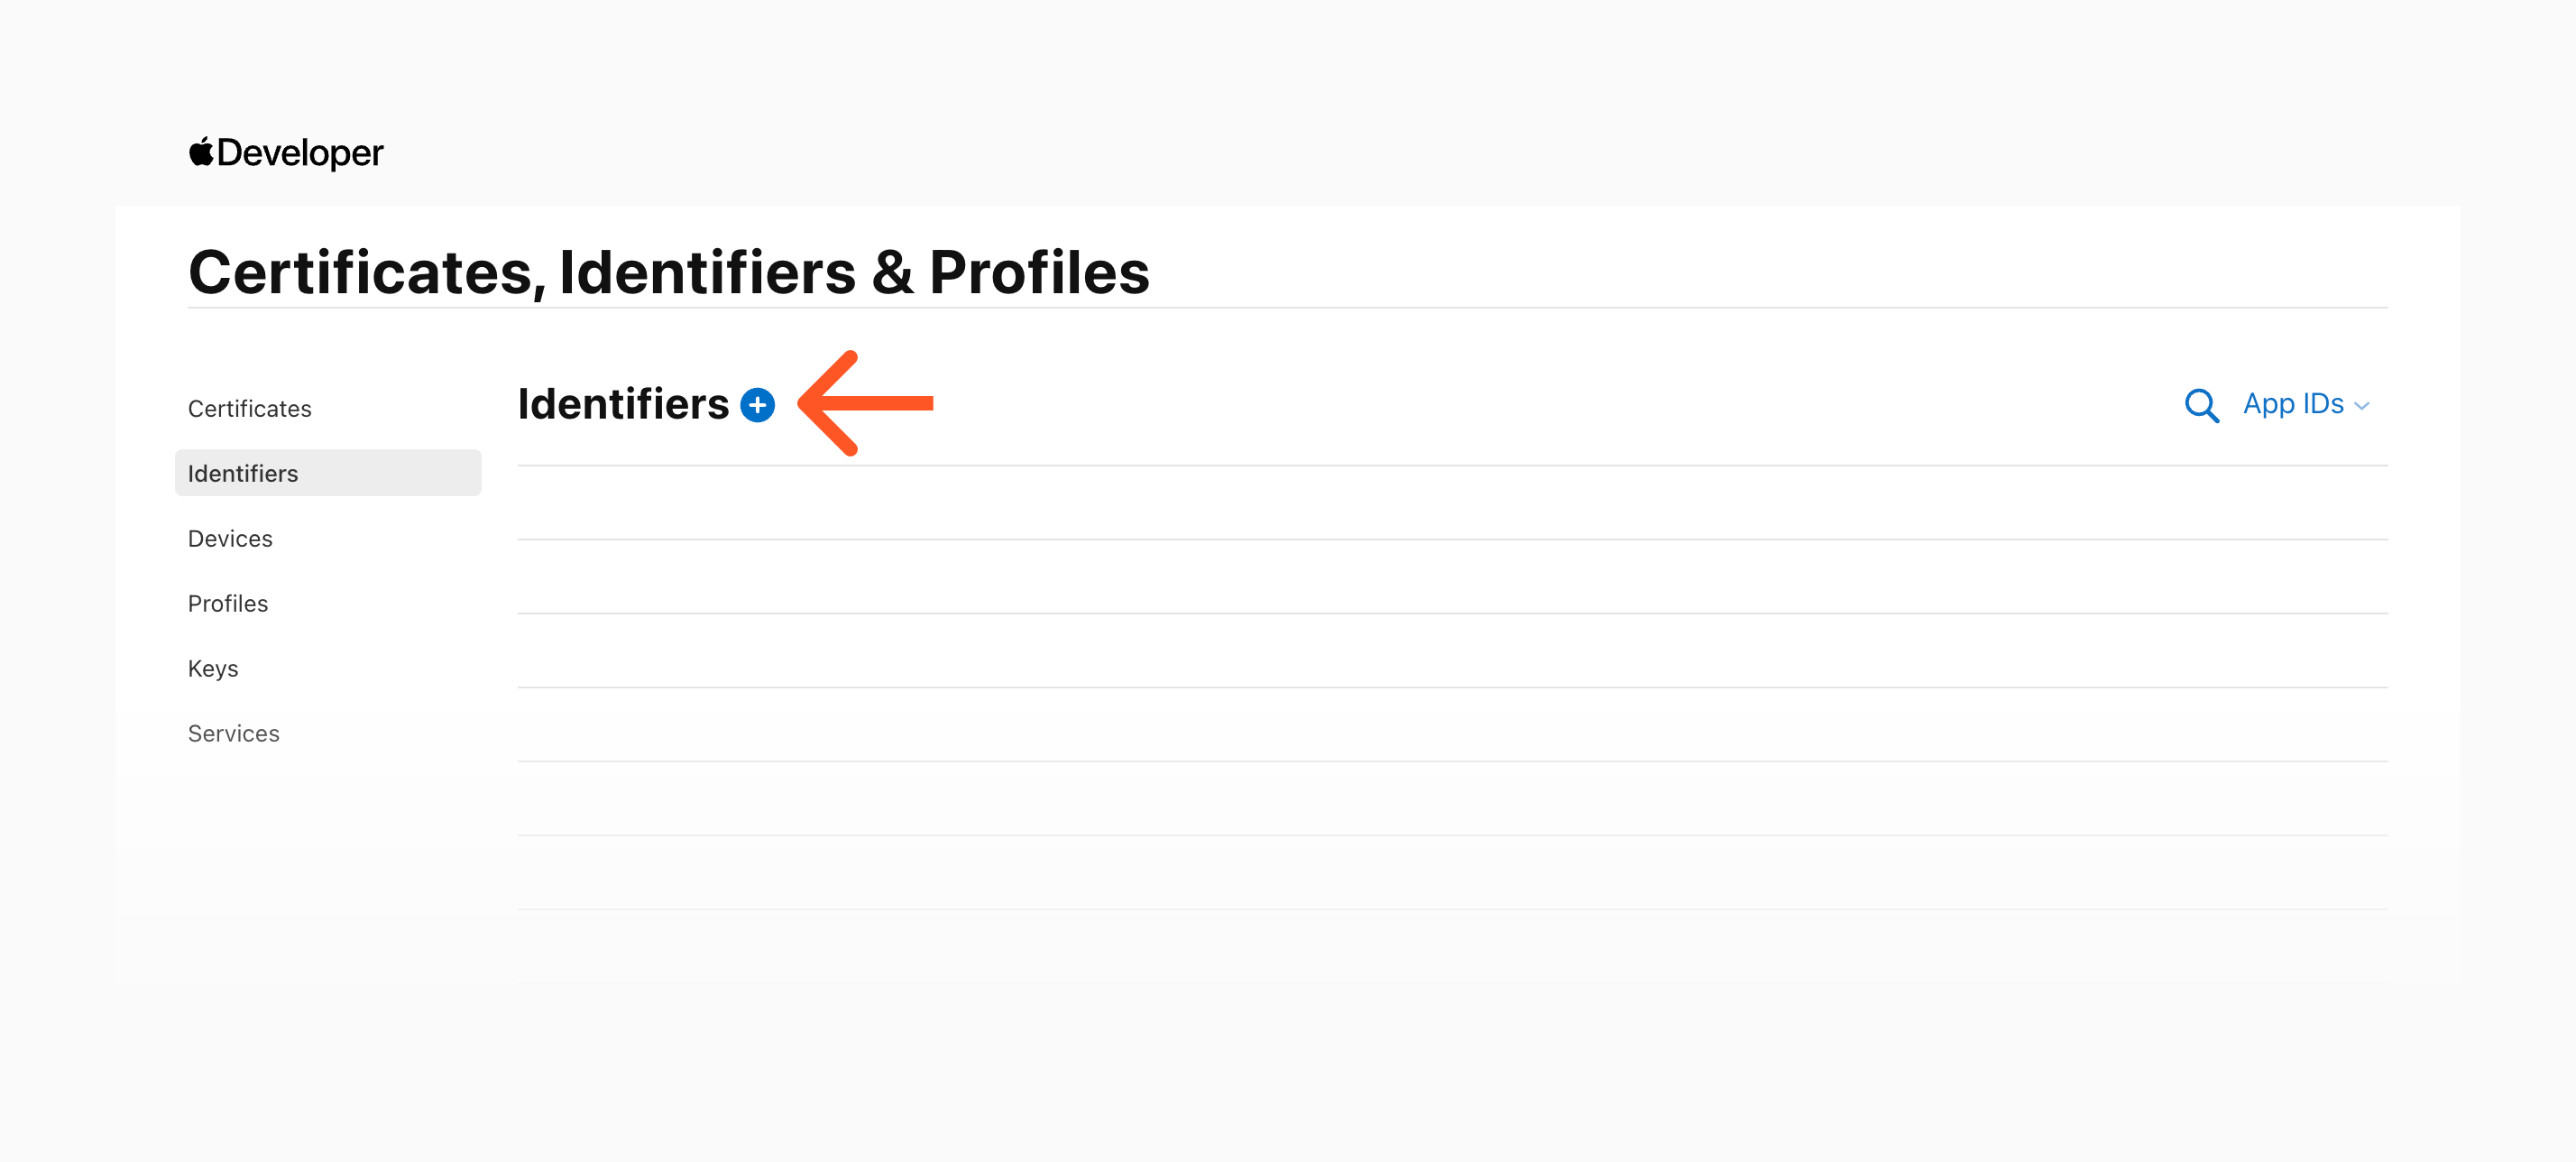
Fig. 4. Creating a Merchant ID - step 1.
Make sure that the Merchant IDs option is selected and click "Continue".
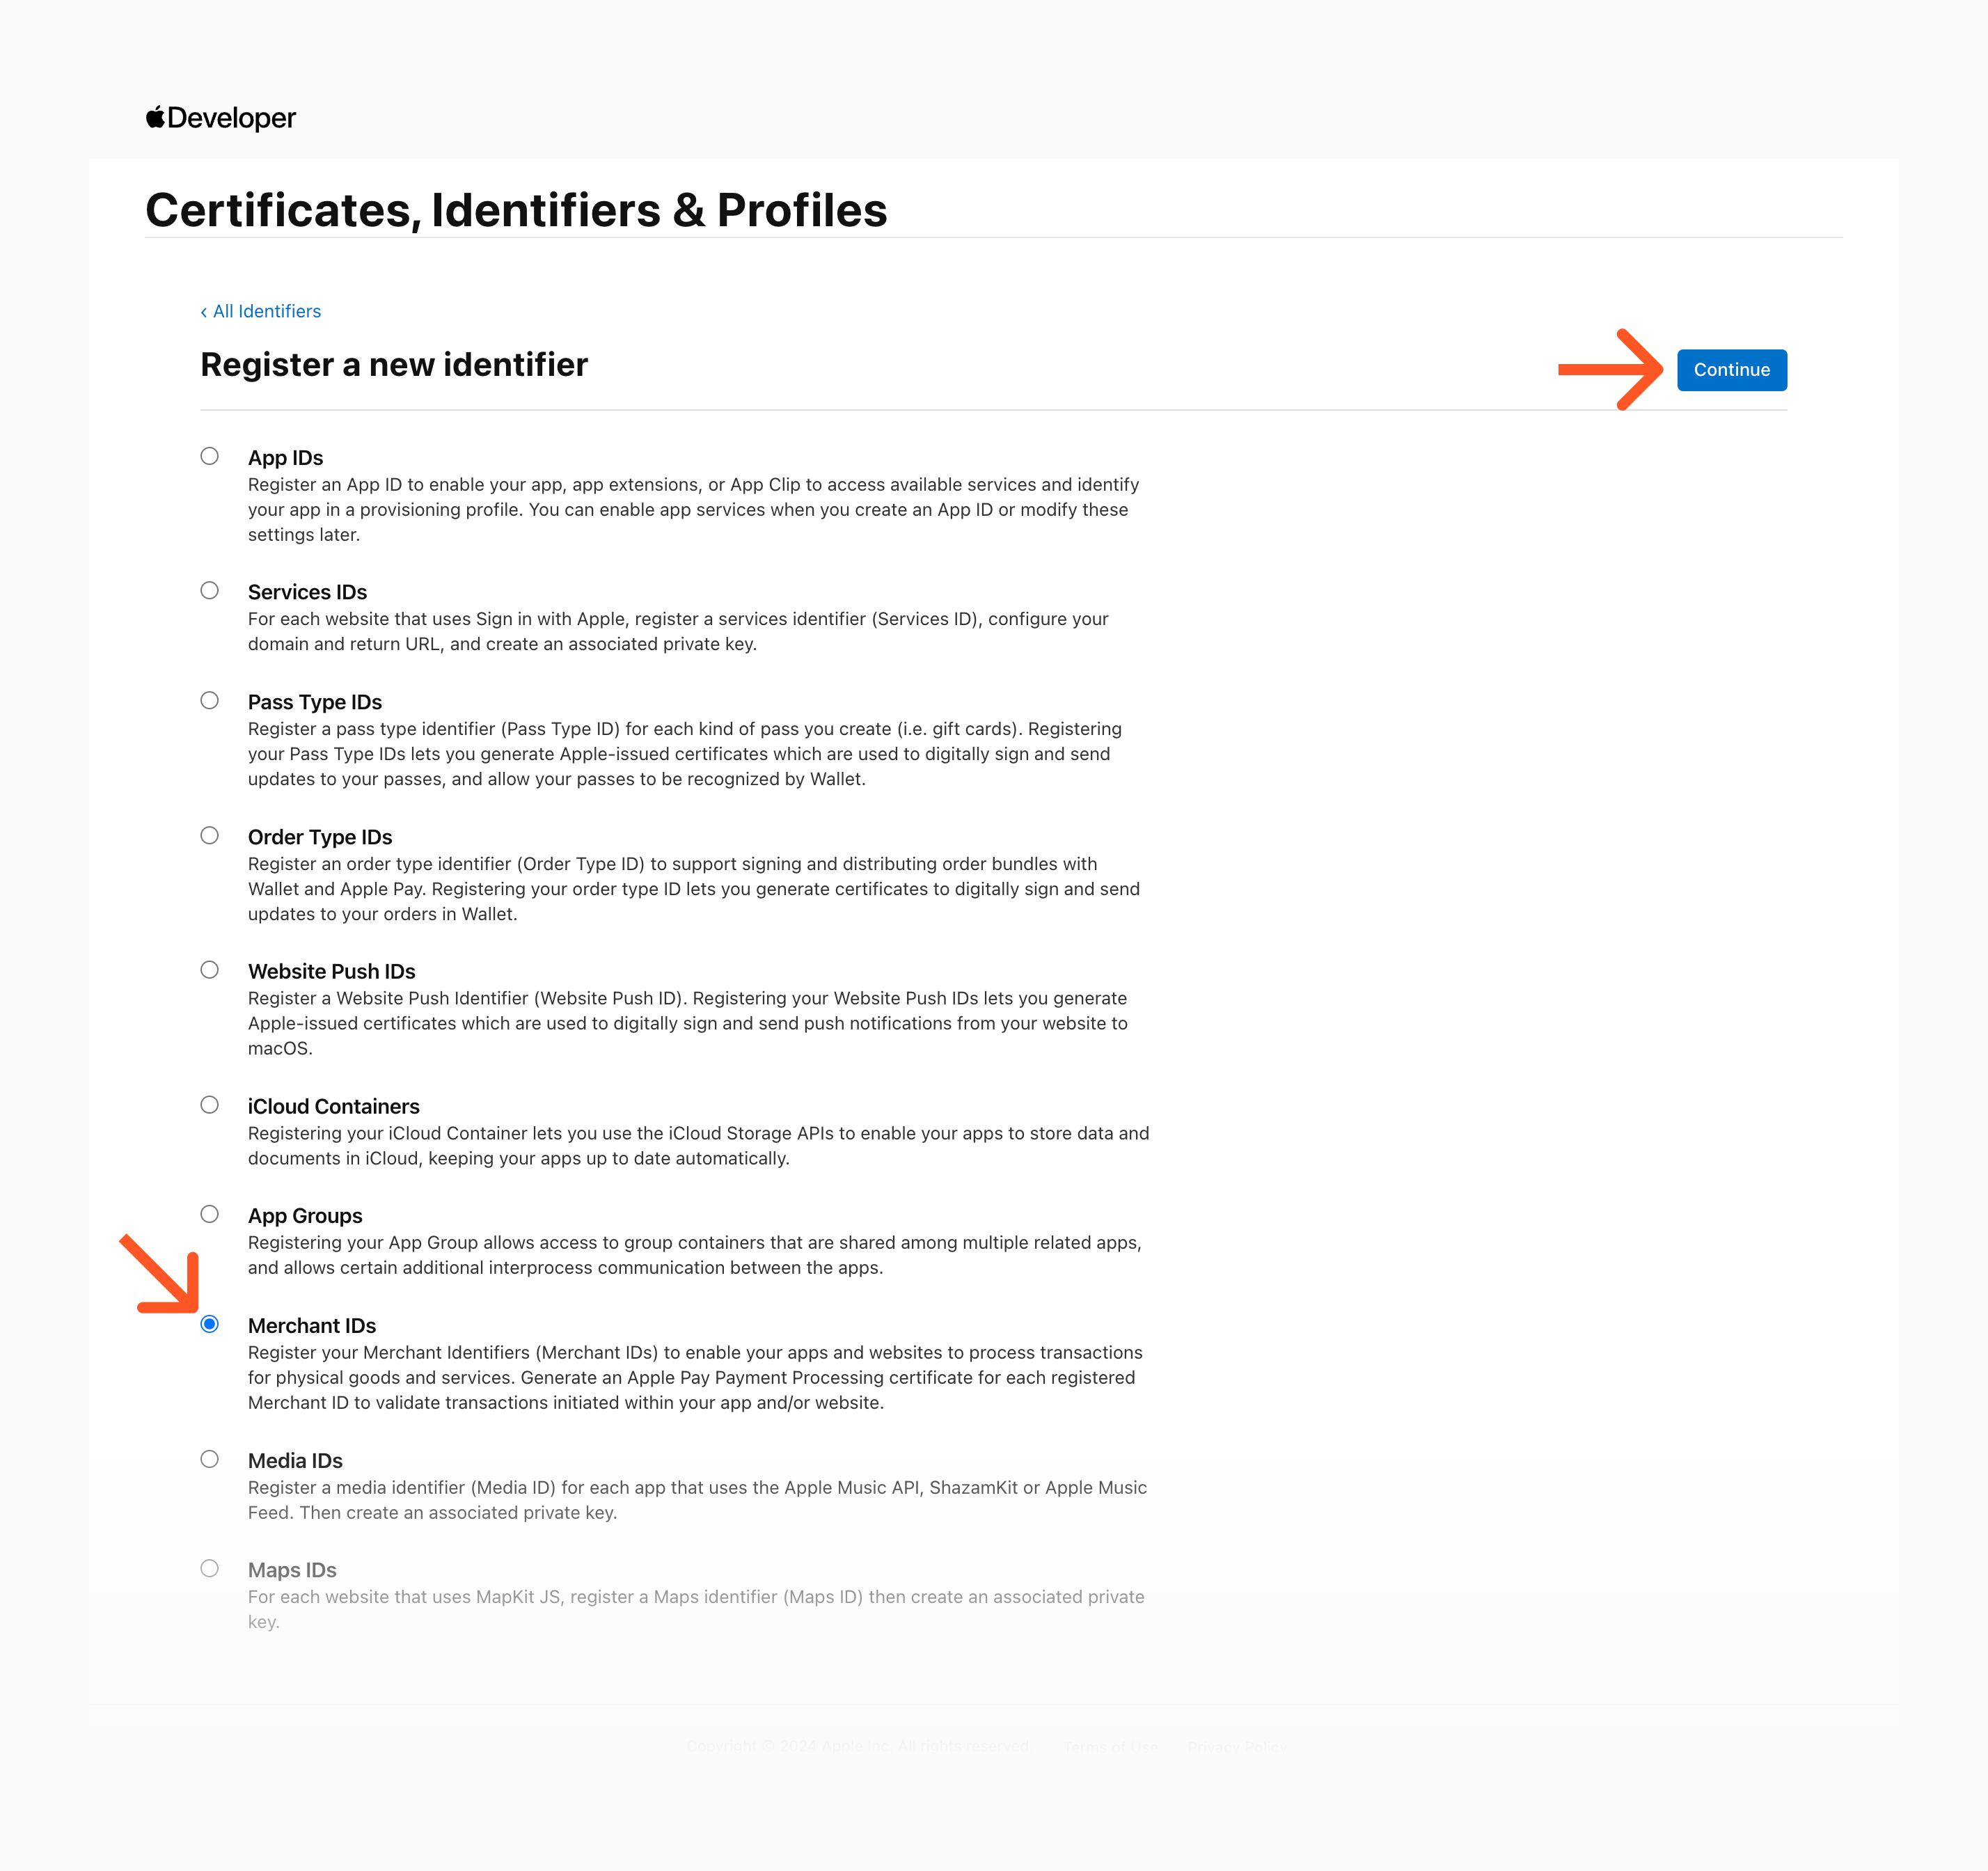
Fig. 5. Creating a Merchant ID - step 2.
Provide the Identifier and the Description as shown in Fig. 6.
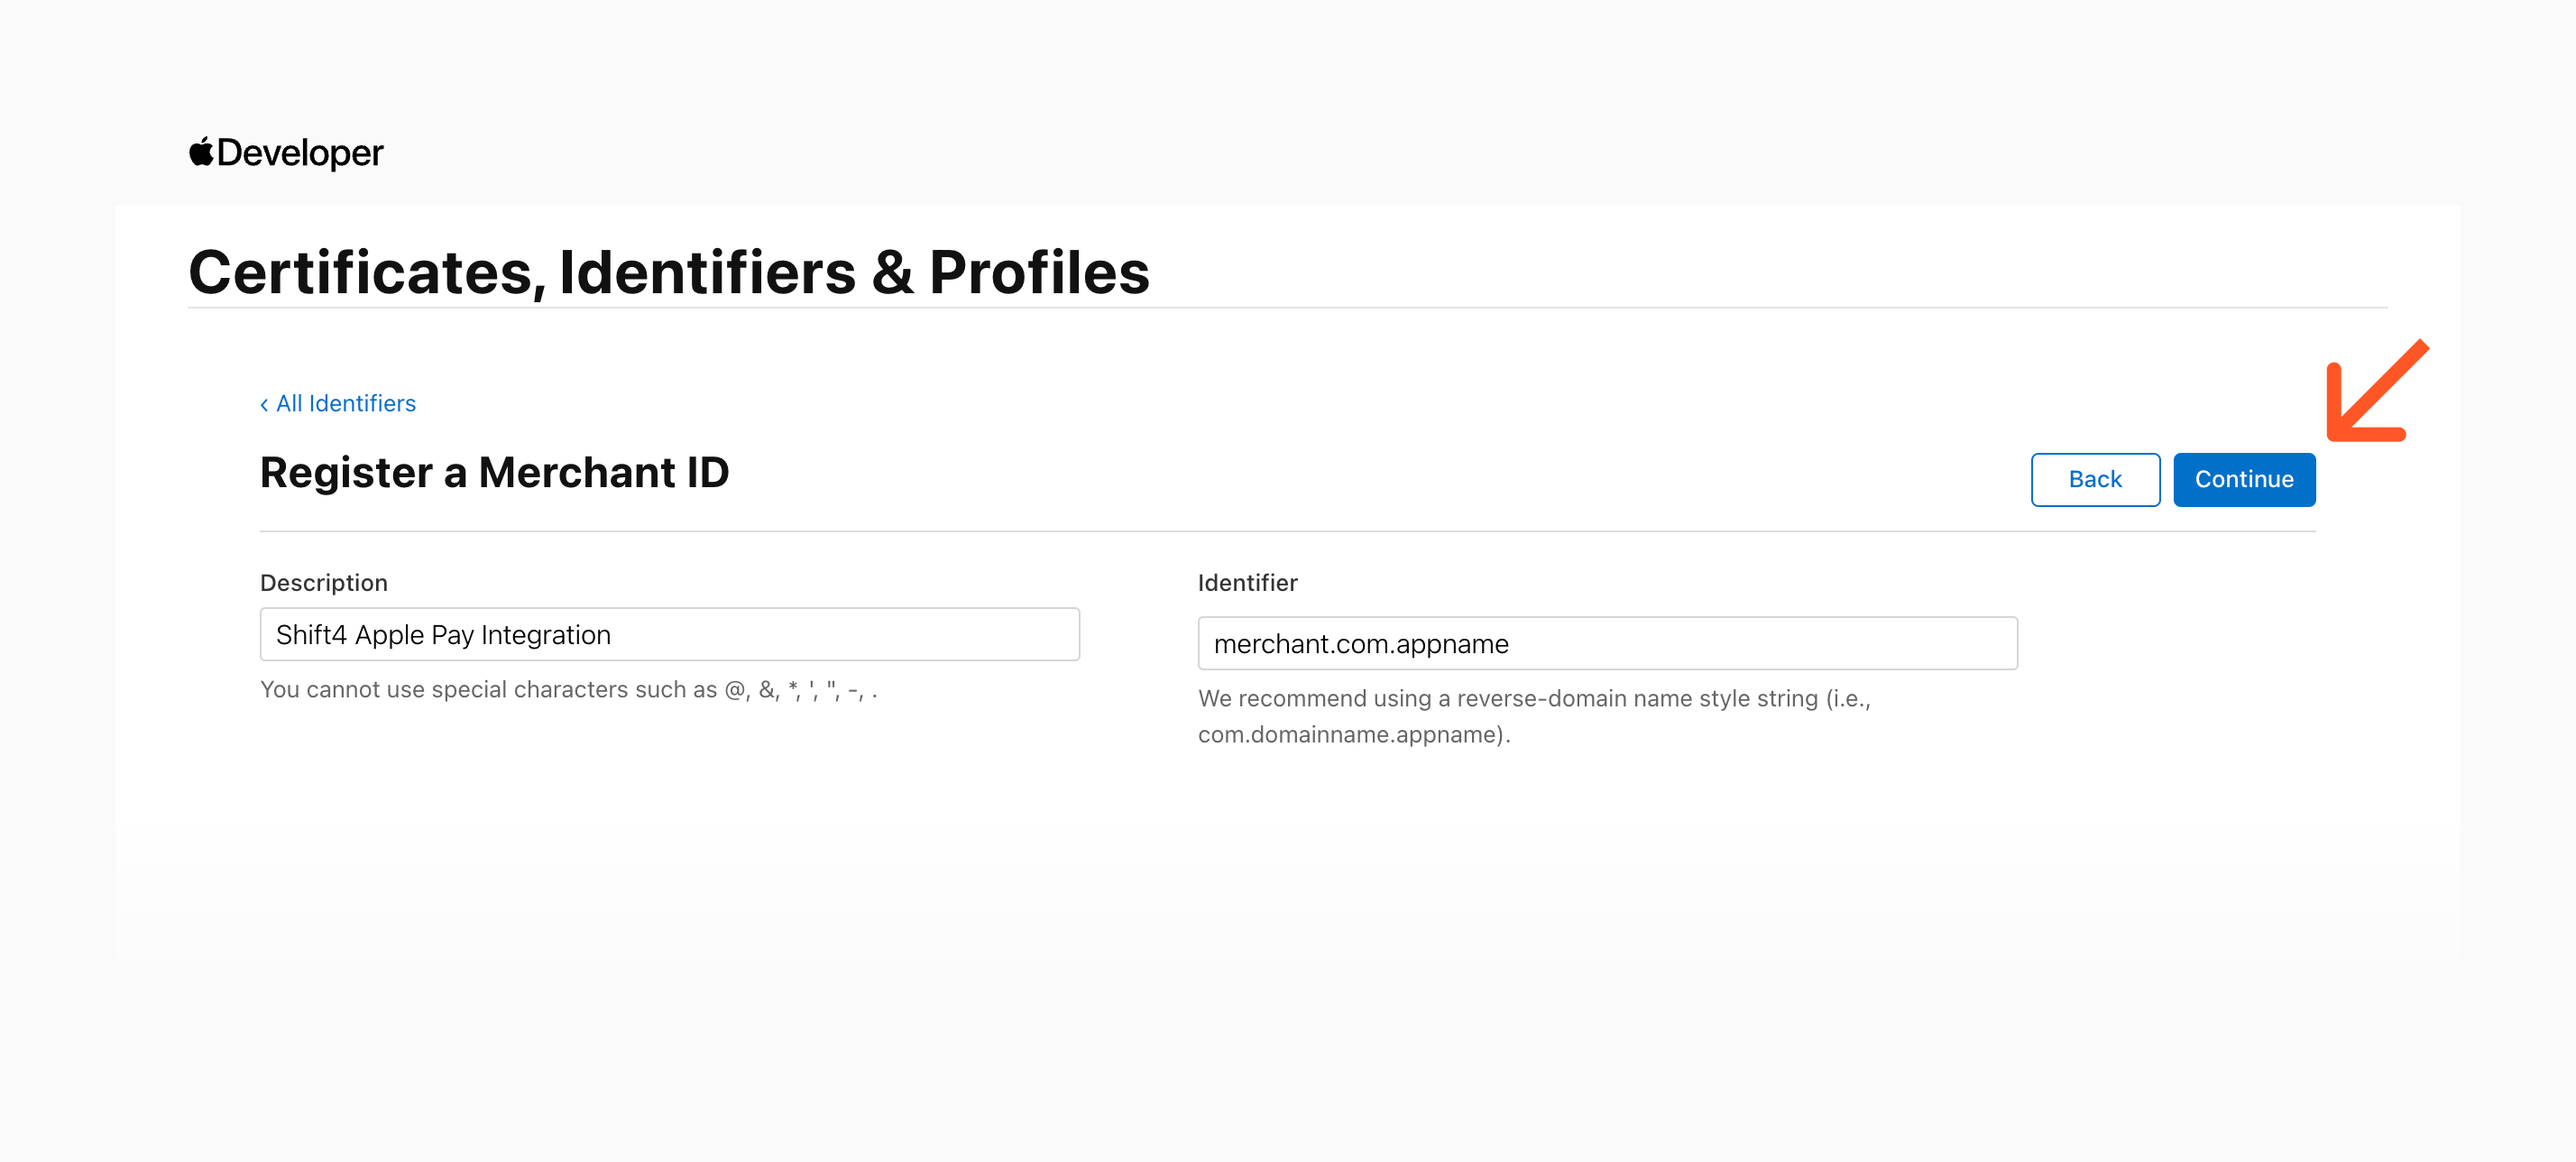
Fig. 6. Creating Merchant ID - step 3.
Check the provided data for accuracy, and then click "Register".
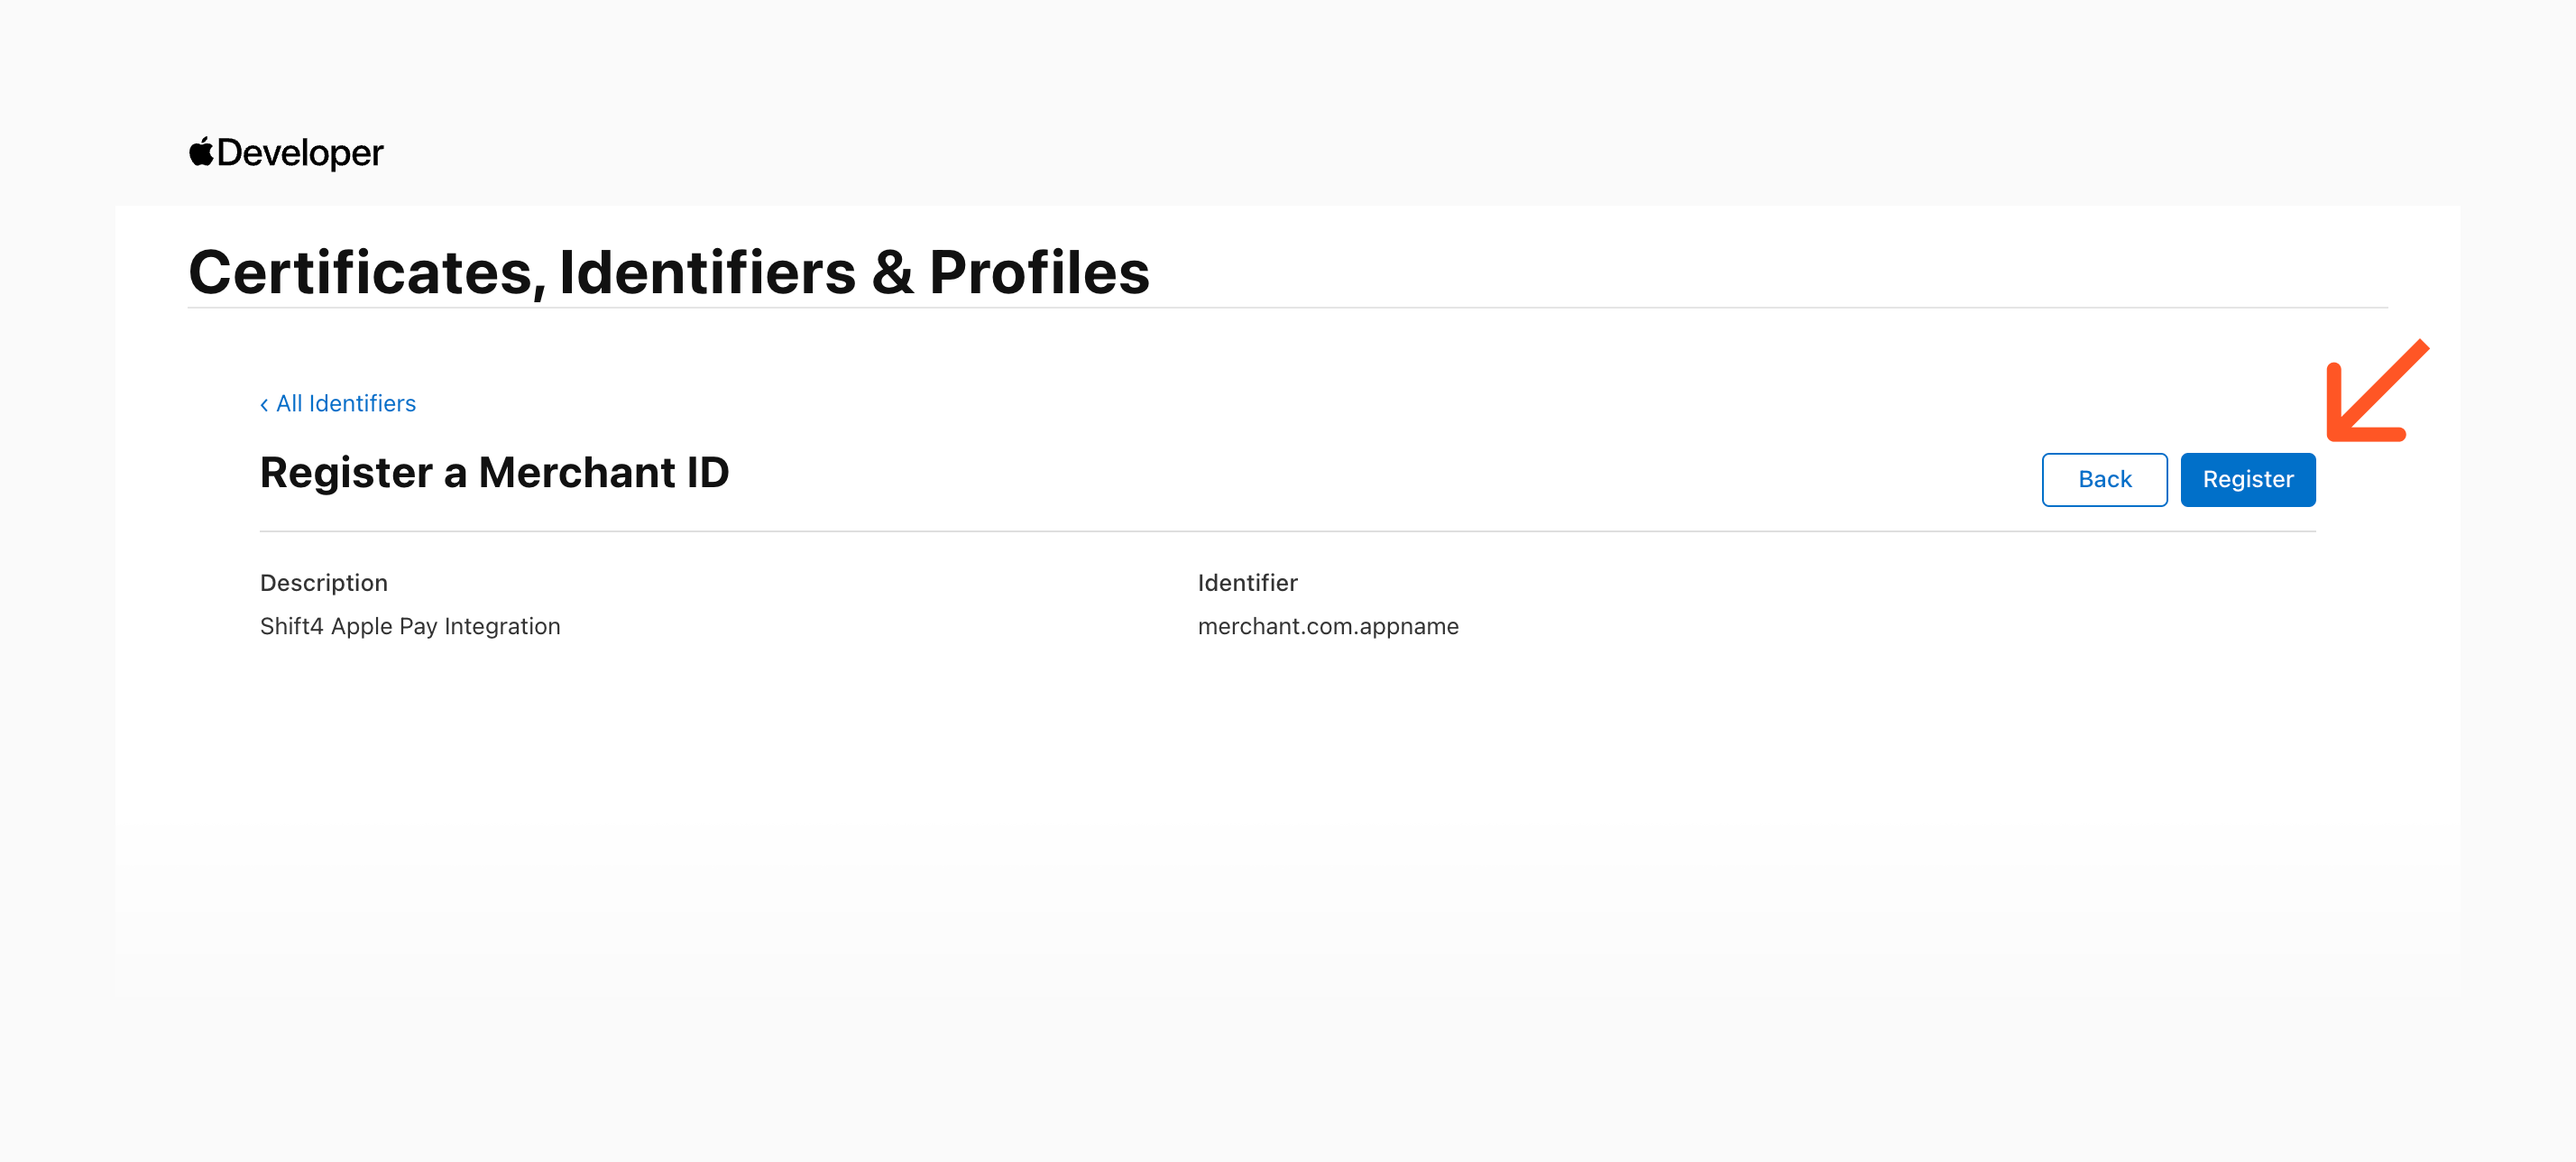
Fig. 7. Creating Merchant ID - step 4.
With your Merchant ID set up for the Shift4 API integration, the next step is configuring it by creating an Apple Pay Payment Processing Certificate, an Apple Pay Merchant Identity Certificate, and registering a Merchant Domain.
Ensure you are on the Merchants IDs section by checking the menu on the right side of the page. If necessary, select the Merchant IDs option from the menu.
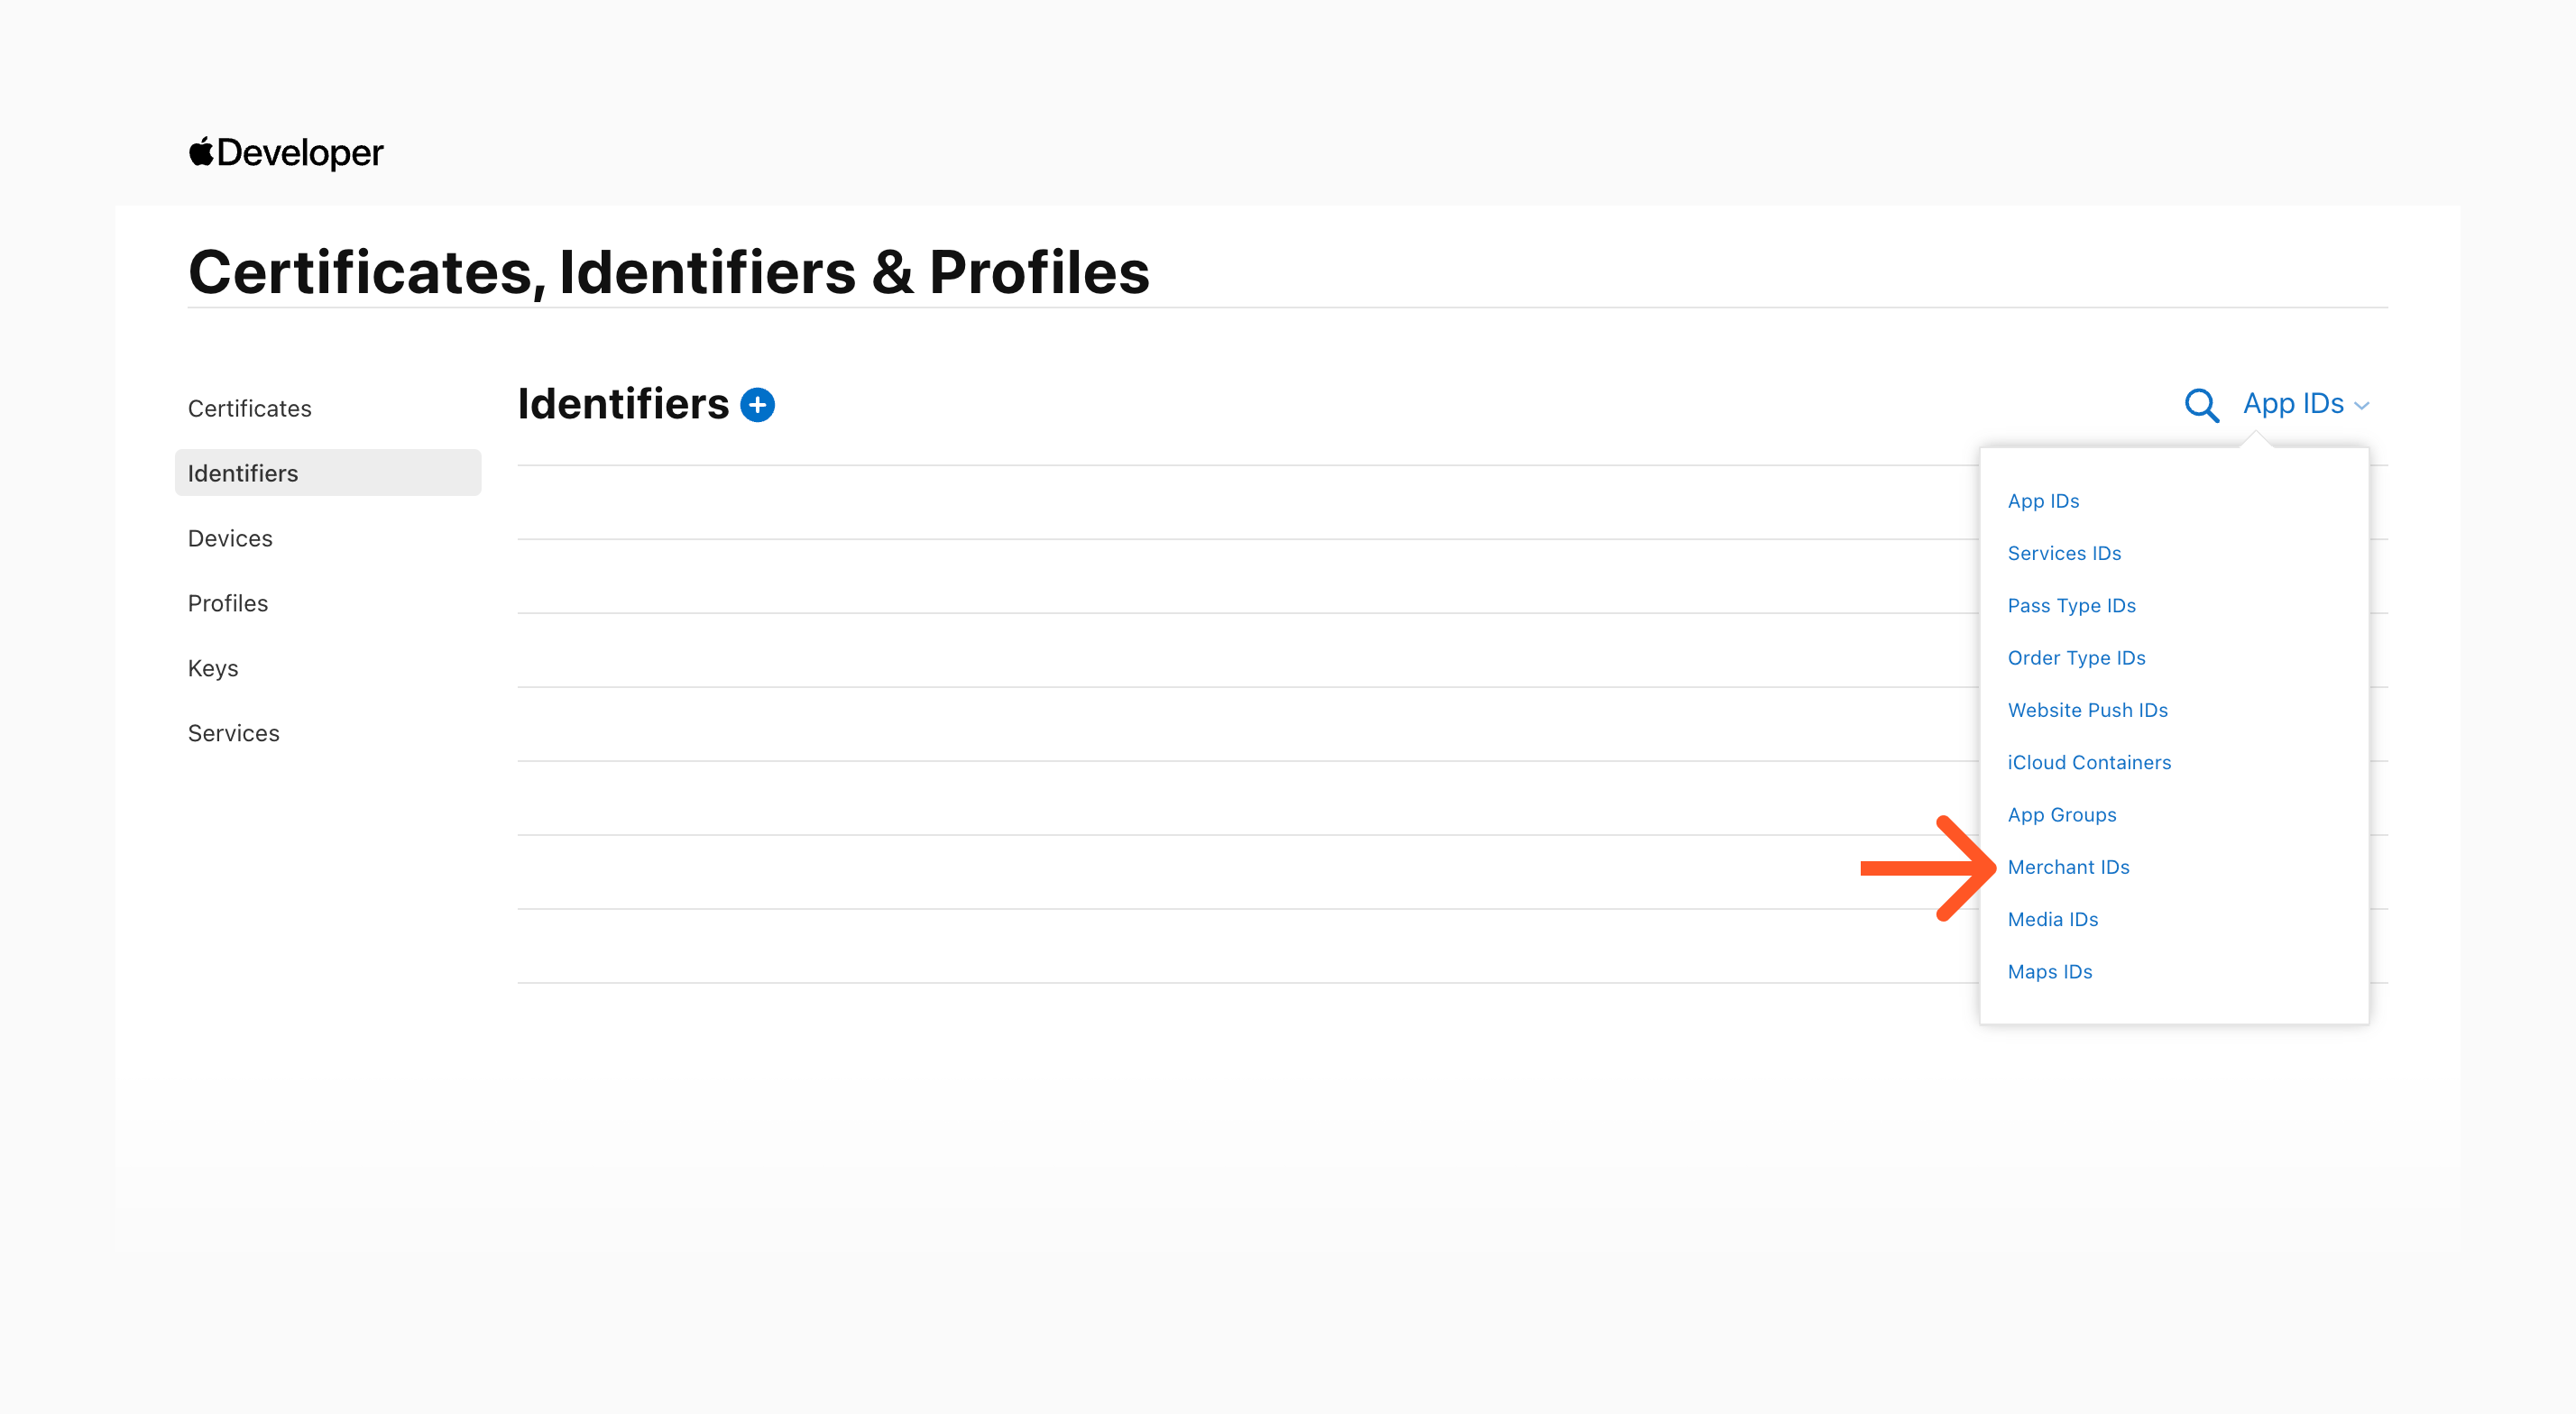
Fig. 8. Navigating to the Merchant ID's page.
Click on the selected Merchant ID to create an Apple Pay Payment Processing Certificate. Click the "Create Certificate" button, as shown in Fig. 9.
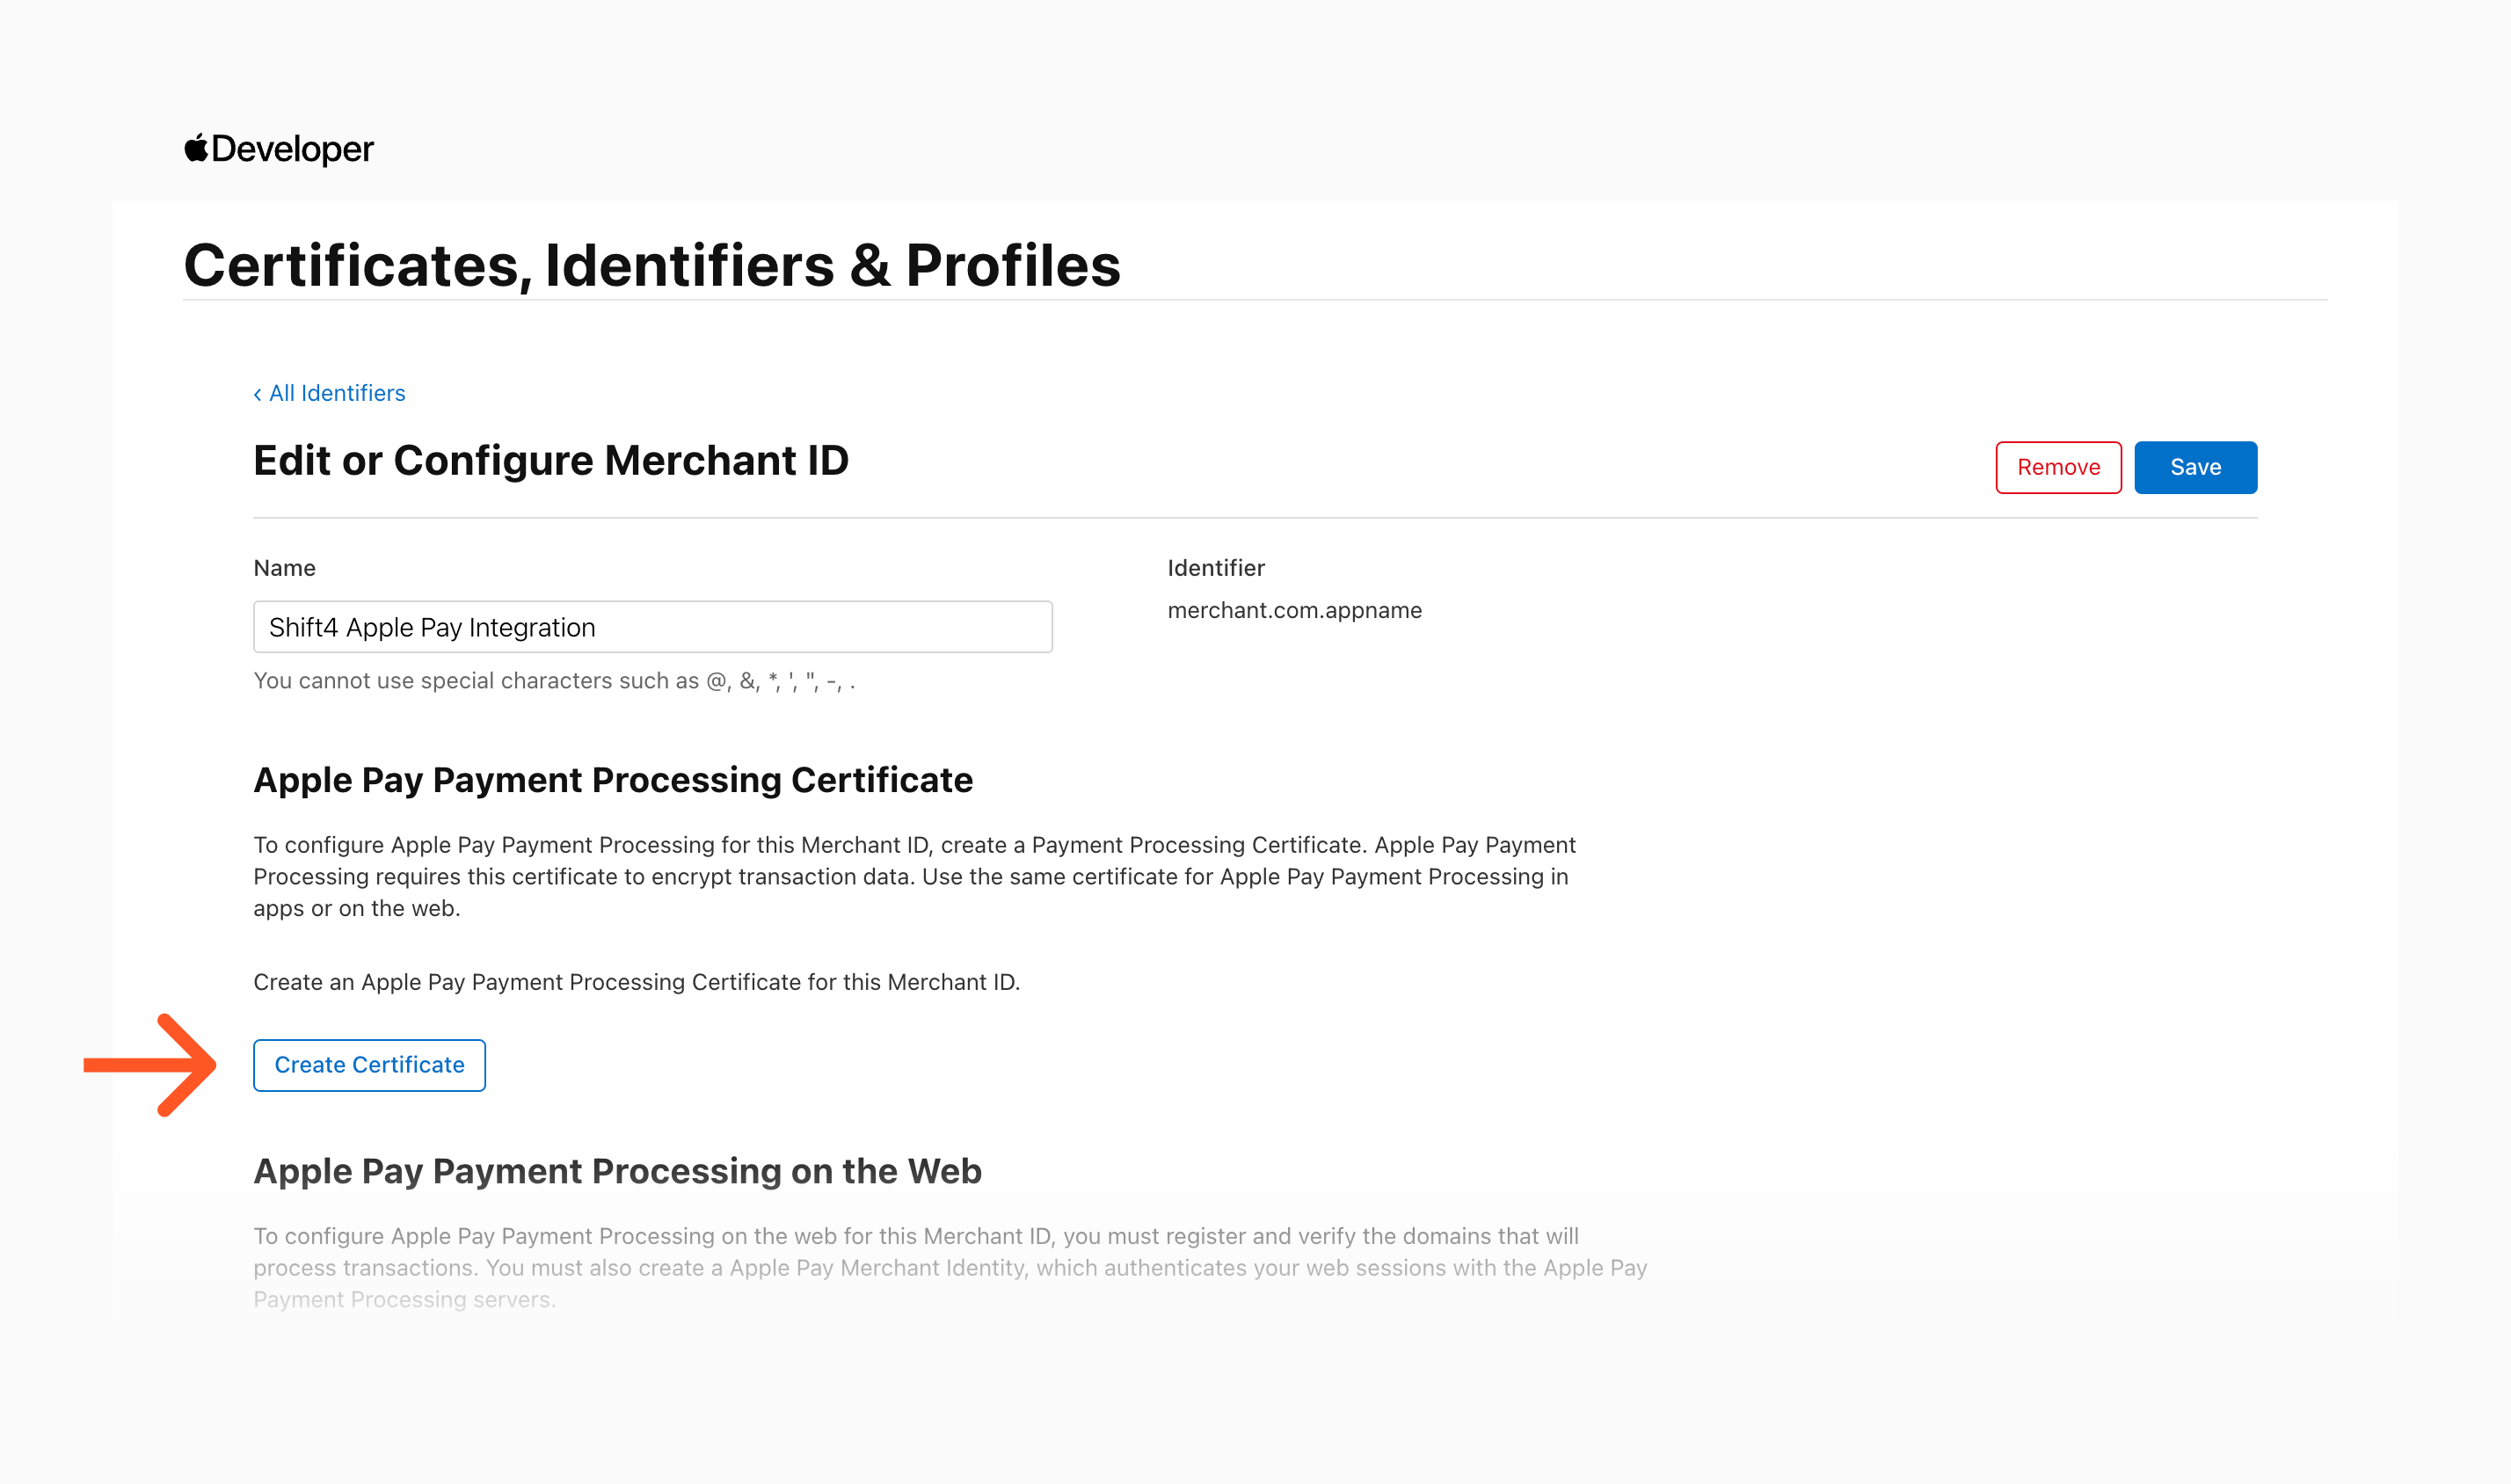
Fig. 9. Merchant ID configuration - step 1.
Select the appropriate Merchant ID setting and click the "Continue" button, as shown below.
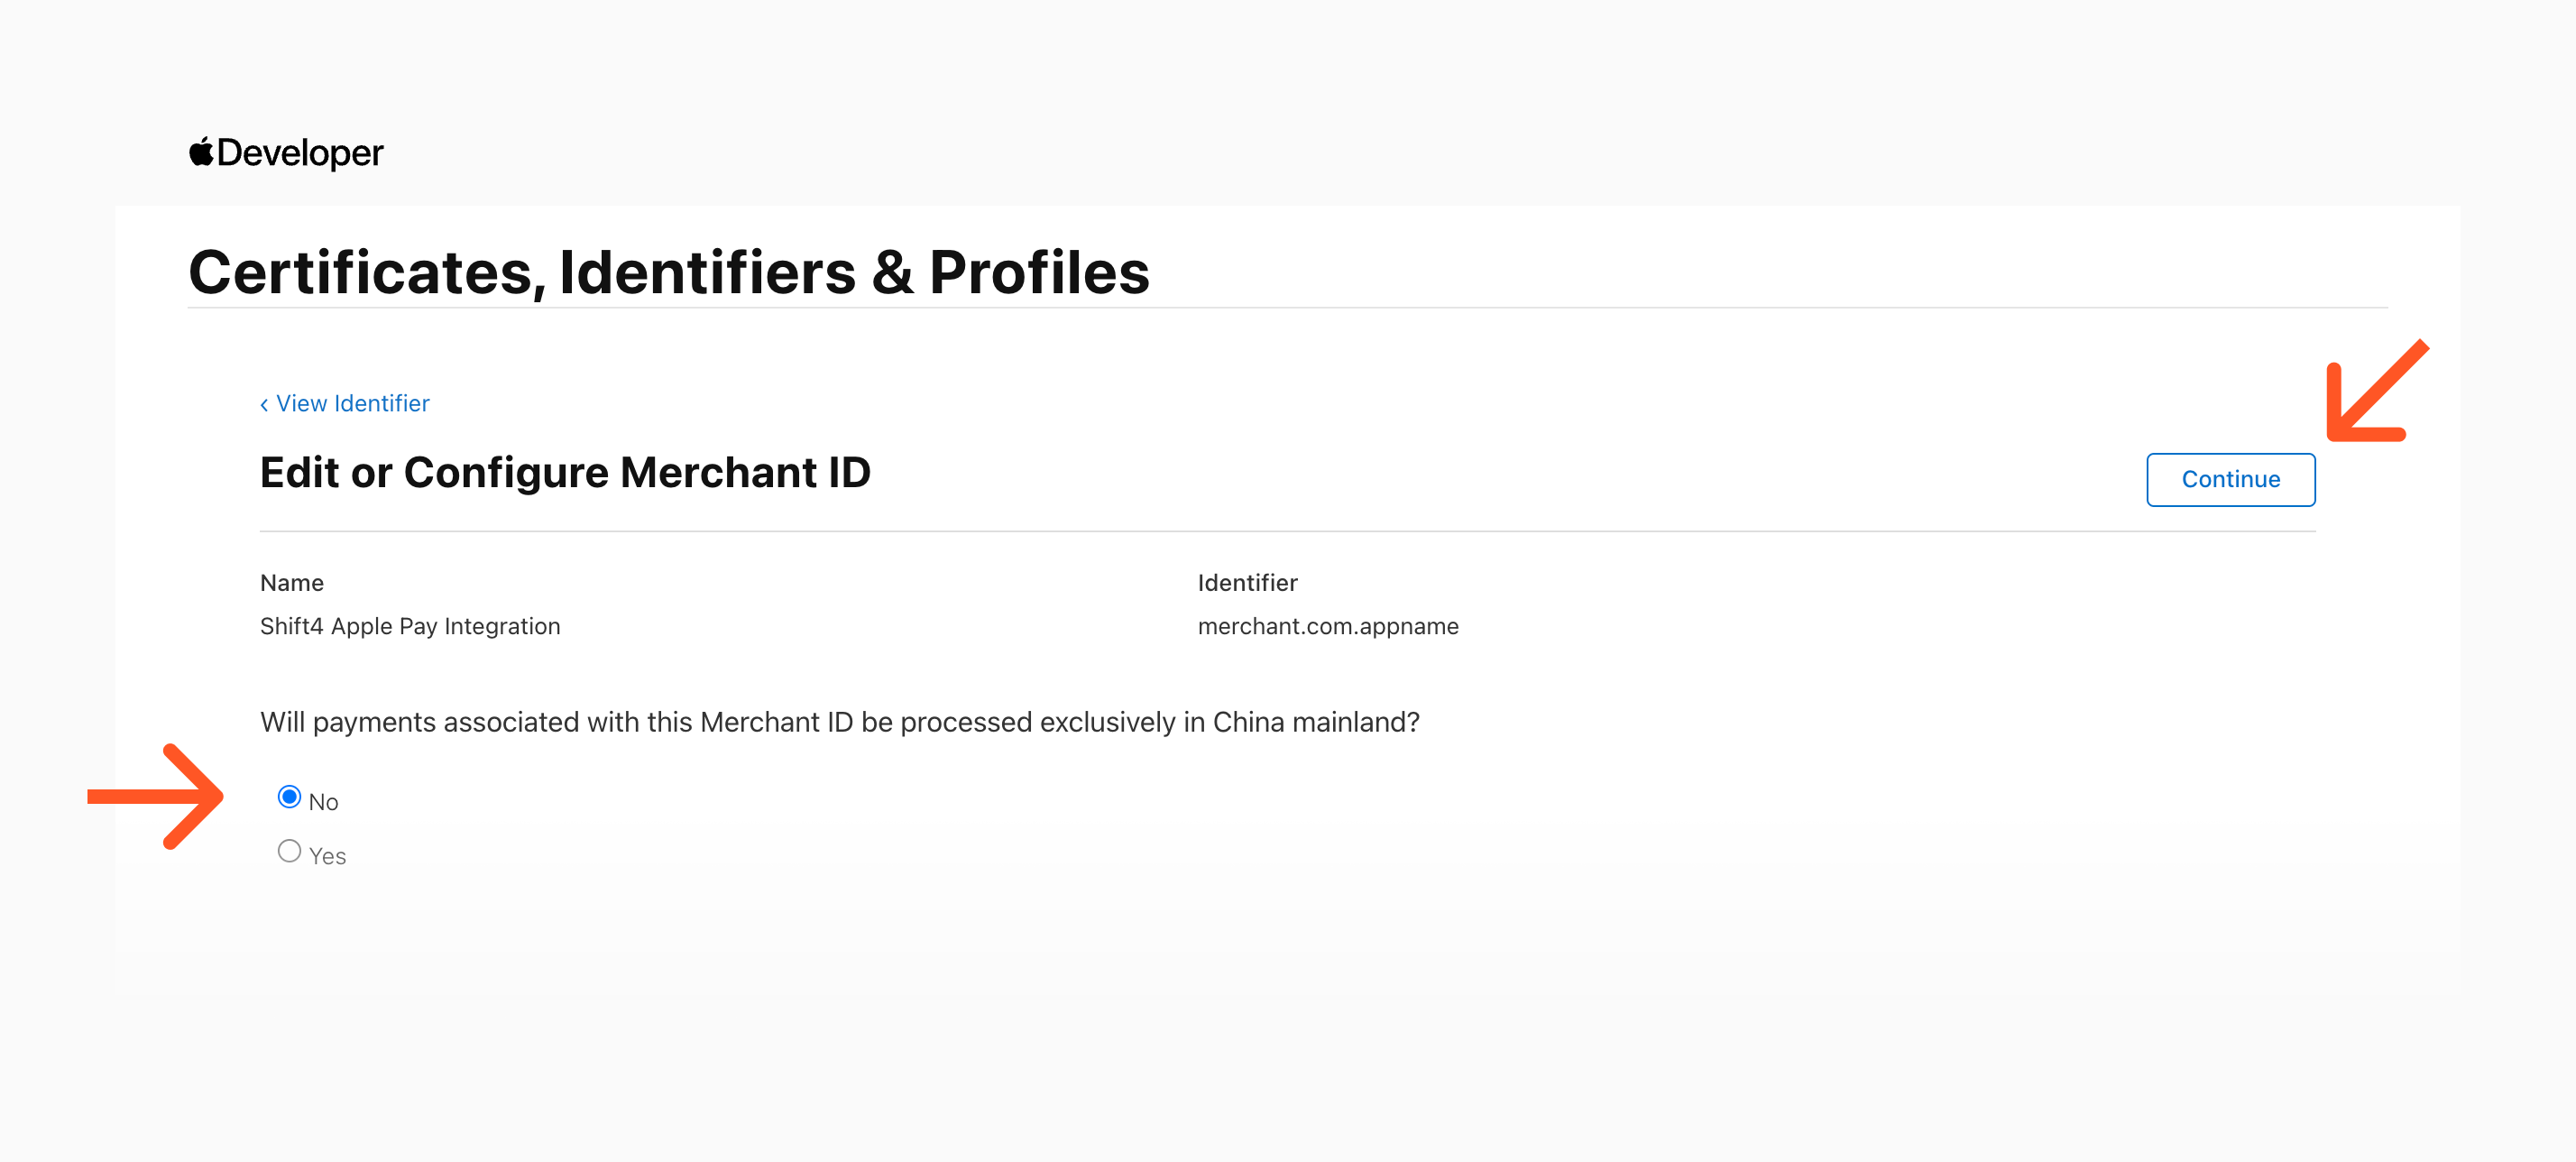
Fig. 10. Merchant ID configuration - step 2 - basic configuration.
Upload the Certificate Signing Request file downloaded from dev.shift4.com and click "Continue".
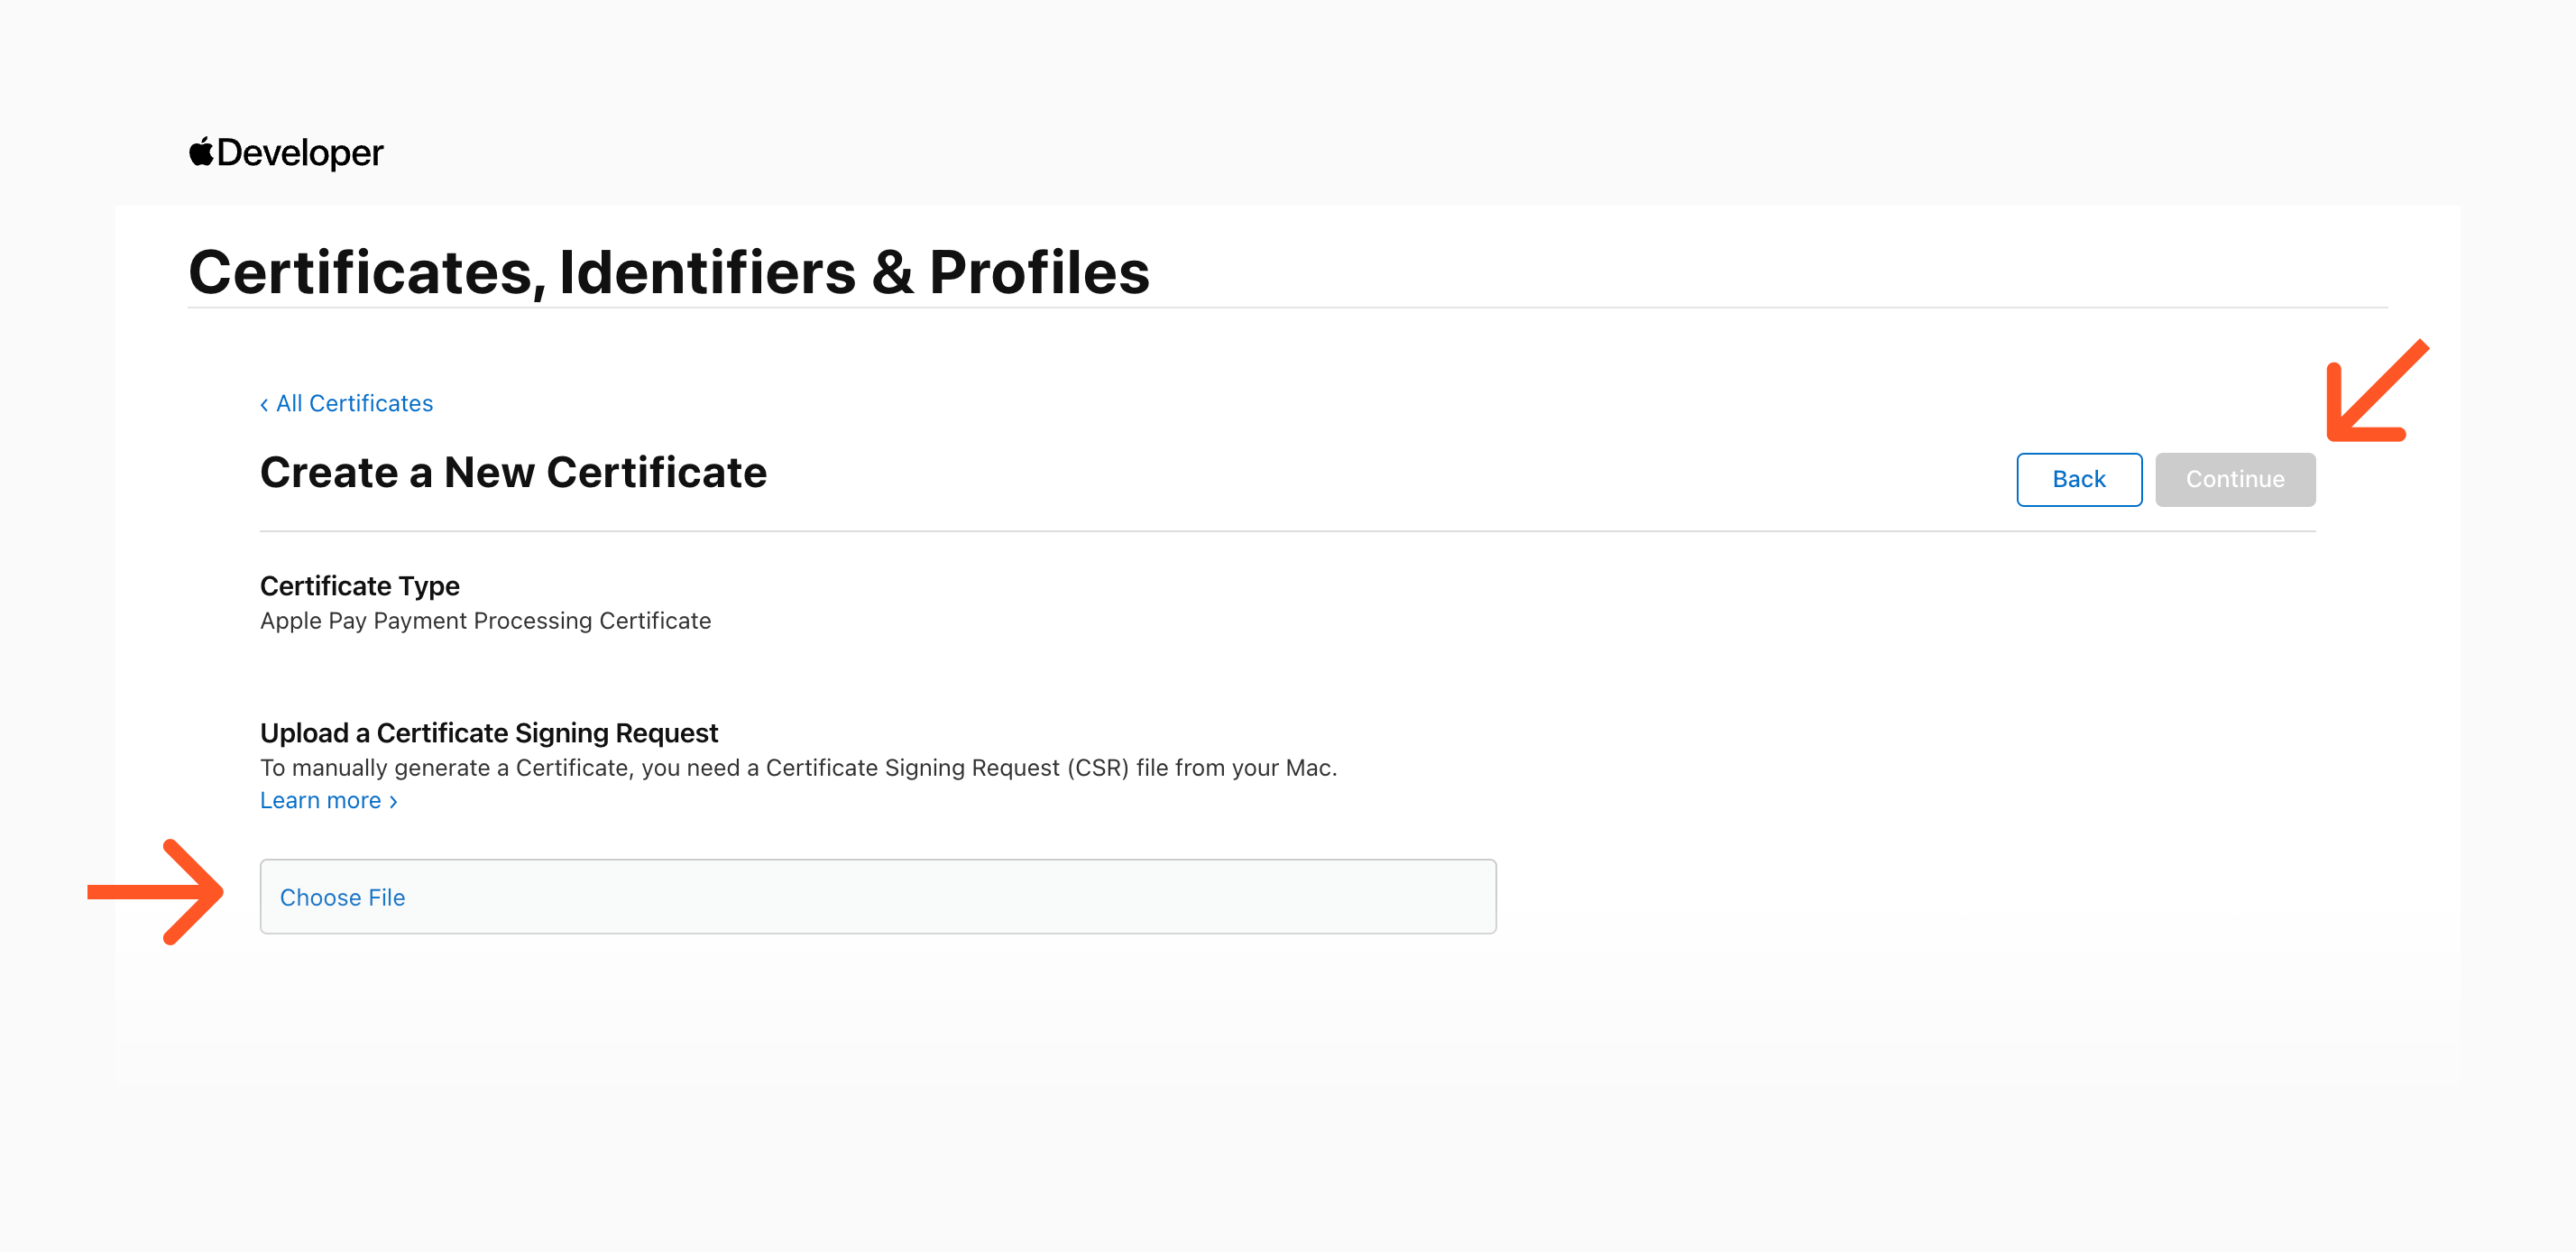
Fig. 11. Merchant ID configuration - step 3 - uploading Certificate Signing Request.
Download the generated Apple Pay Payment Processing Certificate then return to your Account Settings page and upload it there
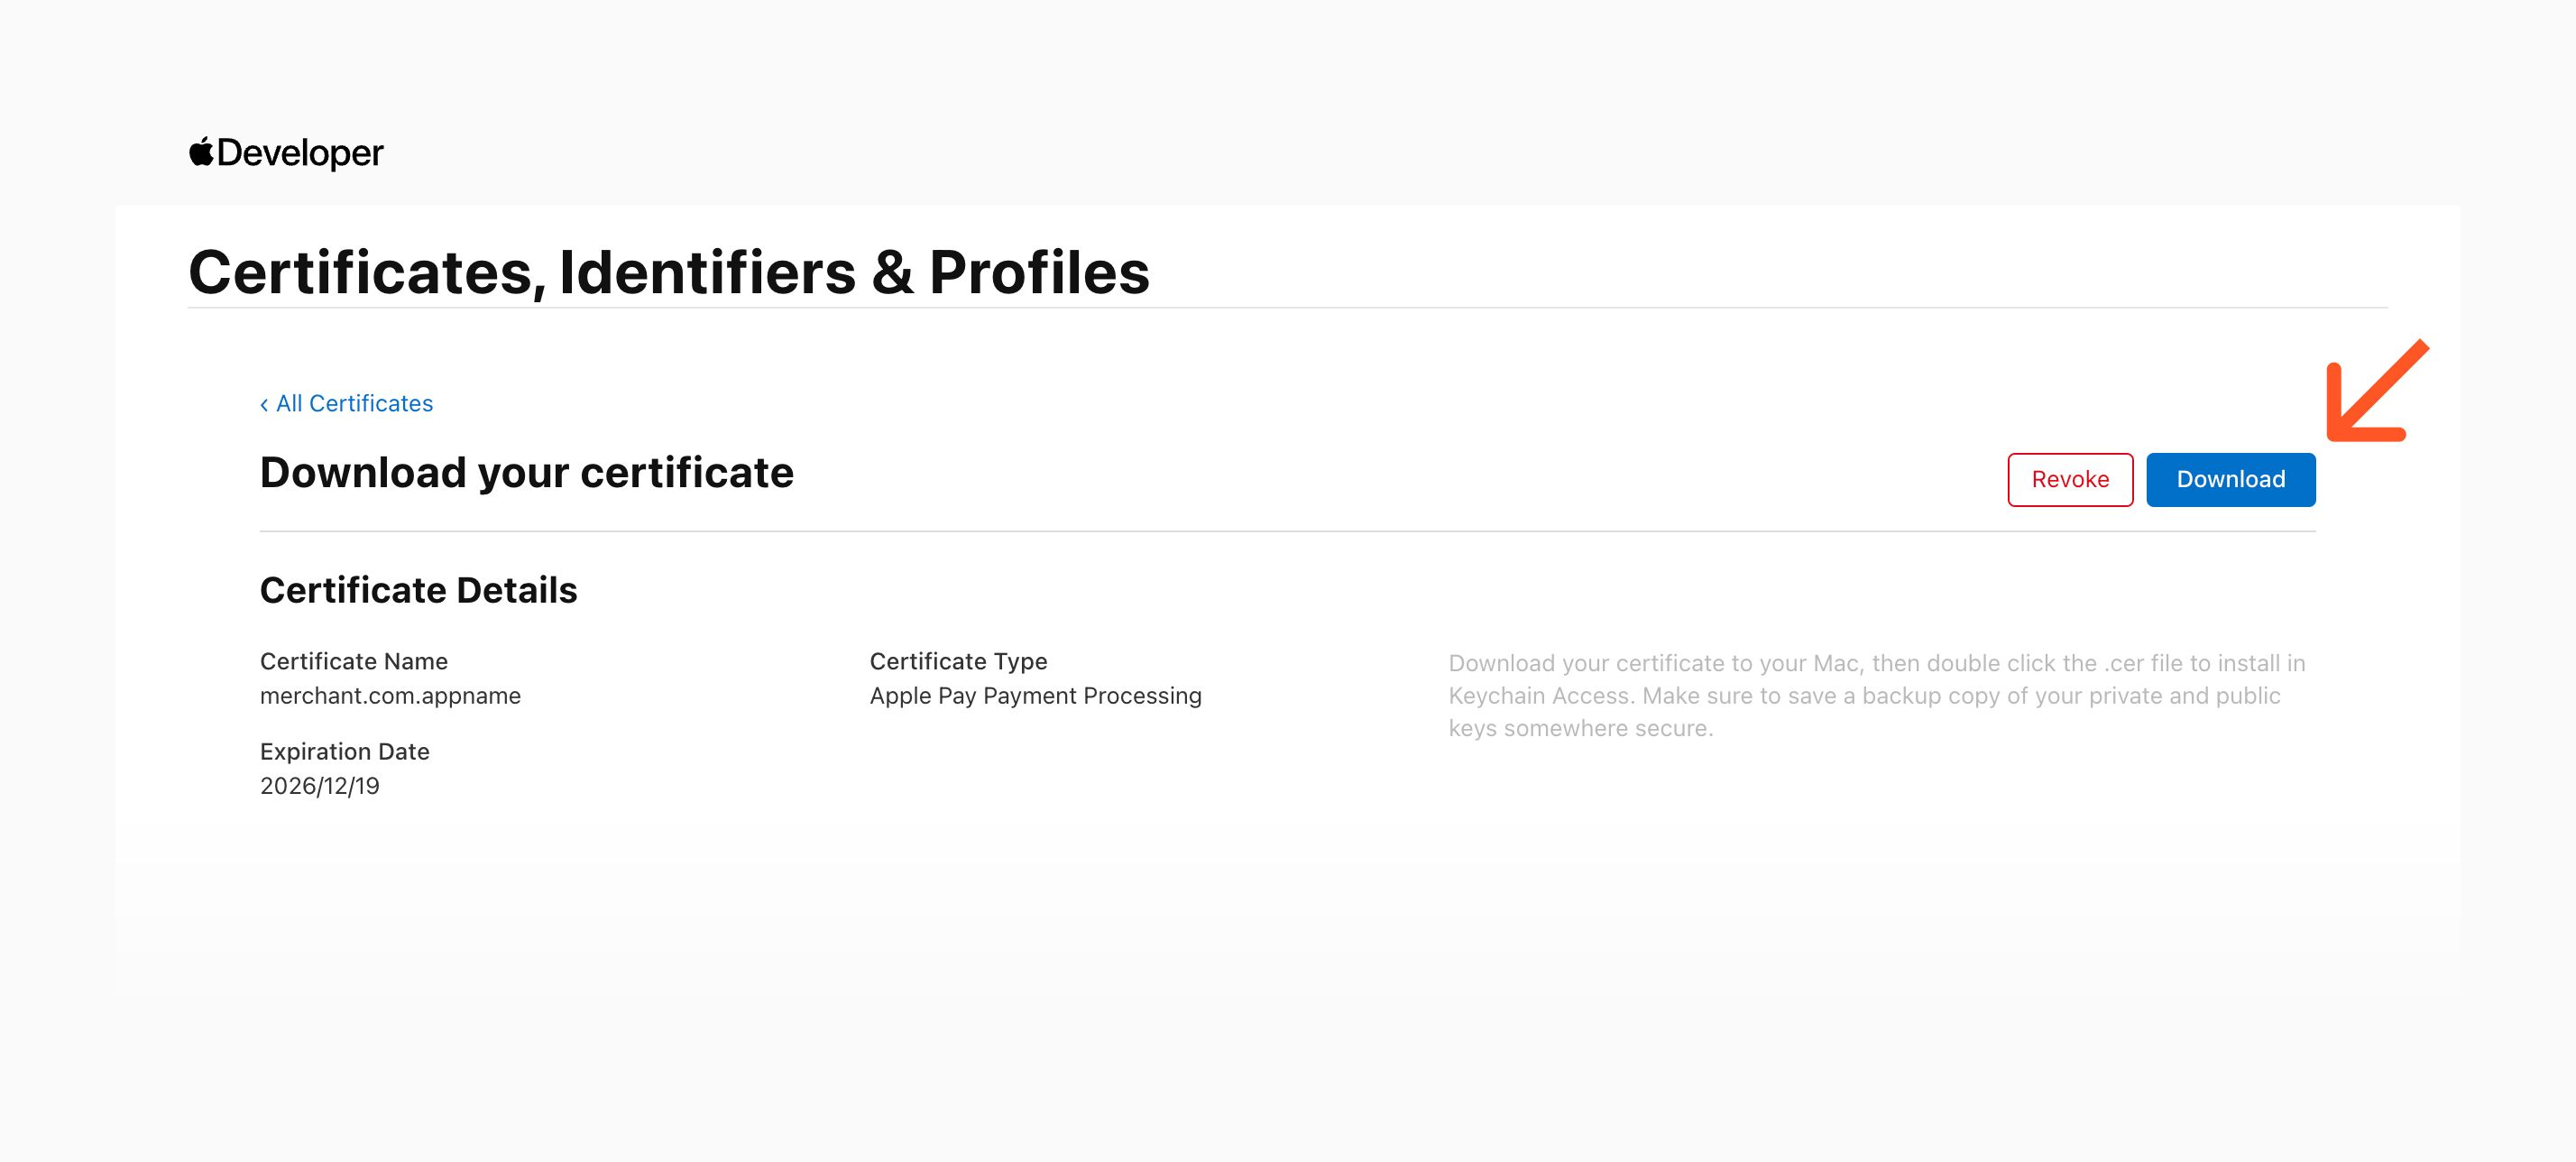
Fig. 12. Merchant ID configuration - step 4 - downloading certificate.
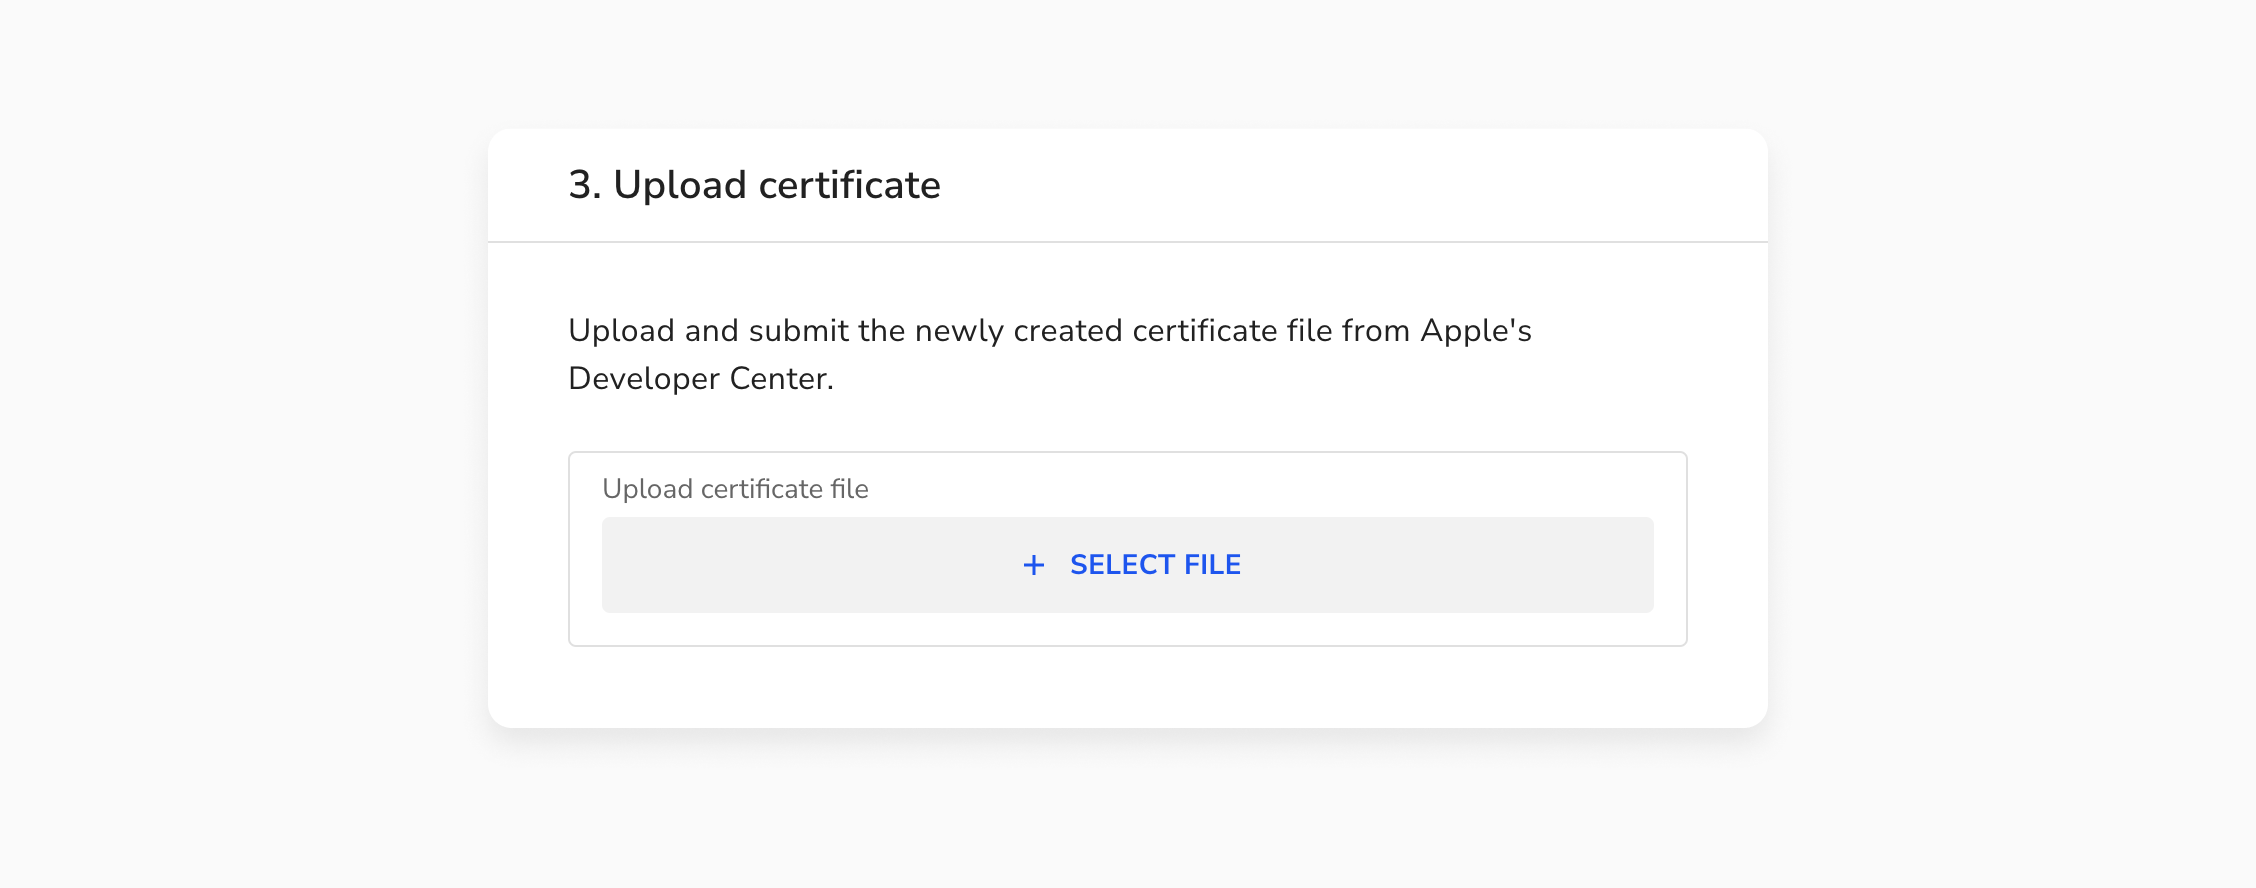
Fig. 13. Uploading certificate at dev.shift4.com
After the successful upload a new certificate in the section Apple Pay Processing certificates appears. Each certificate has an expiration date and can be revoked through the context menu. Once revoked the certificate cannot be reactivated. A new certificate must be uploaded
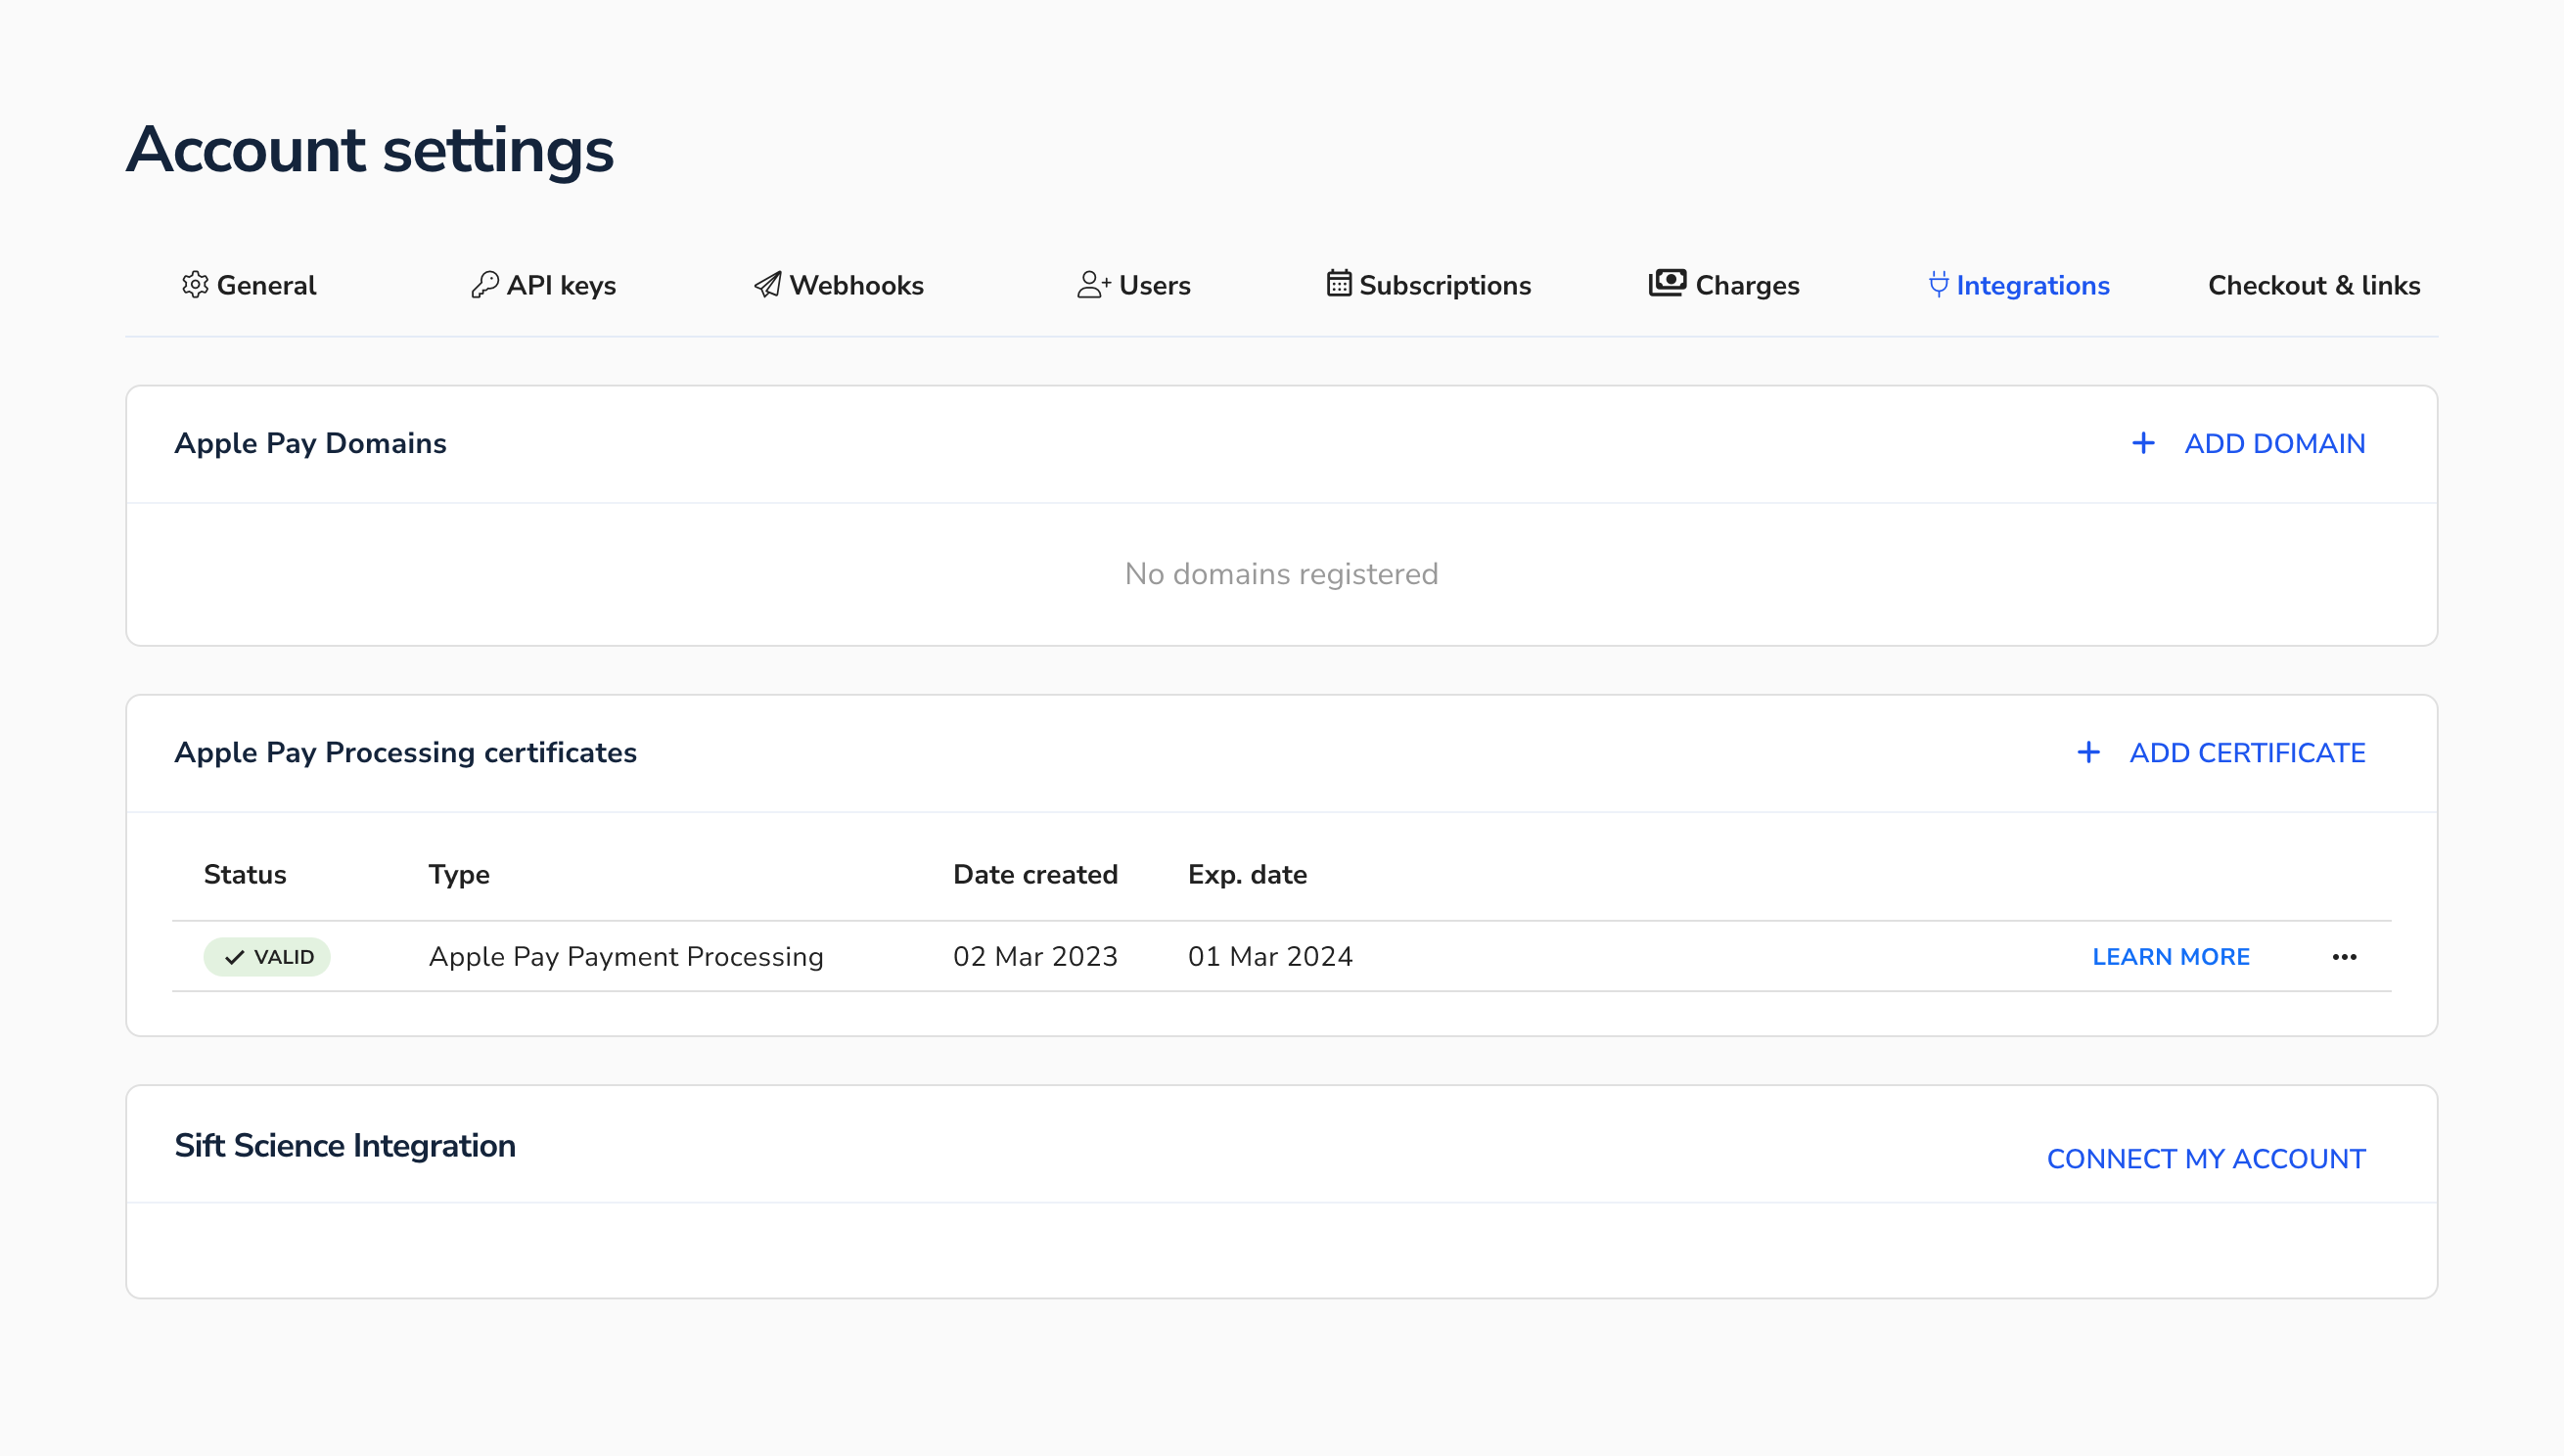
Fig. 14. Account Settings after the successful upload
Apple Pay Merchant Certificate needs to be created in a similar way as the Apple Pay Payment Processing Certificate. You need to follow this procedure except for generating and processing Certificate Signing Request through your Account Settings at dev.shift4.com
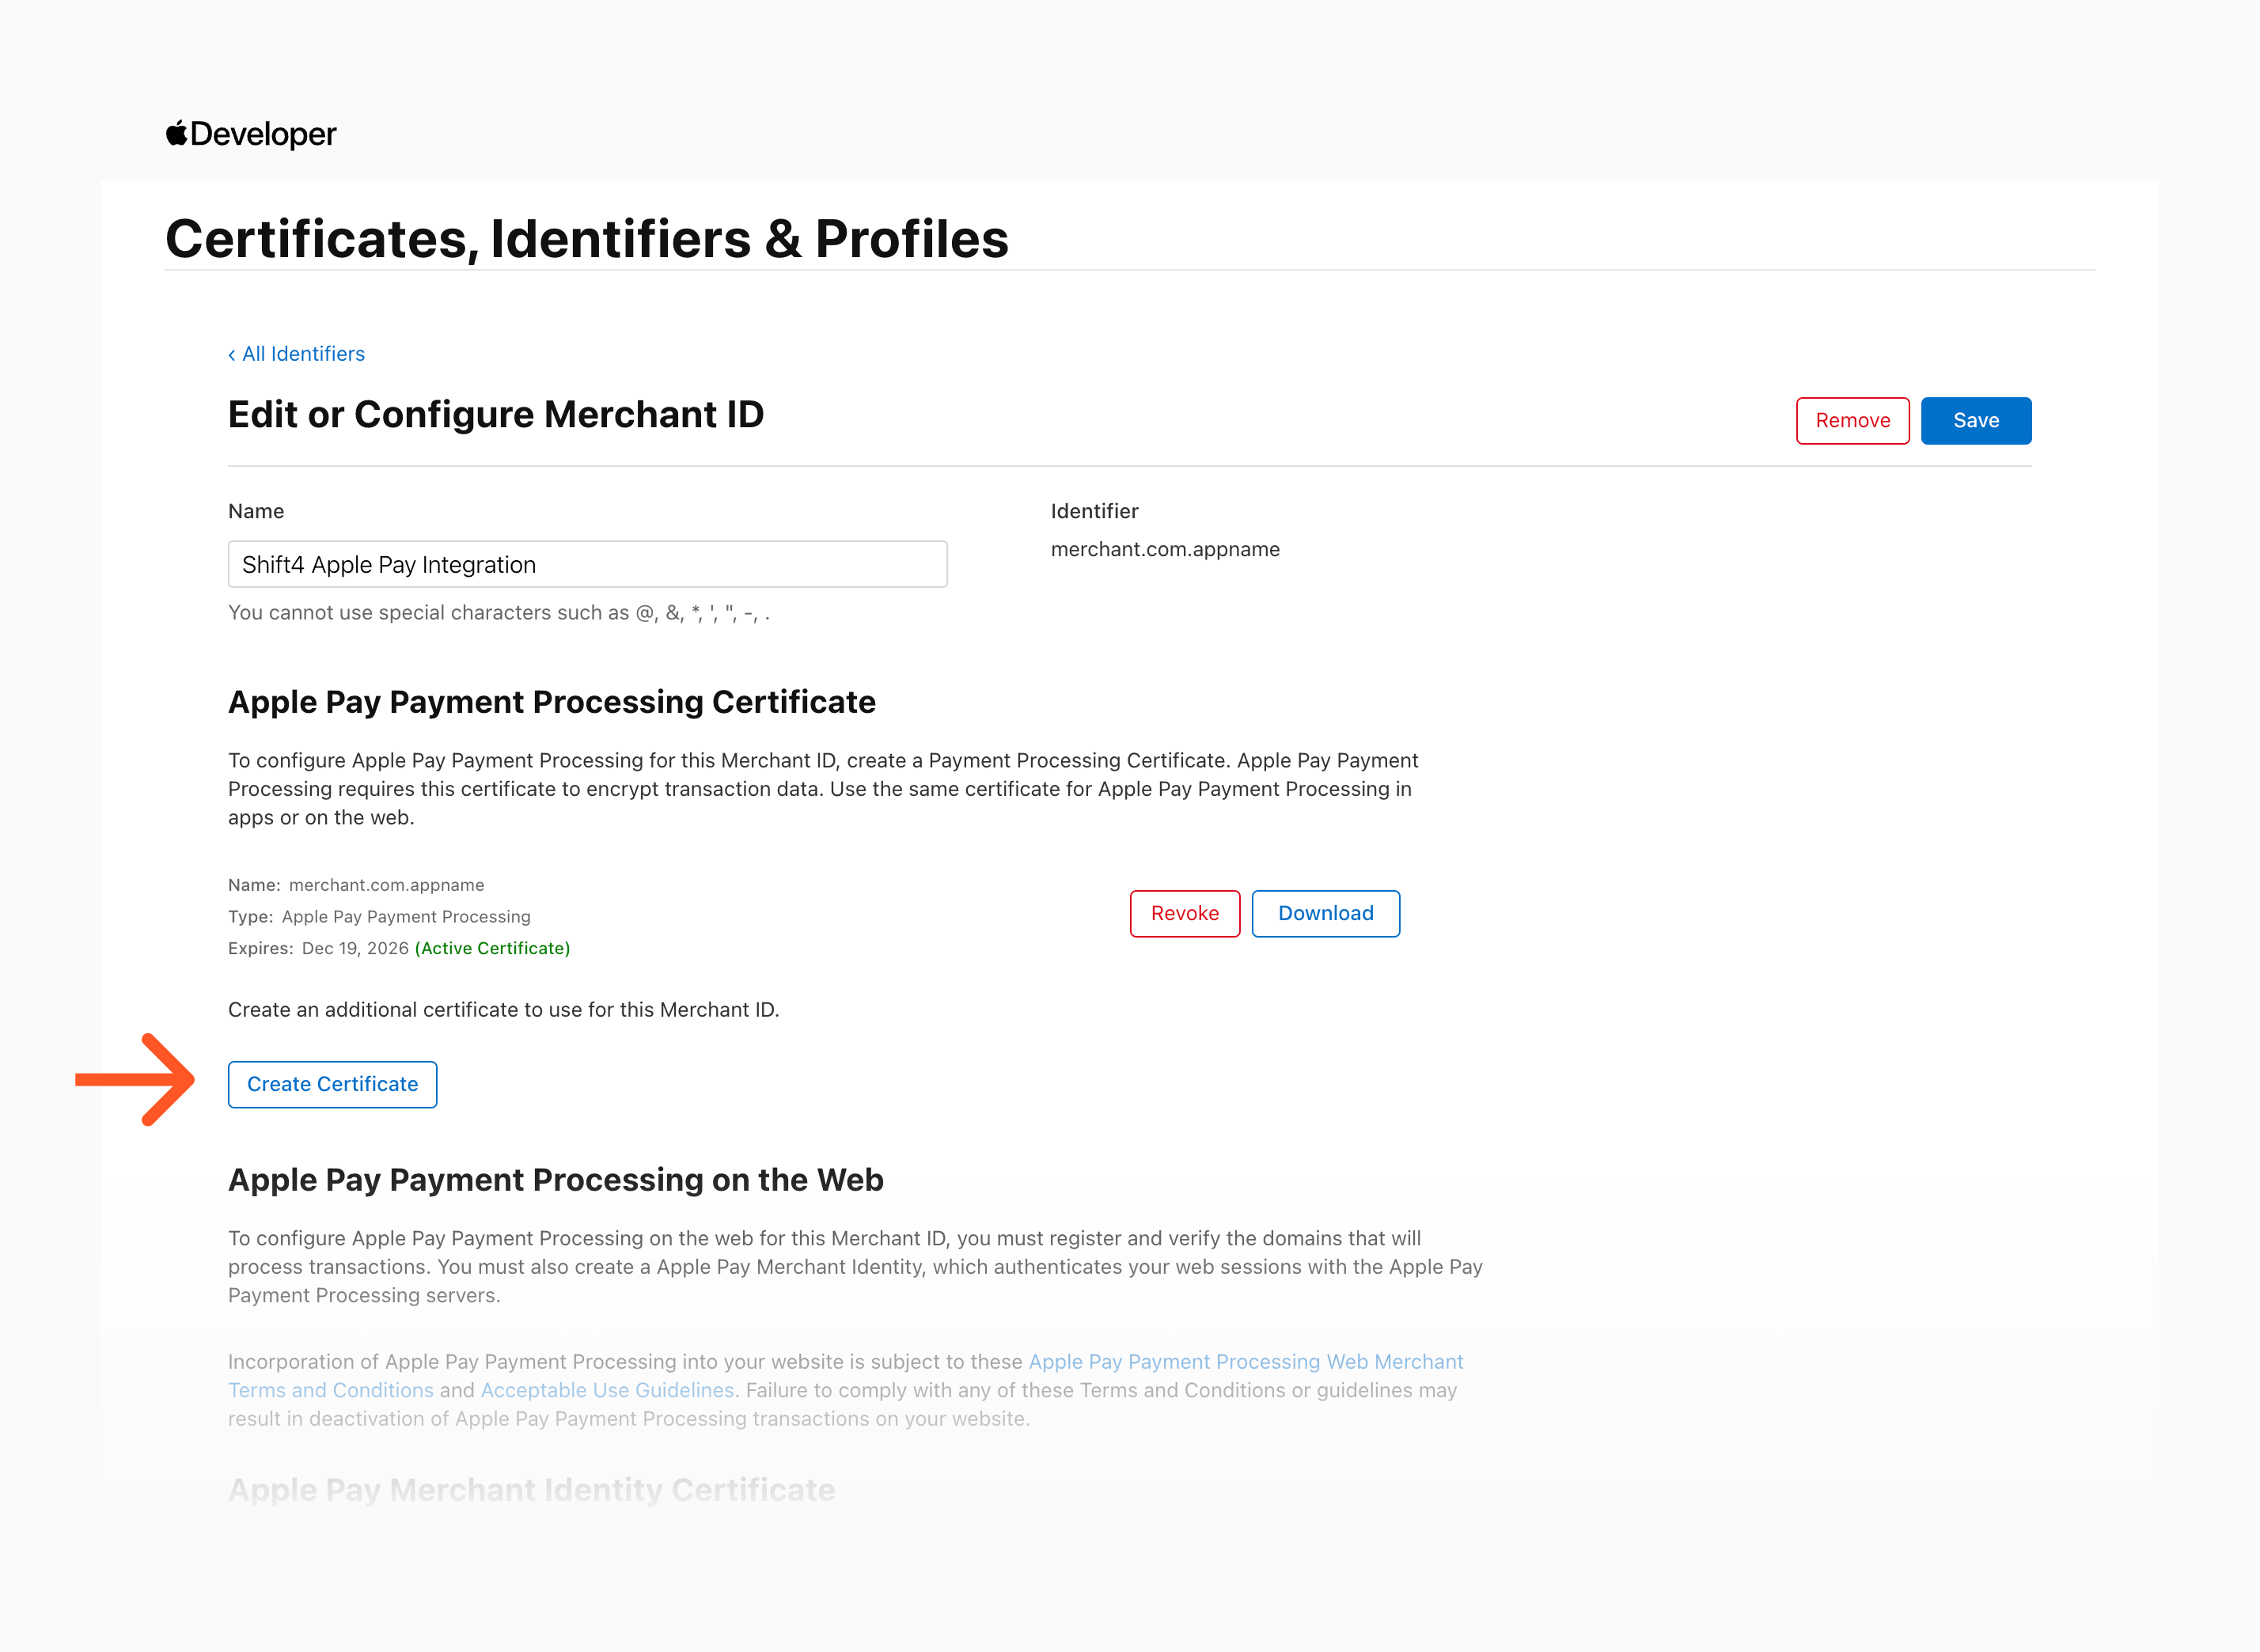
Fig. 15. Merchant ID configuration - step 5 - the "Create Certificate" button on the Merchant ID configuration page.
The arrow in Fig. 15 marks the Create Certificate button in the Apple Pay Payment Processing Certificate section. To create the Merchant Identity Certificate, use the Create Certificate button in the Apple Pay Merchant Identity Certificate section further down the same page.
The final step is to set up the Merchant Domains for your Apple Pay flow. Click the "Add Domain" button, as shown in Fig. 16
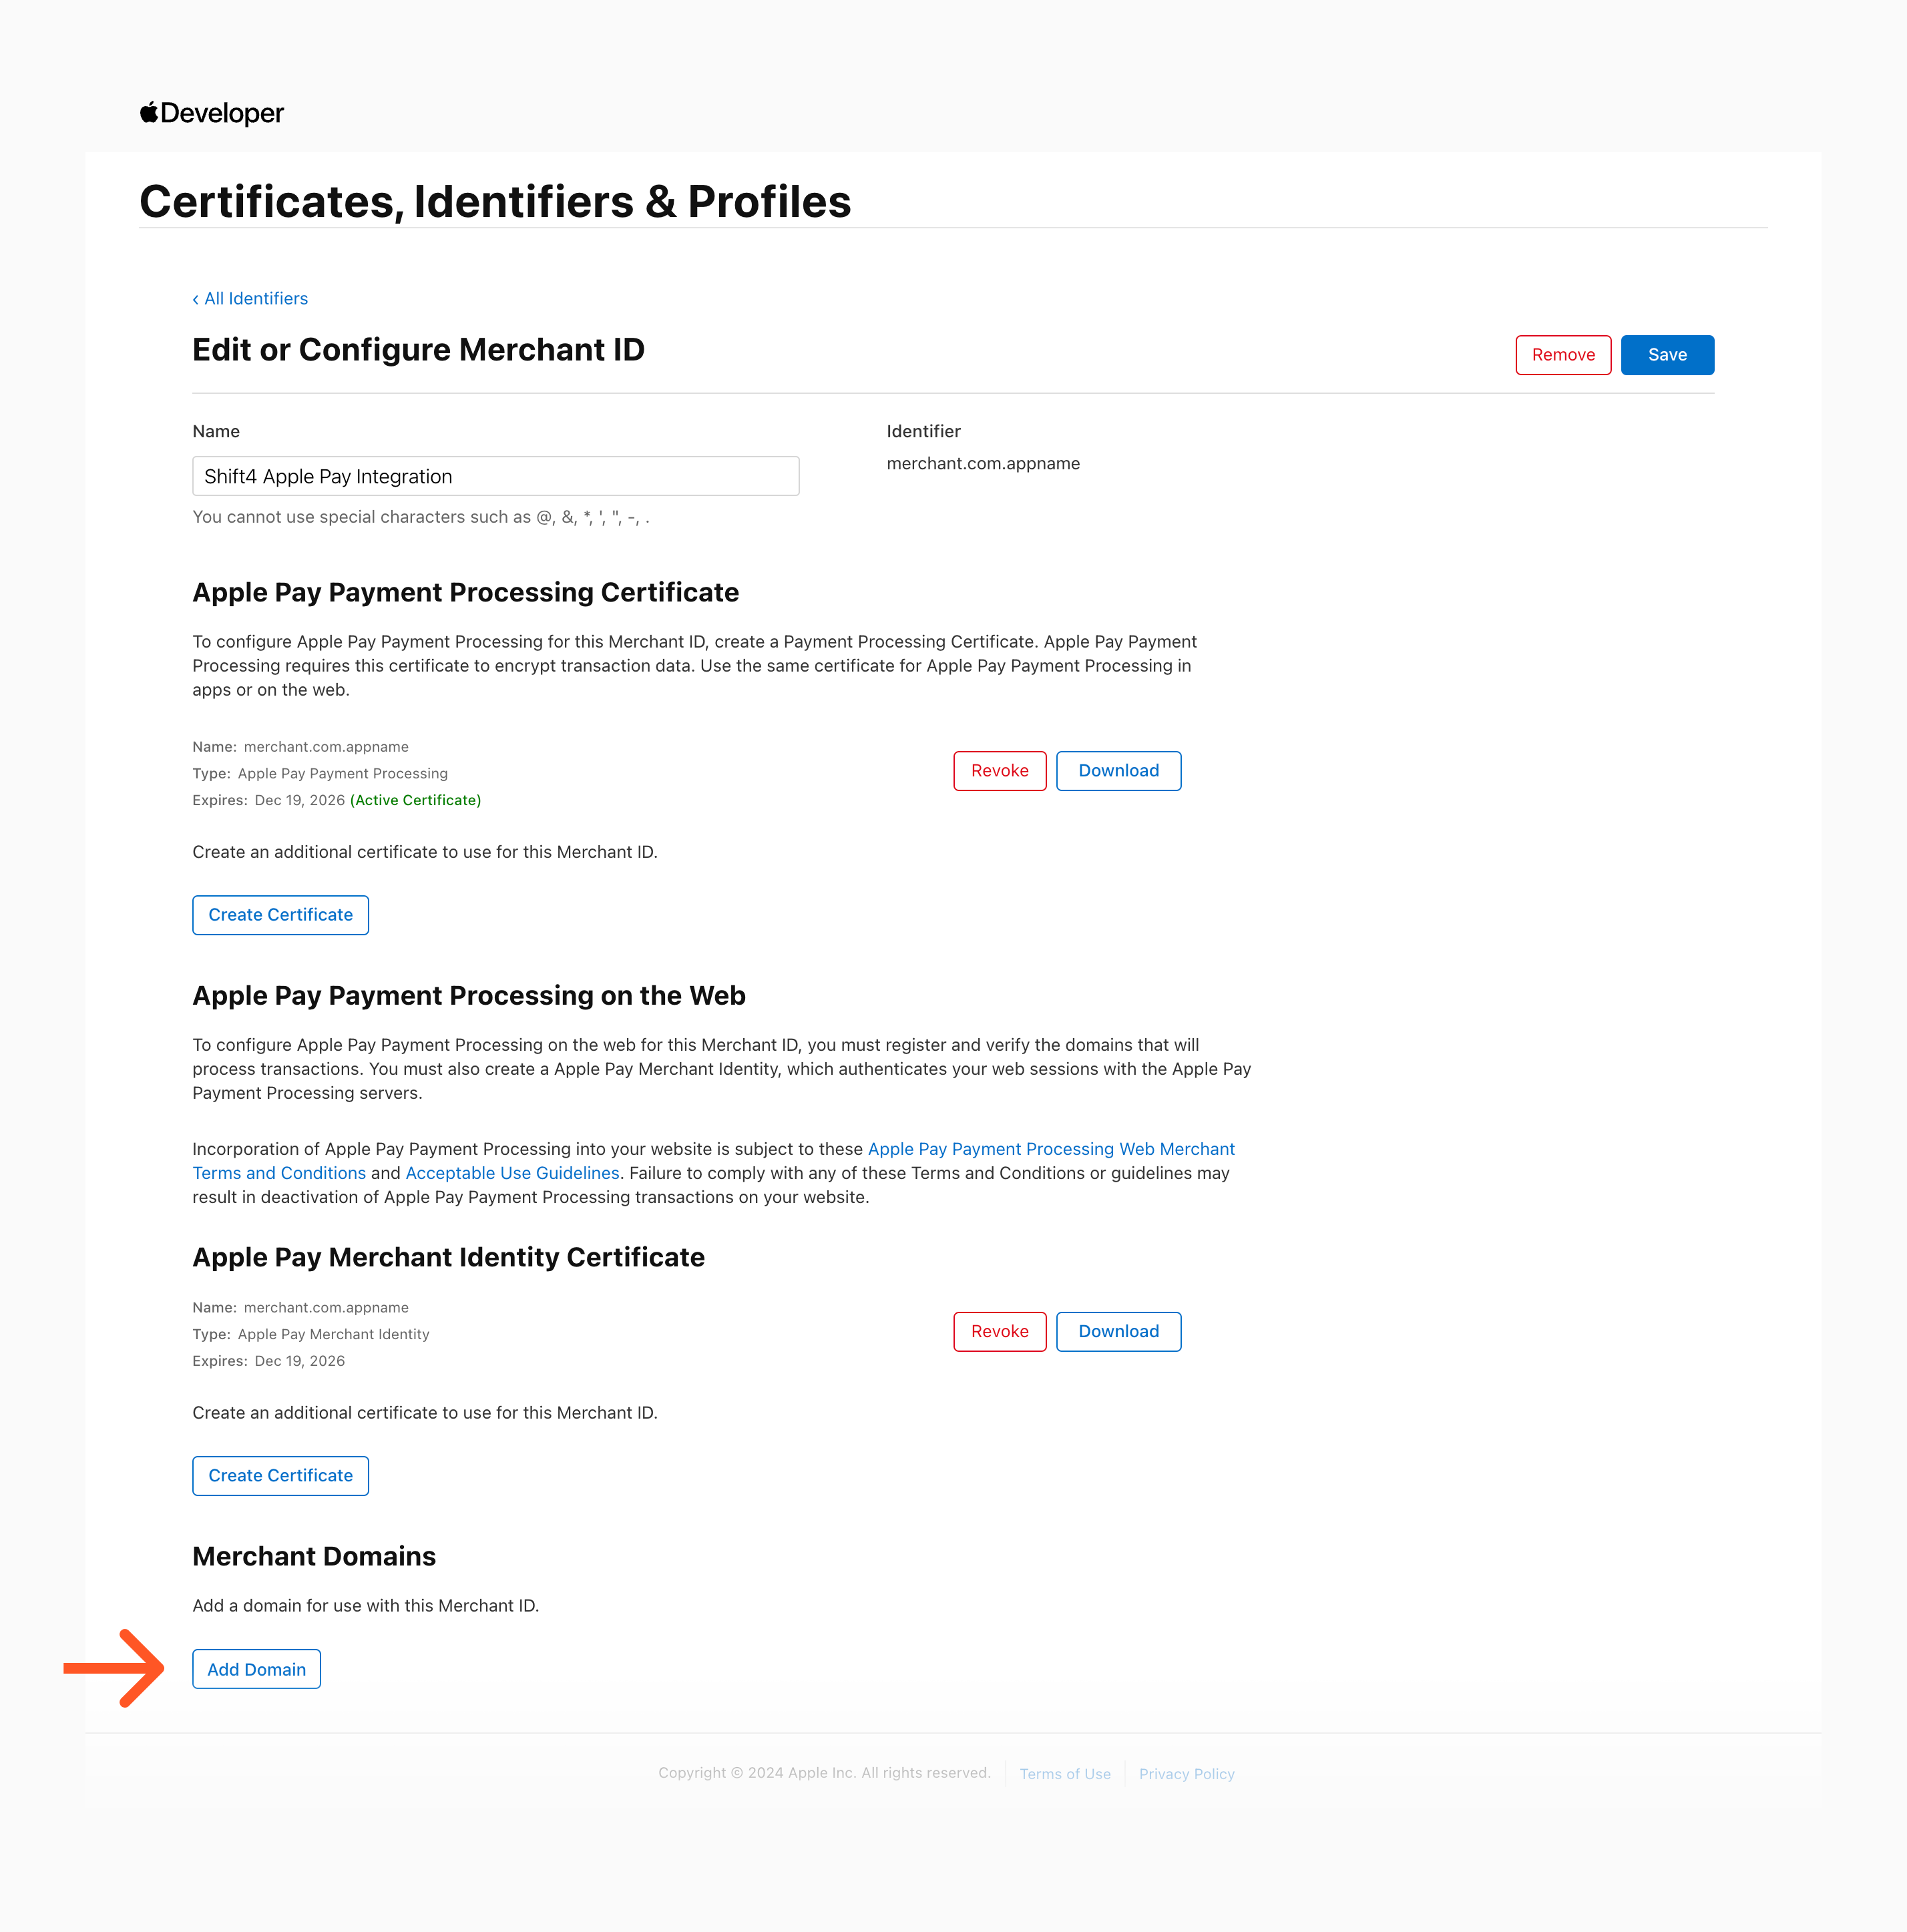
Fig. 16. Merchant ID configuration - step 6 - adding Merchant Domains.
Specify the domain name and click the "Save" button, as shown in the image below.
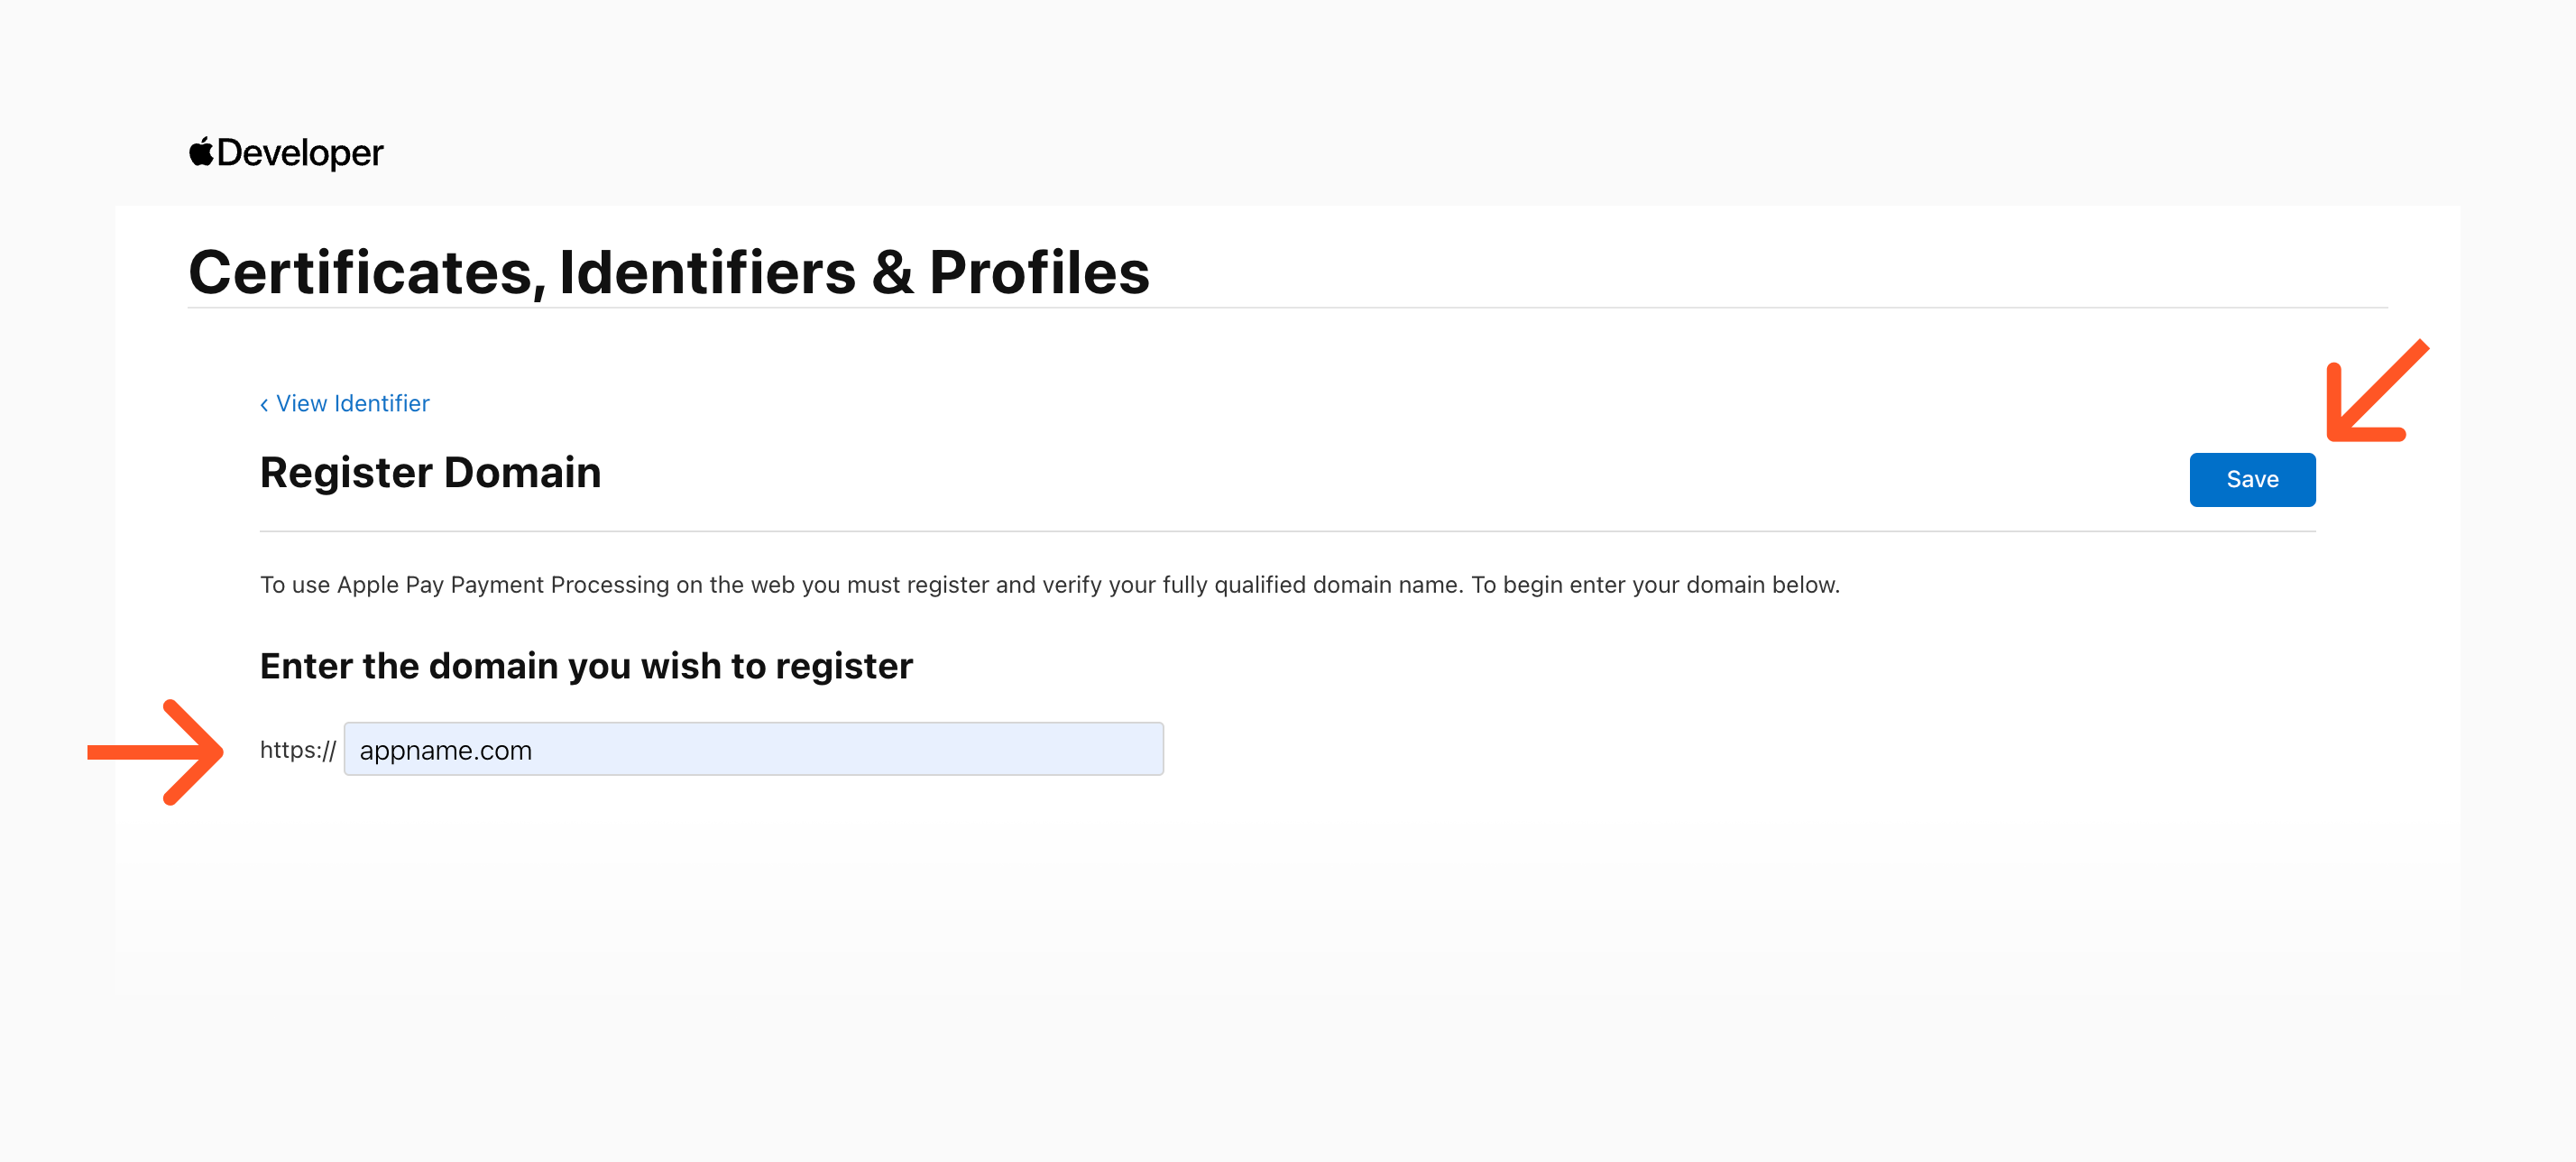
Fig. 17. Merchant ID configuration - step 7 - defining Merchant Domain.
Download the apple-developer-merchantid-domain-association.txt file and upload it under the specified folder (your.domain.com/.well-known/) so that it is publicly accessible for verification. Click the "Verify" button; note that you may verify the domain at a later stage.
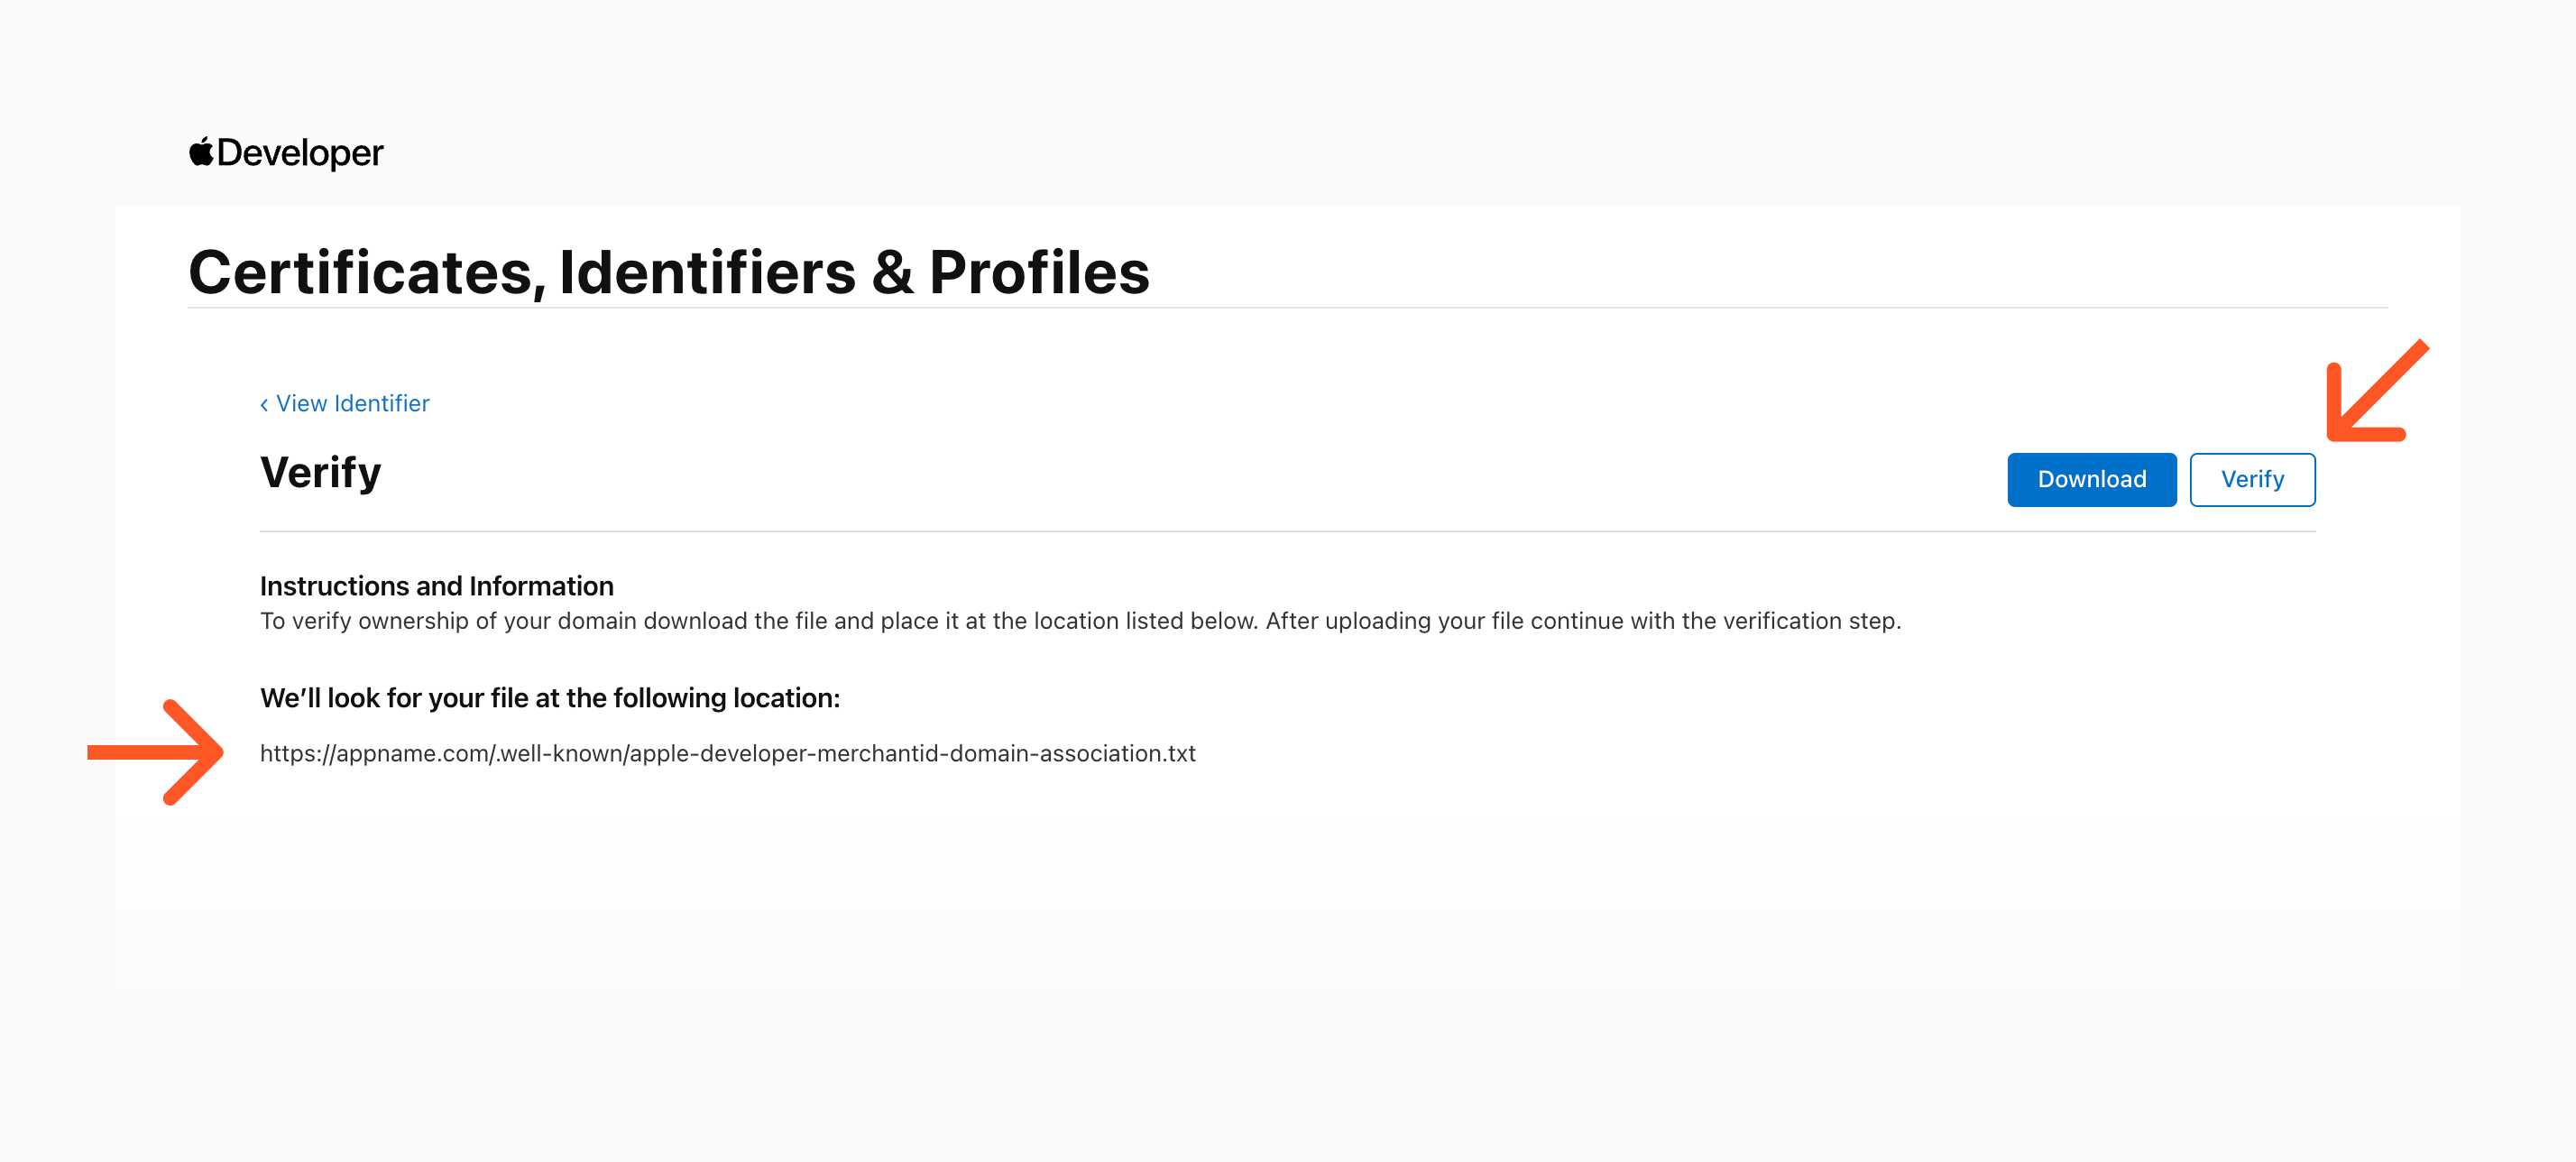
Fig. 18. Merchant ID configuration - step 8 - downloading apple-developer-merchantid-domain-association.txt file.
Your Merchant ID should now be set up. Confirm that all sections are configured, all certificates are active, and your domain is verified. You can do so from the Merchant configuration page if you have not verified your domain yet.
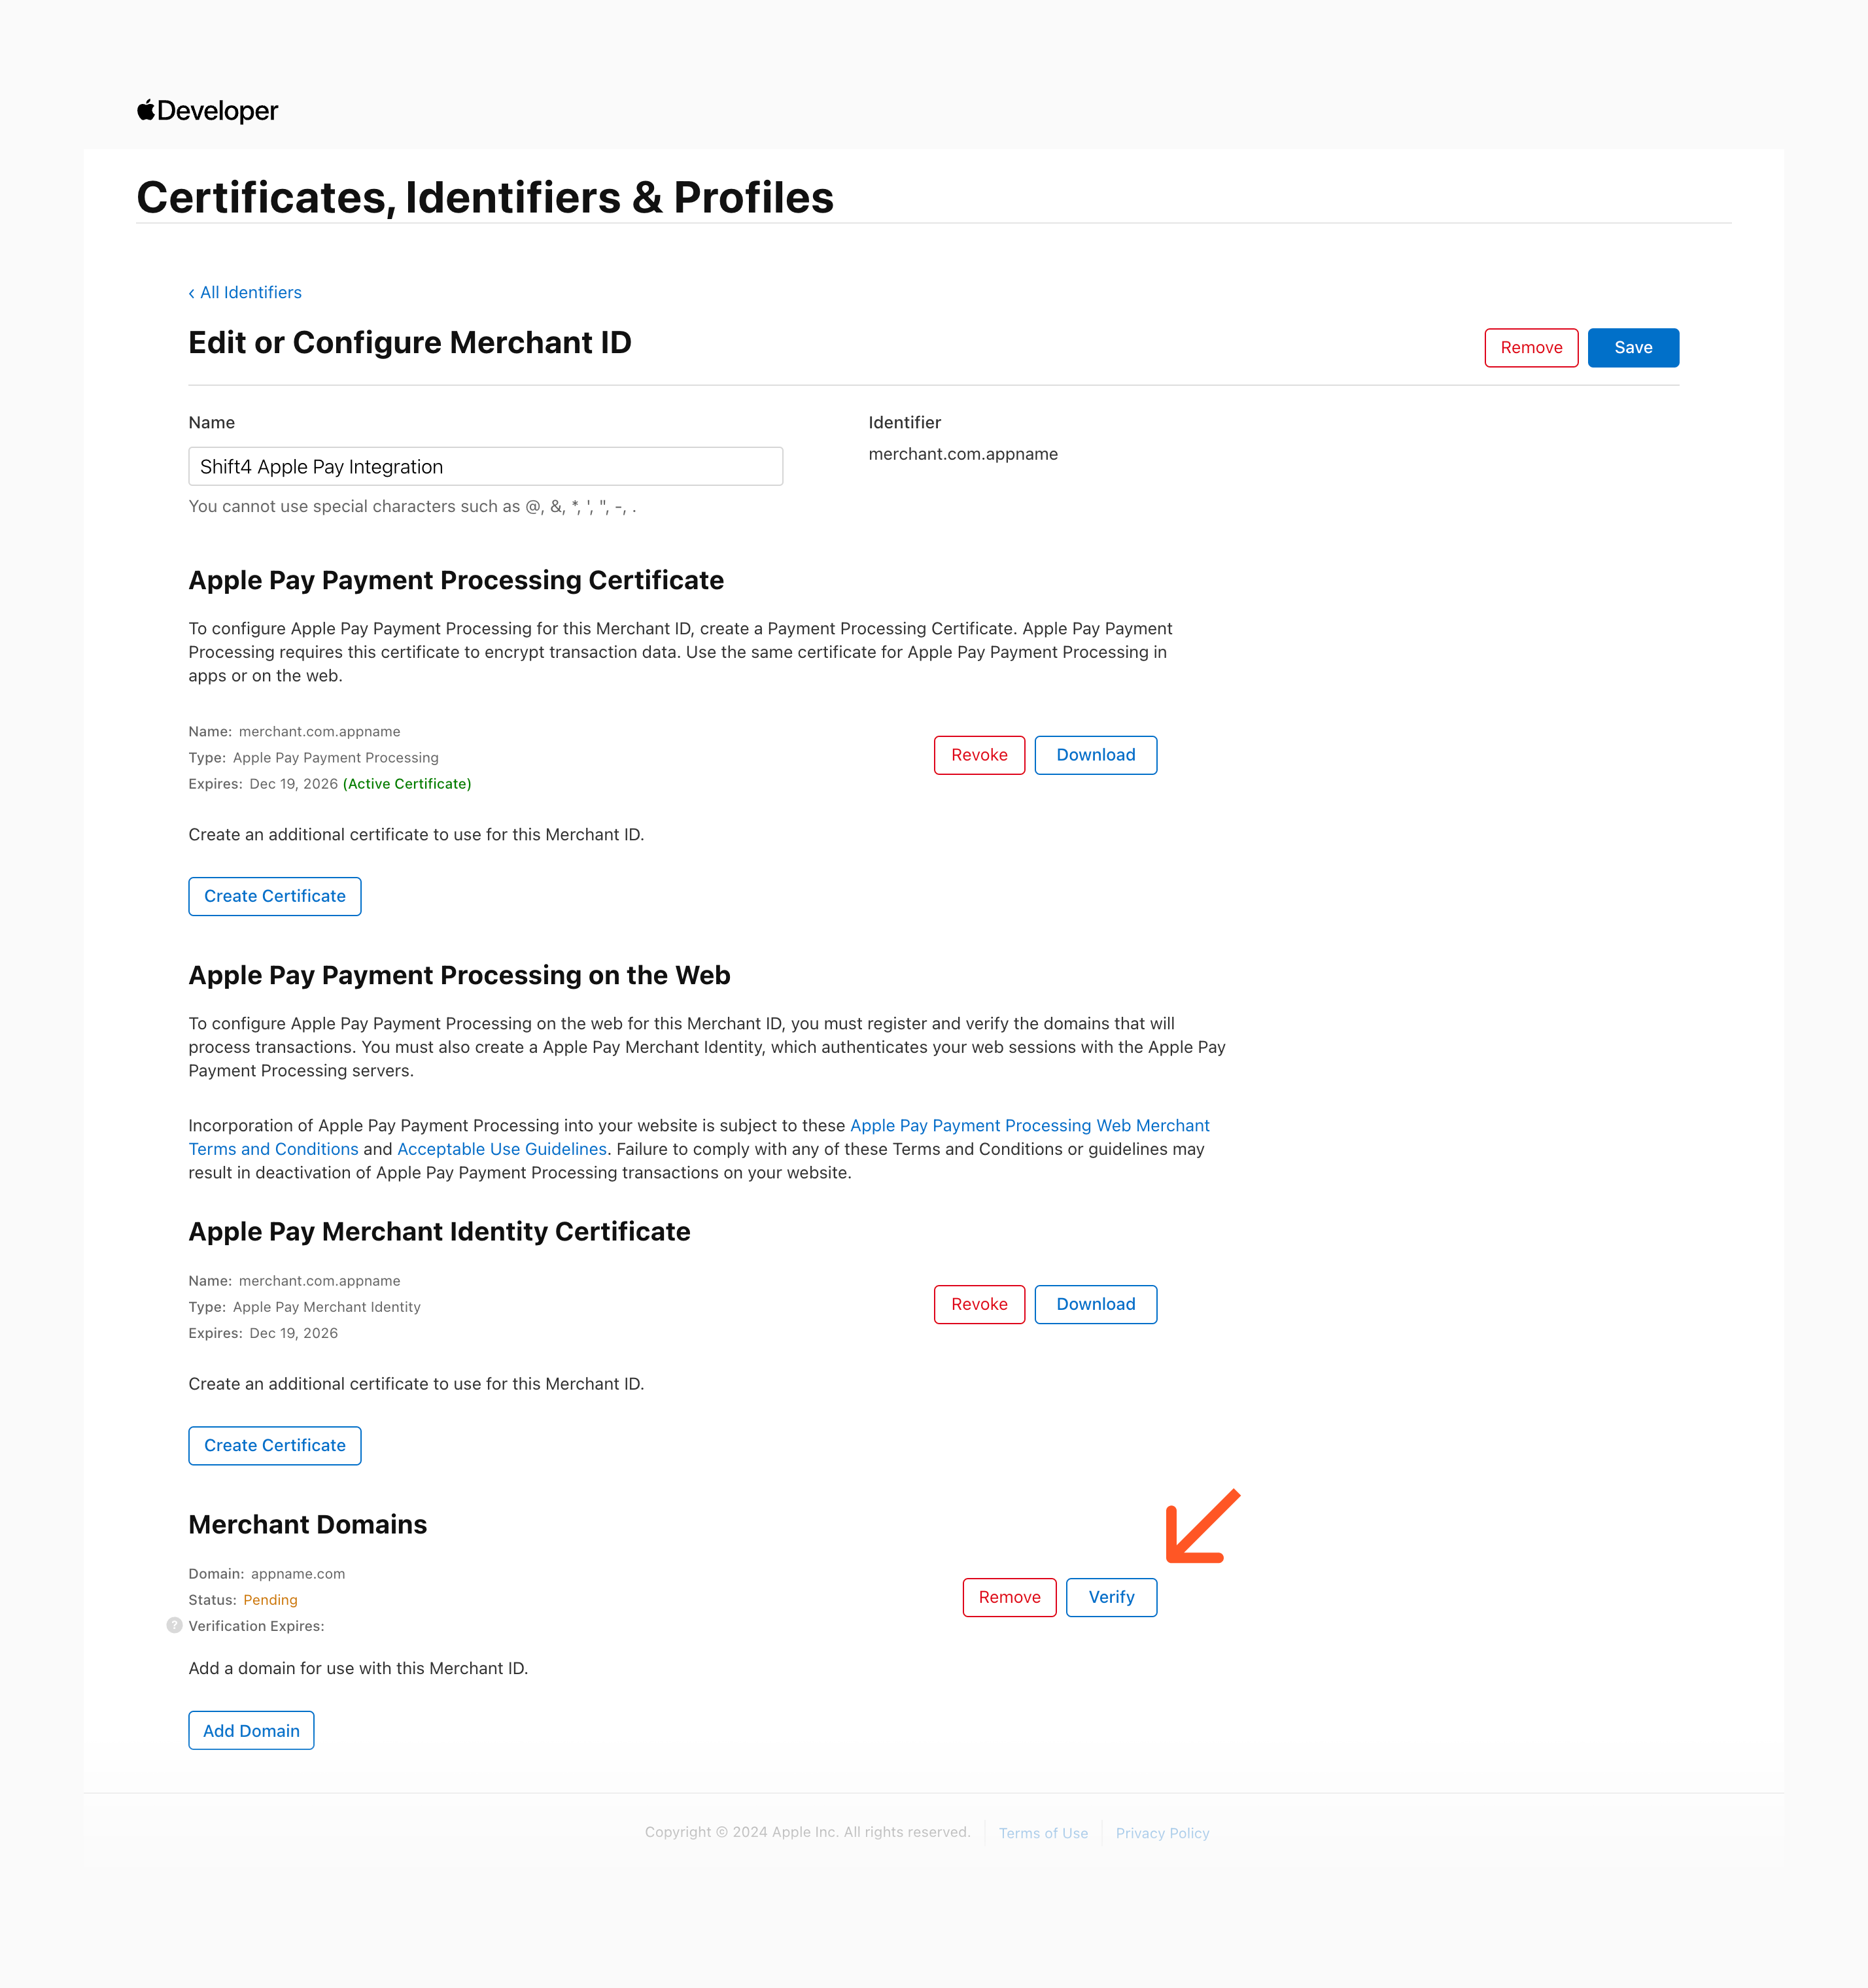
Fig. 19. Merchant ID configuration - step 9 - verification
Once your Merchant ID is configured, you can still manage your certificates and domains. If your Apple Pay Merchant Identity Certificate is approaching the expiration date, please contact Shift4 support to obtain a new Certificate Signing Request that will allow you to generate a new certificate. You can have two certificates defined simultaneously to facilitate certificate rollover.
- Check Apple Pay example
- Review Acceptable Use Guidelines