Salesforce Commerce Cloud
Introduction
The Salesforce B2C Platform, formerly known as Demandware, provides a comprehensive commerce
solution for merchants, including seamless payment acceptance. Through the integration of Shift4's B2C
Cartridge, merchants utilizing B2C Storefronts can securely process all transactions, leveraging the core
capabilities of Shift4 for payment processing.
This cartridge provides support for both the SiteGenesis (SG)
and Storefront Reference Architecture (SFRA) integration types.
- Secure Checkout – Deliver a frictionless payment experience to your customers using Credit, Debit,
or Apple Pay methods. - Store Card – Securely vault and tokenize sensitive card information allowing loyal customers to
expedite checkout for future purchases. - Express checkout with Apple Pay – Enable Apple Pay users to expedite their checkout experience
using a streamlined and secure payment method they are familiar with.
Shift4 Configuration
This document serves as a configuration guide for the Shift4 Salesforce B2C Commerce Cloud
app. The
following sections will walk you through the configuration of Cartridges to your B2C
Commerce Cloud
Platform and completing the Setup Assistant. This guide is meant to walk you
through configuring and
implementing Shift4 payments with SiteGenesis(SG) and Storefront
Reference Architecture(SFRA).
In order to access your B2C Commerce Cloud sandbox and/or your B2C Commerce Cloud
Account
Manager, Multi-Factor Authentication must be utilized to access your Sandbox. Session
timeouts will
occur frequently if the user does not do anything during their session on the
Business Manager Module.
You can use the Salesforce Authenticator app for access and can
download the app in the link below.
Configuring A New Sandbox
If you need to test the Shift4 integration in a sandbox, you will need to create a B2C sandbox,
and set up a
demo site. Once your sandbox is created, log into your sandbox, then navigate to
Administration > Site
Development > Site Import & Export
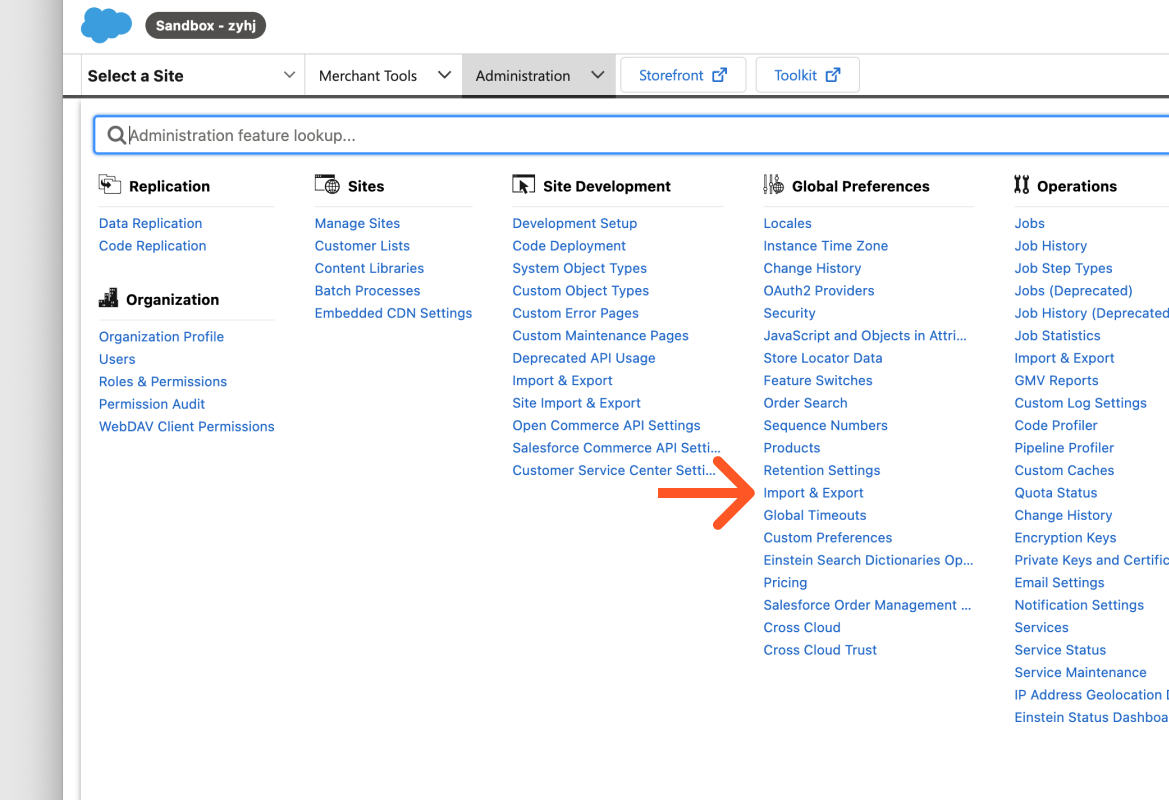
- Under the "Import" section, select the Storefront Reference Architecture Demo Sites option
- Click Import
- On the next page, select Storefront Reference Architecture base + All Optional Features
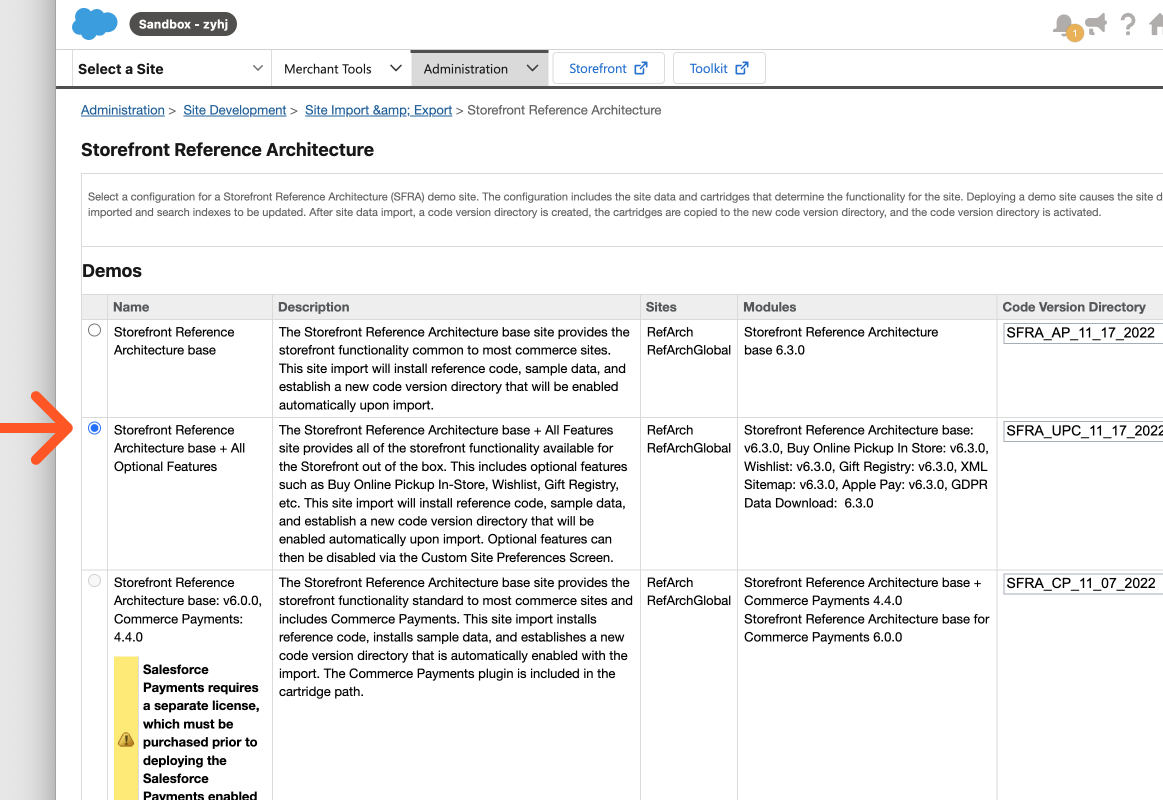
- Click Deploy in the bottom right corner
- Wait about 5-10 minutes while clicking the "Refresh" button in the bottom left corner of
the page until
the status is "Success" - After this, you should be able to select RefArch as a site from the top left menu, and
click the
Storefront button to see the sample storefront.
NOTE: If your project requires support for the legacy SiteGenesis architecture, you will need
to
follow the same steps listed above, except import the “SiteGenesis Demo Site”.
SiteGenesis
- Under the Import section, select the Sitegenesis Demo Sites option
- Click Import
- Wait about 5-10 minutes while clicking the "Refresh" button in the bottom left corner of
the page until
the status is "Success" - After this, you should be able to select SiteGenesis as a site from the top left menu, and
click the
Storefront button to see the sample storefront.
Retrieving Shift4 Cartridge
- Download the Shift4 Cartridge ZIP file here: https://github.com/shift4developer/shift4-salesforce-b2c
- Unzip the file. This should create a folder called Shift4-Payments-B2C
Deploying Shift4 Cartridge To Your B2C Instance
B2C cartridges are uploaded using a tool called dwupload, which is an NPM package. This tool is
installed
with the NPM program
- Download and install NPM here: https://nodejs.org/en/download
- Open a terminal at the cartridge base folder
- Run this command: npm install
- This will install the dwupload tool, along with other dependencies
NOTE: Before running this command in your terminal please ensure you have
access to your B2C
instance!
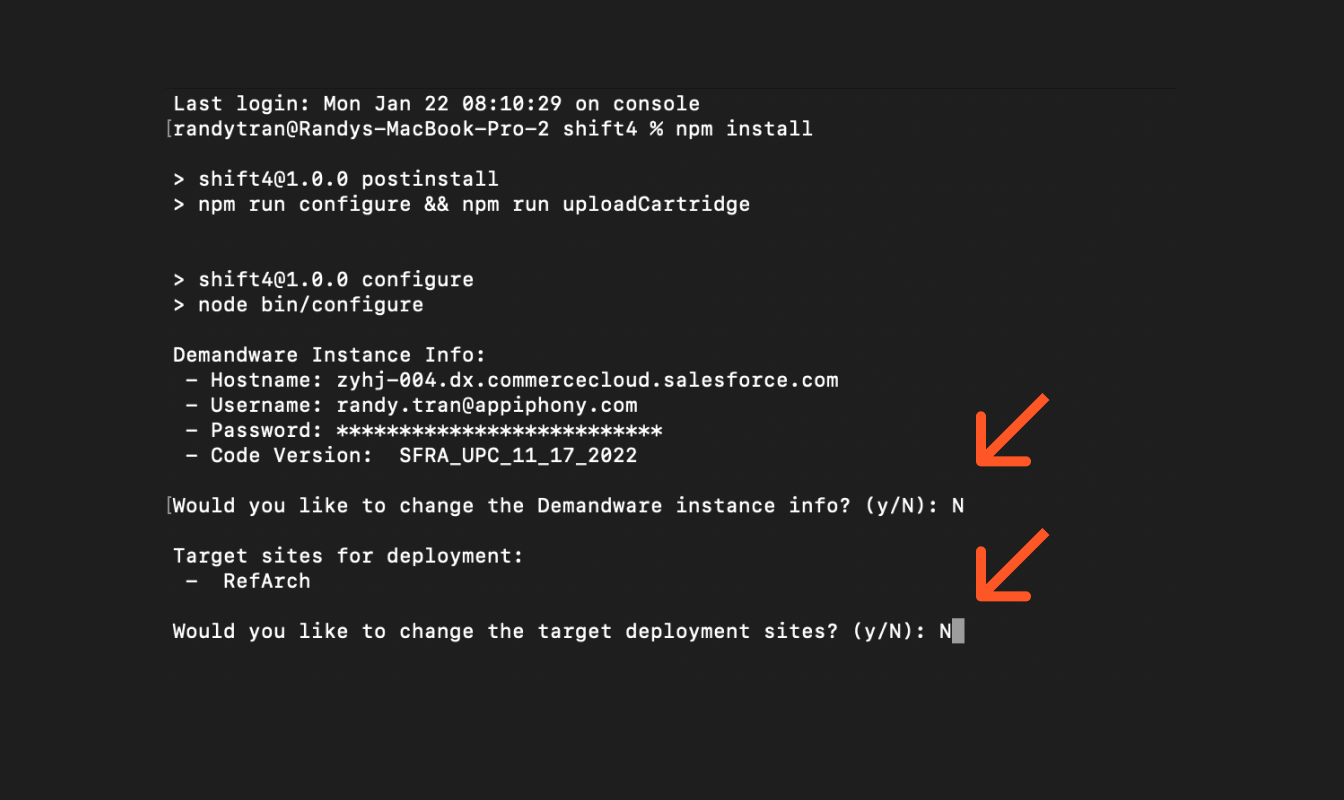
- Follow the prompts after installation to provide credentials for your B2C instance.
- This will create a file called dw.json, which is used by the dwupload tool to
authenticate into your
B2C instance when uploading cartridge code.
- Follow the prompts to provide the names of all storefront sites on which you would like to use Shift4.
- This will create a file called metadata.zip, which includes metadata for each of the sites that you specified, and is necessary for the Shift4 integration to work properly
- Finally, the install command will use the dwupload tool to upload the Shift4 cartridges to
your B2C
instance
NOTE: Ensure that the code-version in your dw.json file matches the active code version in
Administration > Site Development > Code Deployment
Additional Commands
npm run configure
This will prompt you for your B2C login information, and will auto-create the dw.json file. It will
also ask
you for the name of any Sites that you wish to activate this cartridge for. Use this if you
would like to
deploy to a different B2C Instance, a different code version, or a different
storefront site.
npm run uploadCartridge
This will utilize the dwupload tool to re-upload all of the Shift4 cartridges to the B2C instance
specified in
your dw.json file. To confirm that this worked properly, your terminal output
should have a few lines that
look like this: “Successfully uploaded cartridge: int_shift4”.
NOTE:
These commands must be executed in a terminal from the Shift4 cartridge directory.
Your
file explorer should have an option to “open a terminal here” if you right click on the
folder.
Importing Shift4 Metadata To Your B2C Instance
All metadata files are found under the metadata/ folder, as XML files. These files will need to
be uploaded
and imported to your B2C instance in order for the Shift4 cartridges to function
properly.
Storefront Site-Specific Metadata
Each storefront site in your B2C instance may have different payment processors and payment
methods.
The Shift4 cartridge includes metadata for Shift4 Payment Providers
(SHIFT4_CREDIT and SHIFT4_APM),/
as well as Payment Method overrides to set
SHIFT4_CREDIT and SHIFT4_APM as the active payment
processor for the CREDIT_CARD and DW_APPLE_PAY payment methods, respectively. When you run the
npm run configure
command, you may specify the storefront sites you would like to add the
Shift4 payment
providers to. Follow these steps to import this metadata:
- Navigate to Administration > Site Development > Site Import & Export
- Upload the metadata.zip file that was generated after running npm install
- If you don’t see this file, try running npm run configure
- Select the "instance/metadata.zip"file that appears in the table
- ClickImport
- ClickOK next to "Are you sure that you want to import the selected archive?
- Wait for the import to finish (the status is at the bottom and you can click "Refresh" until
it says
"Success")
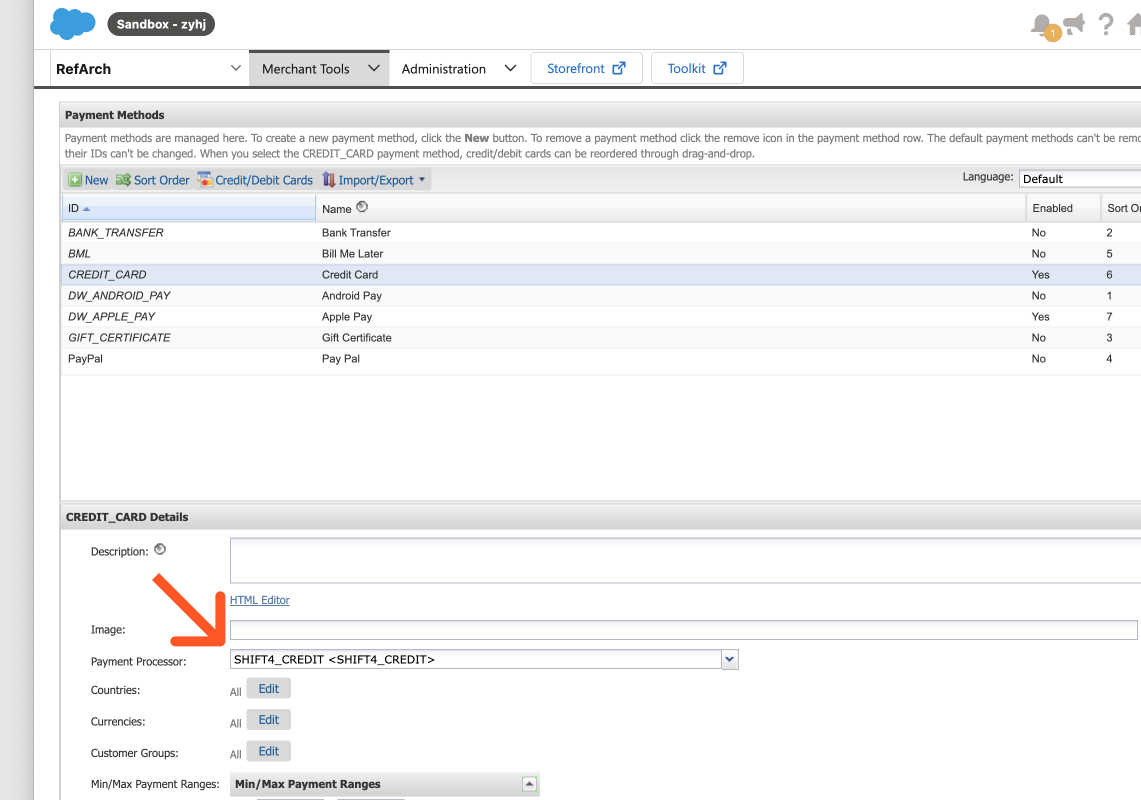
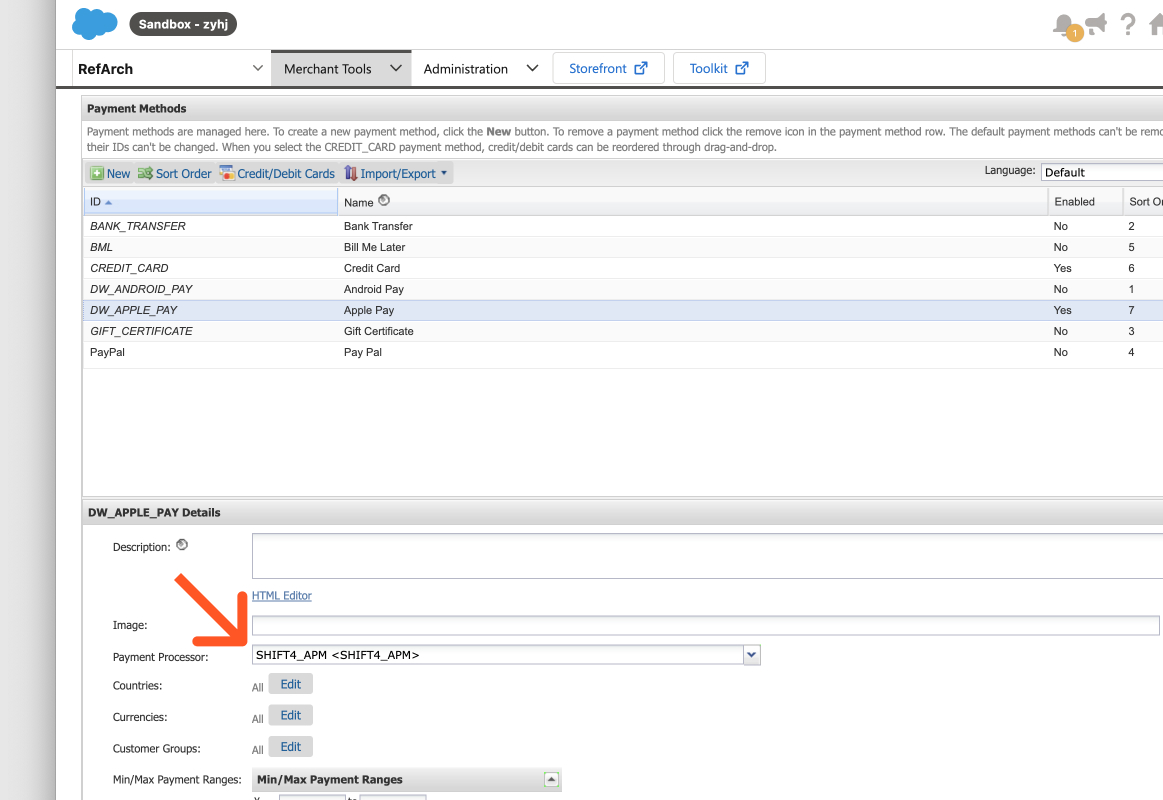
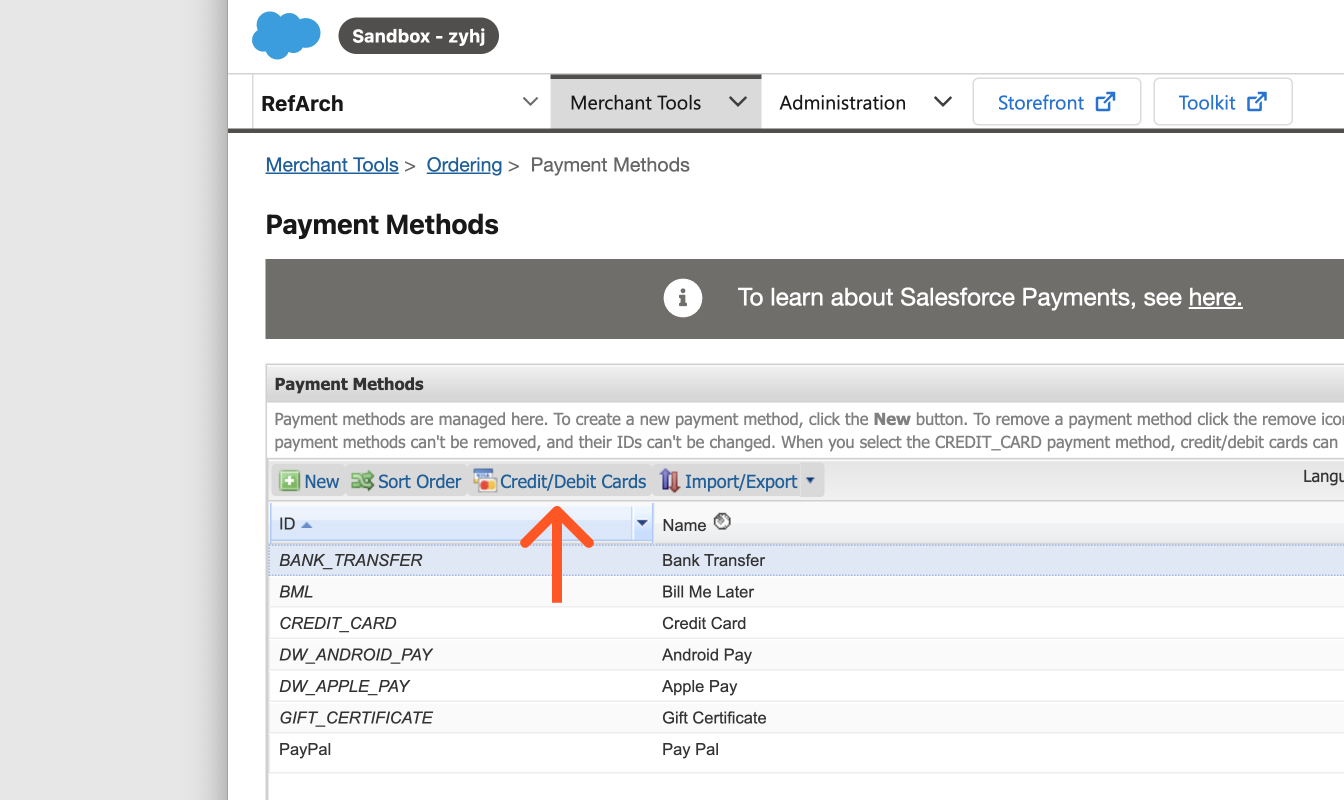
The Payment Method overrides can be found in Merchant Tools > Ordering > Payment Methods:
Shift4 Web Service Connection
The Shift4 integration needs to perform web-service callouts to api.shift4.com when processing
payments. In order to do that, B2C requires a configuration that whitelists api.shift4.com. Follow
these
steps to create that configuration:
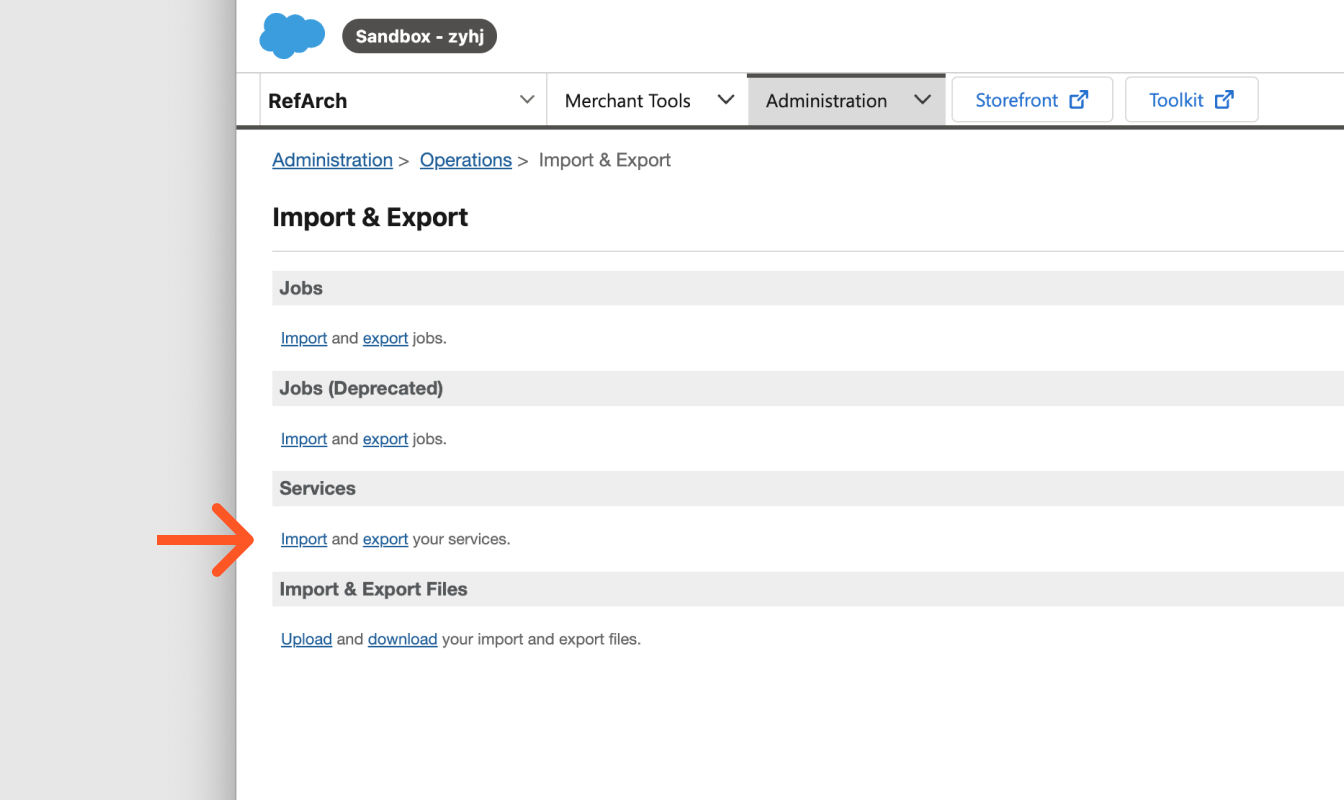
- Navigate to Administration > Operations > Import & Export
- Click Upload under "Import & Export Files"
- Upload the services.xml file, which may be found in the metadata/folder in the Shift4 cartridge/li>
- Go back to the Import & Export page
- Click Import under "Services"
- Select your services.xml file, then click Next
- Wait for schema validation to complete, then click Next

- Select MERGE for the import mode, then click Import
Shift4 Web Service Connection
The Shift4 cartridge utilizes a few custom fields that extend the following system object types:
- Site Preferences
- Customer Profile
- Payment Transaction
Follow these steps to import these custom fields:
- Navigate to Administration > Site Development > Import & Export:
- Click Upload under "Import & Export Files"
- Upload your system-objecttype-extensions.xml and/or custom-objecttype-extensions.xml files
- Go back to the Import & Export page
- Click Import under "Meta Data"
- GSelect one of the uploaded files, then click Next
- Wait for schema validation to complete, then click Import
Now that we’ve successfully imported our metadata, we can move on to enabling our cartridges
to utilize
the Shift4 Setup for B2C.
Enabling Shift4 Cartridges
Uploading the Shift4 cartridges with npm run uploadCartridge does not mean the cartridge is
active yet.
You need to enable specific cartridges for each site within your B2C instance in order
for the cartridges to
function properly.
Enabling The Business Manager Cartridges
The Business Manager cartridges give you access to the Shift4 Setup page. This is a streamlined
setup
assistant that allows you to connect to the Shift4 API and specify other preferences on a
storefront site
basis. Follow these steps to enable the Business Manager cartridges:
- Navigate to Administration > Sites > Manage Sites
- Click on Business Manager under the Business Manager site section
- Go to the Settings tab
- Select your Instance type
- In the “Cartridges” input, prepend the following value: bm_shift4:int_shift4:
- The full value in the input field should look something like this when you’re done: “bm_shift4:int_shift4:bm_custom_plugin:bm_app_storefront_base”
- Scroll to the right of the page and click “Apply”
Granting Permission to the Business Manager Cartridges
Once the Business Manager cartridges are enabled, you’ll need to grant permission to the
Shift4 Business
Manager modules on a per-role basis. The following steps show how to grant
permissions for the
Administrator role, but you can repeat these steps for any other role you
would like to allow Shift4 Setup
access.
- Navigate to Administration > Organization > Roles & Permissions
- Click on the Administrator role
- Click on the Business Manager Modules tab
- Select Sites in the modal and click Apply
- Find your business manager module and check the box(es) next to it
- Click Update at the bottom of the page
Enabling The SFRA Cartridges
- Navigate to Administration > Sites > Manage Sites
- Click on a site that uses the Storefront Reference Architecture (e.g. RefArch)
- Go to the Settings tab
- In the “Cartridges” input, prepend this value: int_shift4_sfra:int_shift4:
- The full value in the input field should look something like this when you’re done:
“int_shift4_sfra:int_shift4:plugin_instorepickup:...:app_storefront_base:modules” - Scroll to the right of the page and click Apply
Enable The SiteGenesis Cartridges
- Navigate to Administration > Sites > Manage Sites
- Click on a site that uses the SiteGenesis Architecture (e.g. SiteGenesis)
- Go to the Settings tab
- In the “Cartridges” input, prepend this value: int_shift4_sg:int_shift4:
- The full value in the input field should look something like this when you’re done:
“int_shift4_sg:int_shift4:sitegenesis_storefront_controllers:sitegenesis_storefront _core” - Scroll to the right of the page and click Apply
How To Setup Apple Pay
Apple Pay is supported in this B2C integration with Shift4. In order to successfully process
payments using
Apple Pay, we have to configure our Apple Pay settings in the Business Manager
as well as register the
storefront domain with Apple Pay. The Shift4 cartridge includes an Apple
Pay domain registration
endpoint, which requires some configuration to set up.
Domain Verification Config
The following steps will ensure that the root endpoint of your B2C domain points at the
storefront of your
choice. This will enable Apple Pay to find the domain verification file at the
/.well-known/apple-
developer-merchantid-domain-association endpoint.
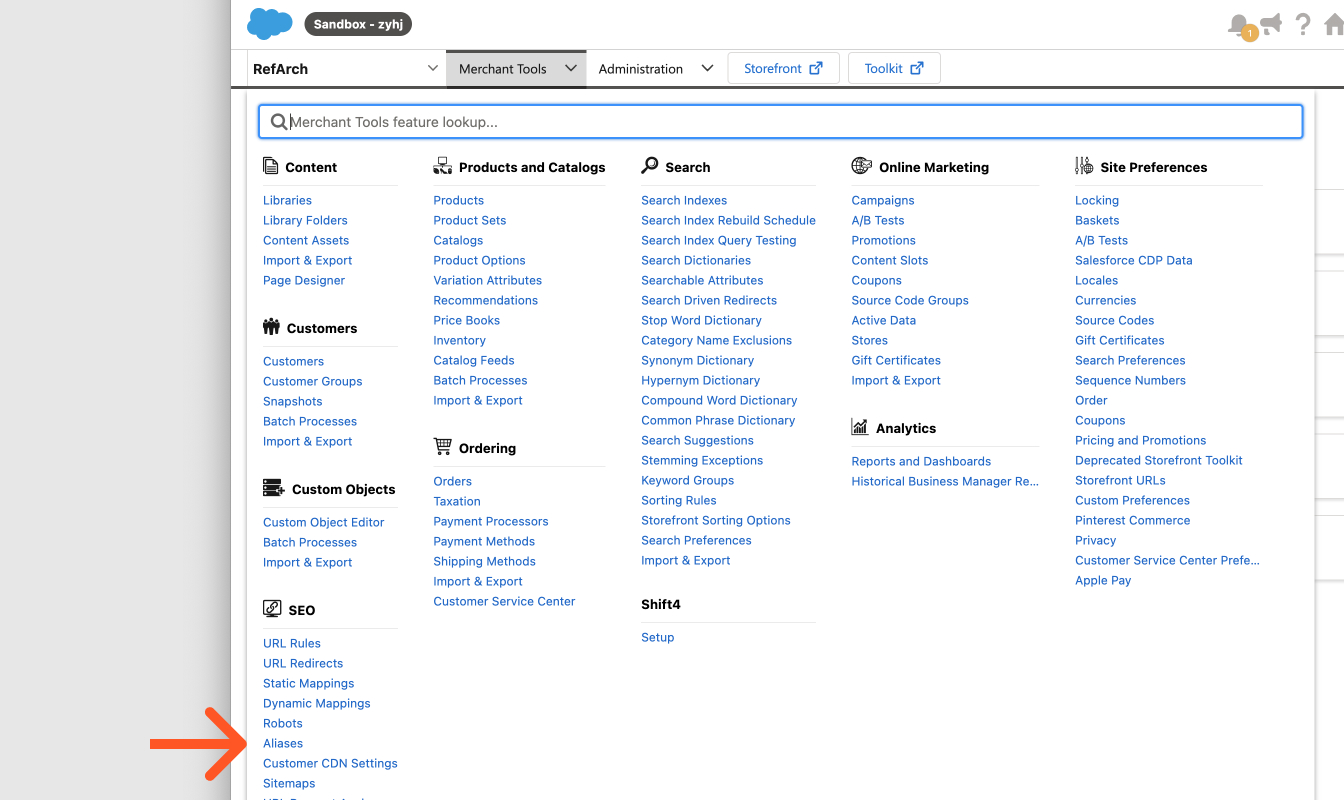
- In your B2C Business Manager, select the Storefront Site on which you would like to enable Apple Pay
- Navigate to Merchant Tools > SEO > Aliases
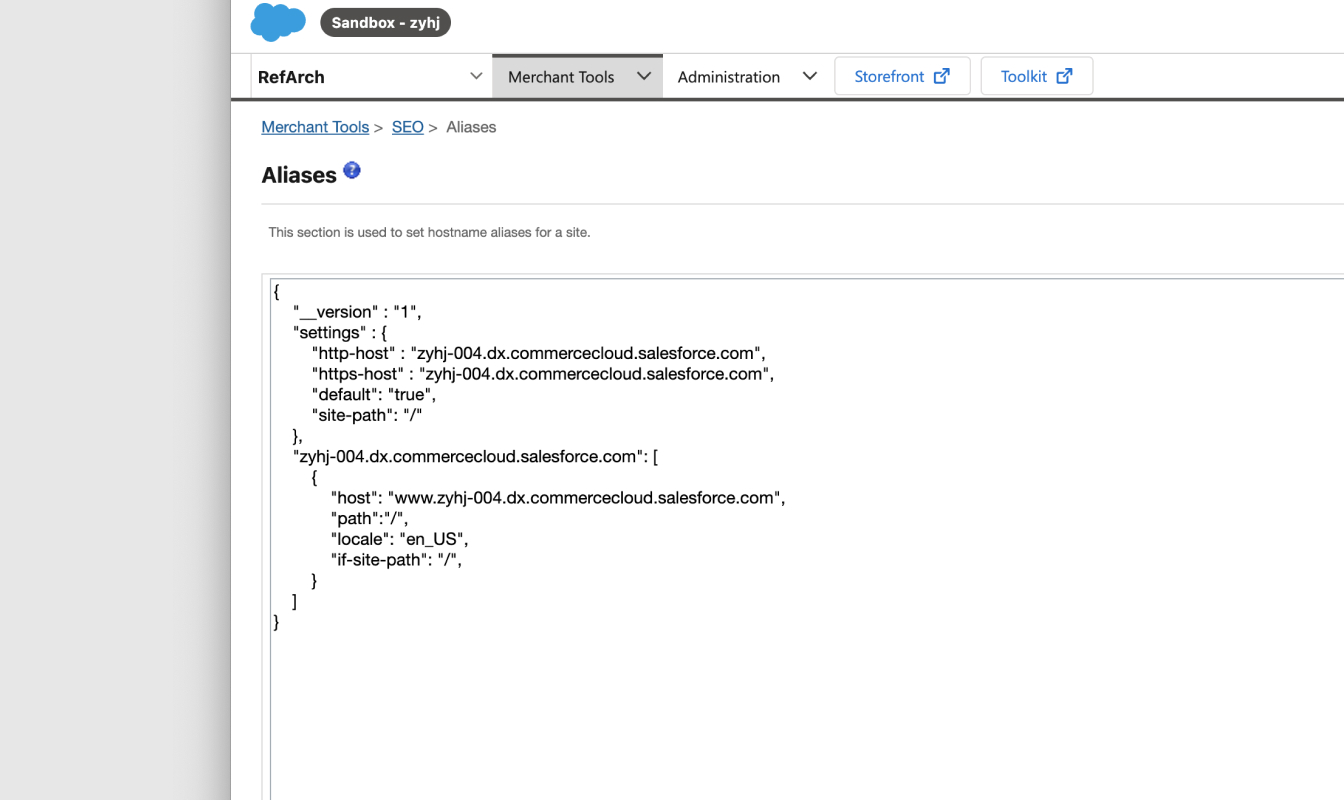
- Ensure the following configuration is applied to the input field. Be sure to replace ALL
REFERENCES of
my.storefront.com with the domain name of your storefront.
  {
    "__version": "1",
    "settings": {
      "http-host": "my.storefront.com",
      "https-host": "my.storefront.com",
      "default": true,
      "site-path": "/"
    },
    "my.storefront.com": [
      {
        "host": "my.storefront.com",
        "path": "/",
        "locale": "en_US",
        "if-site-path": "/"
      }
    ]
  }
- Click Save
- Here is an example:
Register Apple Pay Domain in Shift4
Now that we’ve set up our Hostname Alias for our storefront site, we can register our Apple Pay
domain in
our Shift4 account.
- Log into your Shift4 Account
- Click on your account dropdown in the top-right corner of the page
- Click Settings Account Settings
- Navigate to the Integrations tab
- Click Add Domain under the Apple Pay Domainssection
- Enter the domain name of your storefront
- Click Confirm
- If domain registration fails, check to ensure that you have the int_shift4
cartridge
in the cartridge path for both your Business Manager site, as well as your storefront site. - We should now see our domain populated under the Apple Pay domains
Configure Apple Pay settings in B2C Business Manager
Now that we’ve created a Hostname Alias and added our Apple Pay domain in our Shift4
account, we can
now proceed to configuring our Apple Pay settings in our B2C Business
Manager.
- Navigate back to your B2C Business Manager
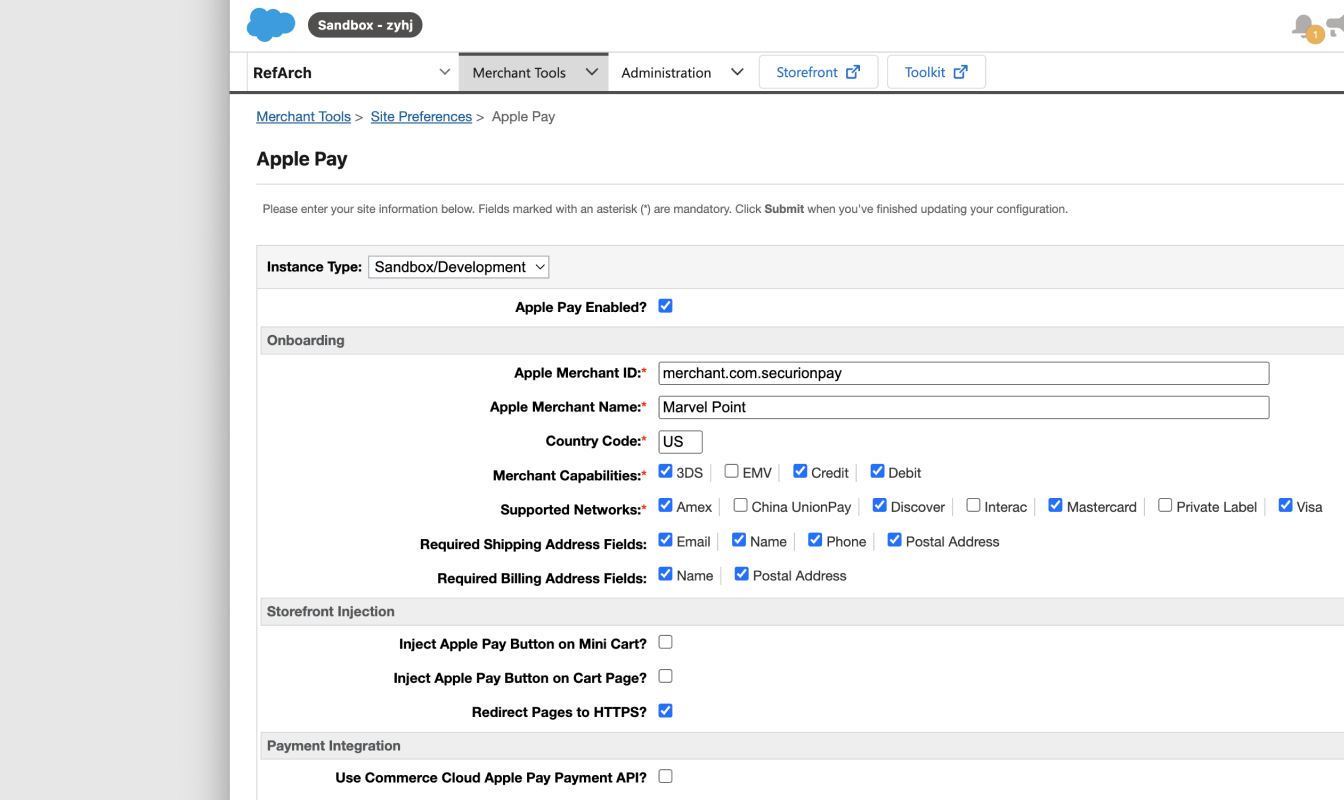
- Navigate to SettingsMerchant Tools > Site Preferences > Apple Pay
- Check the Apple Pay Enabled? checkbox
- Select the Instance Type in the dropdown: Sandbox/Development, Staging, Production
- Enter the following values for the Onboarding Section:
- Merchant ID: merchant.com.securionpay
- Apple Merchant Name: The name of your company
- Country Code: 2 Letter Country code in which your storefront resides
- Merchant Capabilities: 3DS, Credit, Debit
- Supported Networks: Amex, Discover, Mastercard, Visa
- Required Shipping Address Fields: Select all options
- Required Billing Address Fields: Select all options
- Under the Storefront Injection section:
- Inject Apple Pay Button on Mini Cart?: optional
- Inject Apple Pay Button on Cart Page?: optional
- Ensure the Redirect Pages to HTTPS checkbox is enabled
- Leave the “Payment Integration” section blank.
- Click Submit
- Scroll to the bottom of the page
- If you are in a sandbox environment, then click “Register Apple Sandbox”
- If you are in a production environment, click “Register Apple Production”
- Once successfully saving Apple Pay settings for Production, the user must go
back to the Sandbox/
Development Instance Type in order to see the Domain Registration section. - Repeat this process for all B2C Storefront Sites you wish to enable ApplePay for
NOTE: Apple Pay can only be used in Safari
Shift4 Setup Assistant
The Shift4 Setup Assistant will need to be completed to allow your cartridges in your B2C
instance to make
outbound calls to Shift4 and customize the behavior of the application. To
access the Setup Assistant,
navigate to Merchant Tools < Shift4 < Setup:
Outbound Connector
In order for the cartridge to make outbound API calls to Shift4, the user will need to provide
their Shift4
Secret Keys. In the business manager, a section will be provided that allows the user
to input their Test and
Live Mode Secret Keys.
- For outbound connection, complete the following fields in the Production environment
section and/or
Testing Environment section - you can get this information from your Shift4 account: - Public Key
- Secret Key
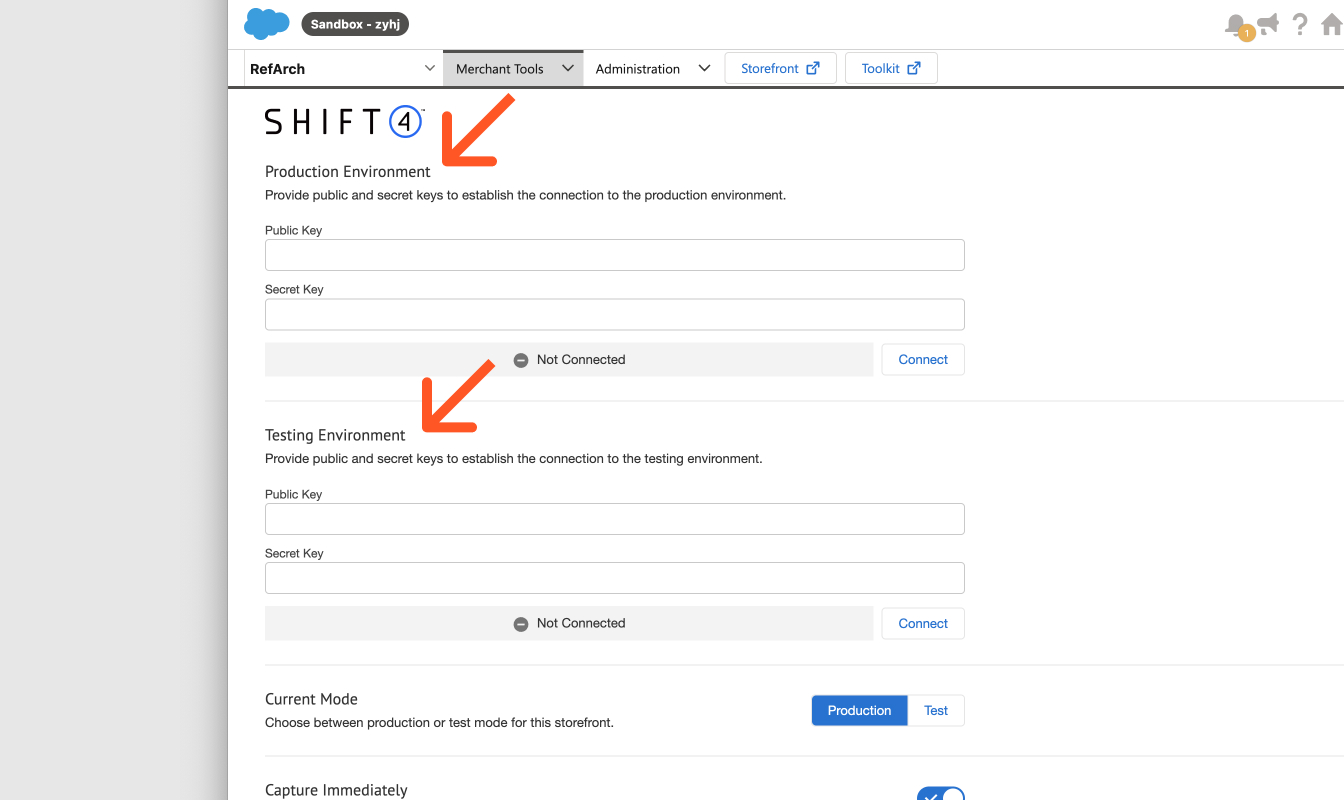
- Click Connect
Cartridge Settings
There will be two settings that the users can access in the Shift4 Setup to customize the
behavior of the
application. These include the Current Mode and Capture Immediately fields.
Users can choose between
the production or test mode for the storefront and can set the option to capture
funds immediately when
a charge is created with a toggle.
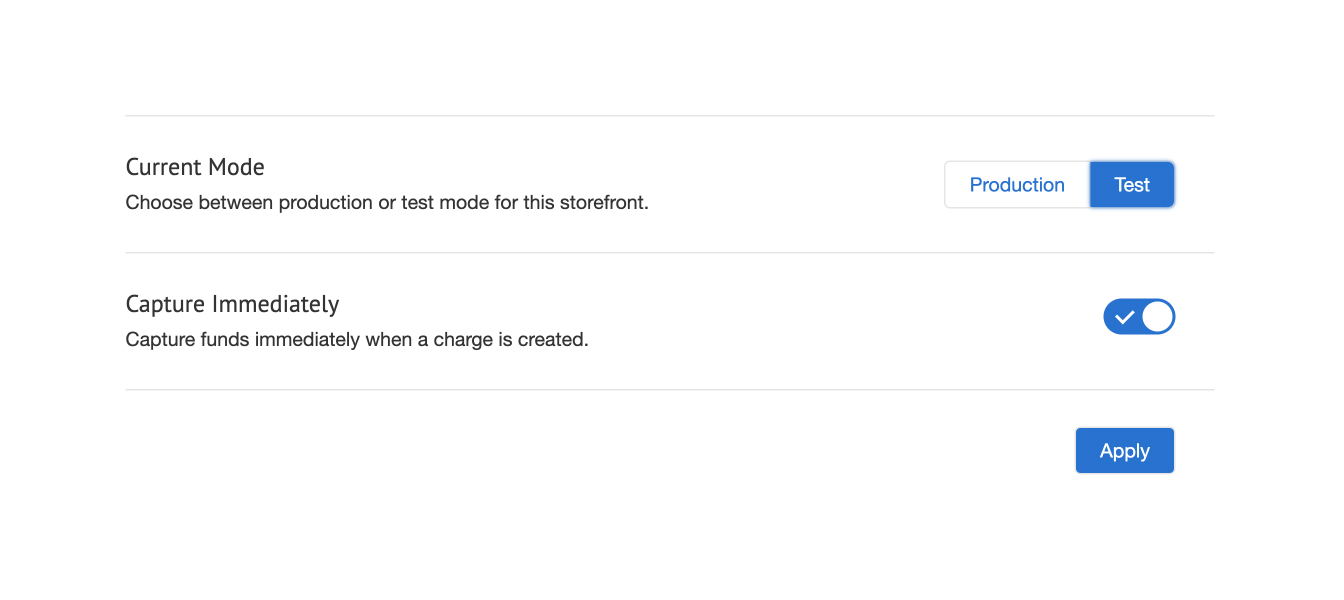
- Current Mode
- Choose between Production and Testmode by clicking on the toggle
- Click Apply
- Capture Immediately
- Toggle Off/On
- Click Apply
Manage Credit/Debit Cards
There are a few card types in Shift4 documentation https://dev.shift4.com/docs/testing that are
not
automatically included and enabled in the Business Manager. These include Maestro, JCB,
and Diners
Club International(not enabled). In order to add these cards as supported payment
methods, navigate to
Merchant Tools > Ordering > Payment Methods.
- Click on Credit/Debit Cards
- Click New on the top left hand corner
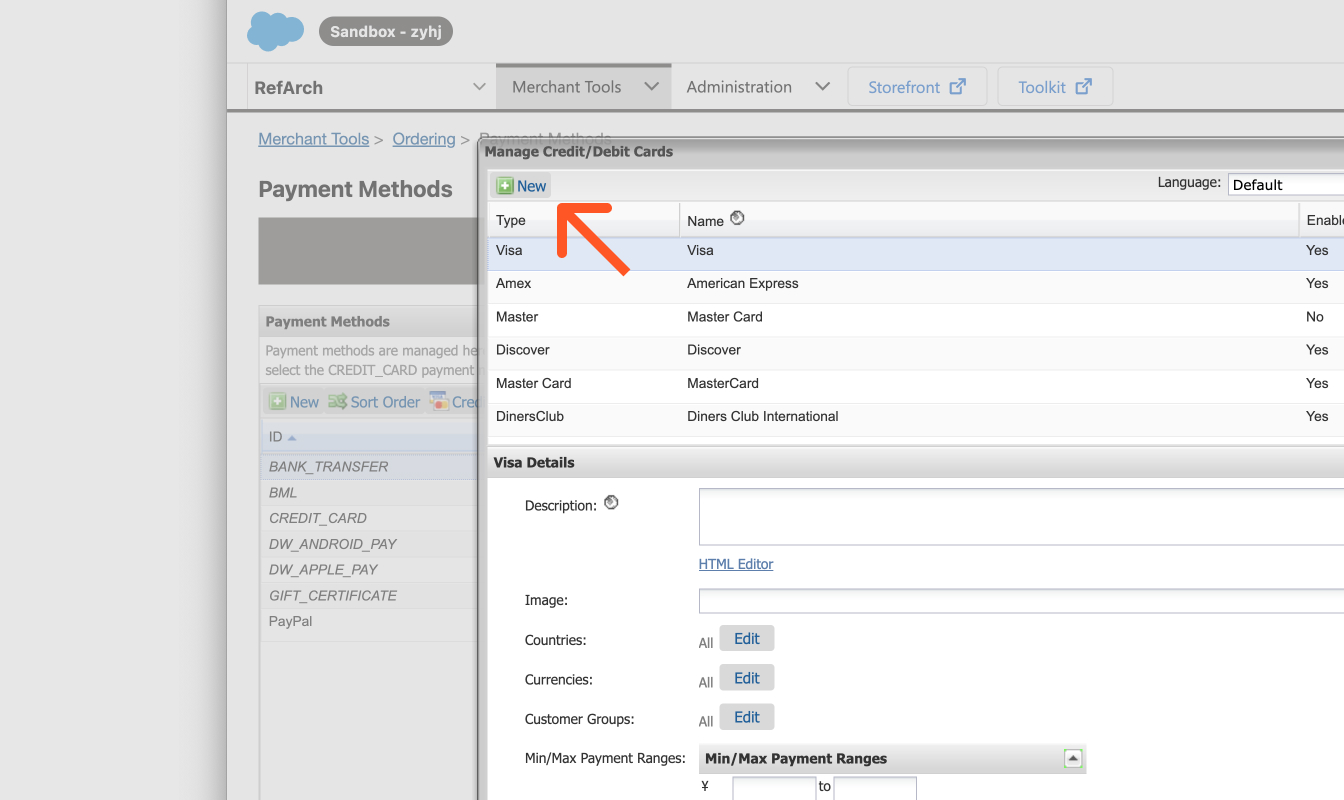
- Enter a Type
- Enter a Name
- In the Enabled dropdown, select Yes
- If applicable include a Description
- If applicable include an Image
- If applicable click Edit to modify Countries
- If applicable click Edit to modify Currencies
- If applicable click Edit to modify Customer Groups
- If applicable click enter any Min/Max Payment Ranges
- Select Security Code Length in the dropdown
- Enter Card Number Verification
- Enter Card Number Length
- Select Checksum Verification
- Click Apply